Account Setup and Onboarding Guide
How you get set up in Atarim depends on which side of the relationship you're on — and for agencies, a 6-step wizard reads your site before it ever asks you to register.
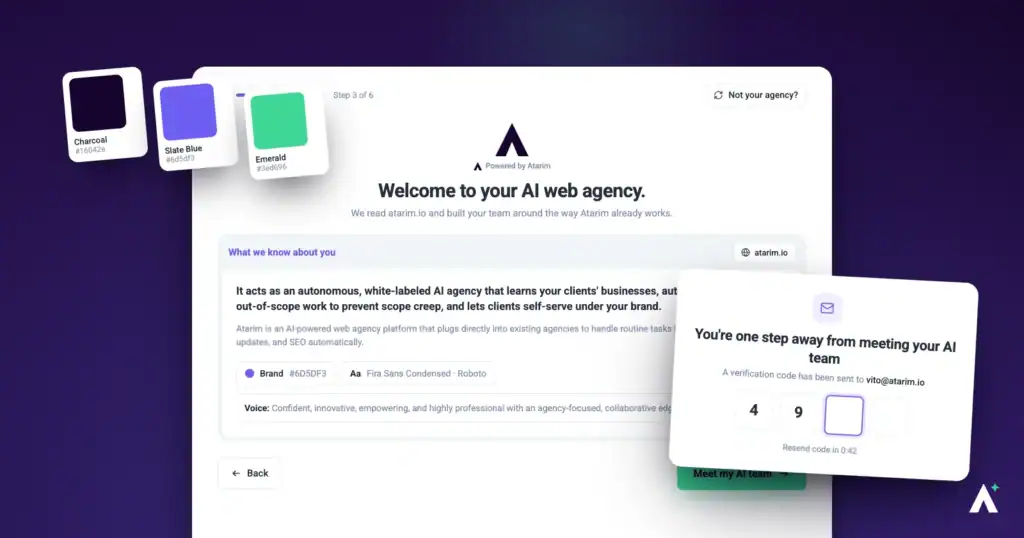
Onboarding splits into two distinct paths in V5 — a 6-step guided wizard for agencies setting up a workspace, and a lightweight, pre-filled registration for invited Website Owner clients. The agency wizard has an unusual order: it reads your site and shows you what it learned before it ever asks you to create an account.
Step-by-Step Guide:
Creating Your Atarim Account
Before you can start managing projects or collaborating, you need to set up your Atarim account at app.atarim.io/register.
Instructions:
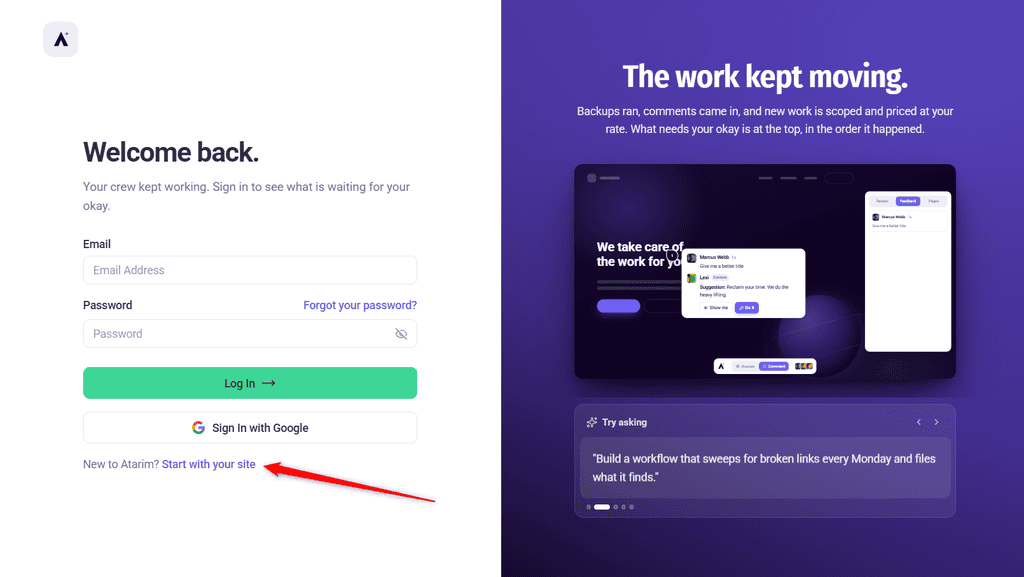
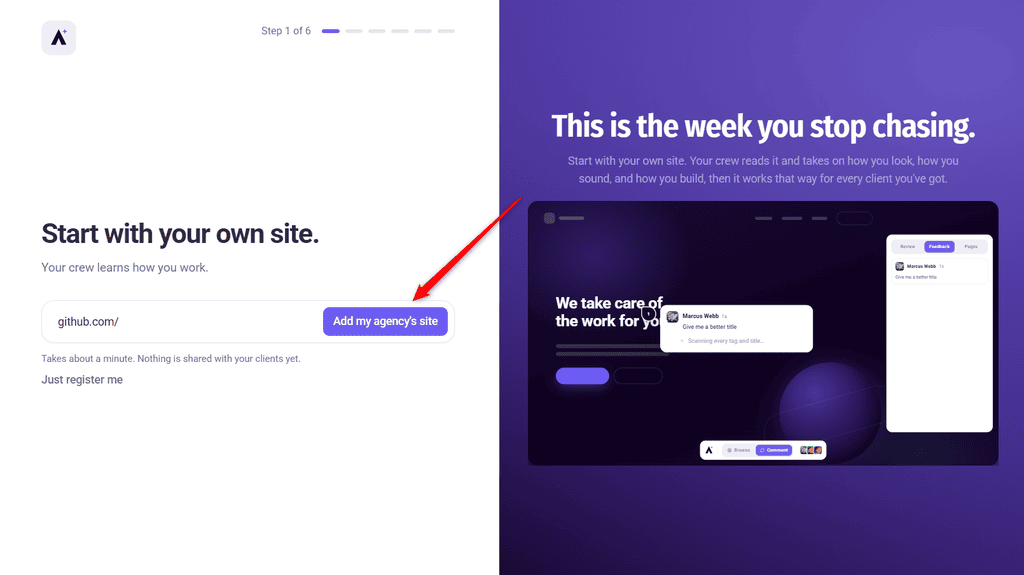
- Open the sign-up page. You land straight on the first step of the onboarding wizard, headed Start with your own site.
- There is no separate sign-up button and no form to fill in yet — the wizard reads your site first and asks you to register afterwards.
- If you would rather skip the site read and create an account straight away, choose Just register me underneath the field.
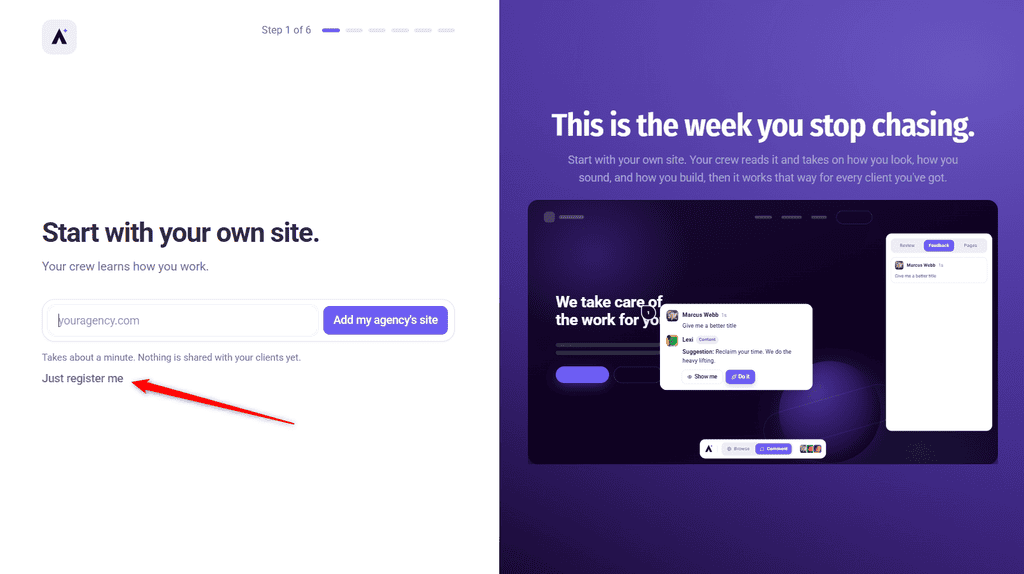
Wizard Step 1 of 6 — Add Your Agency’s Site
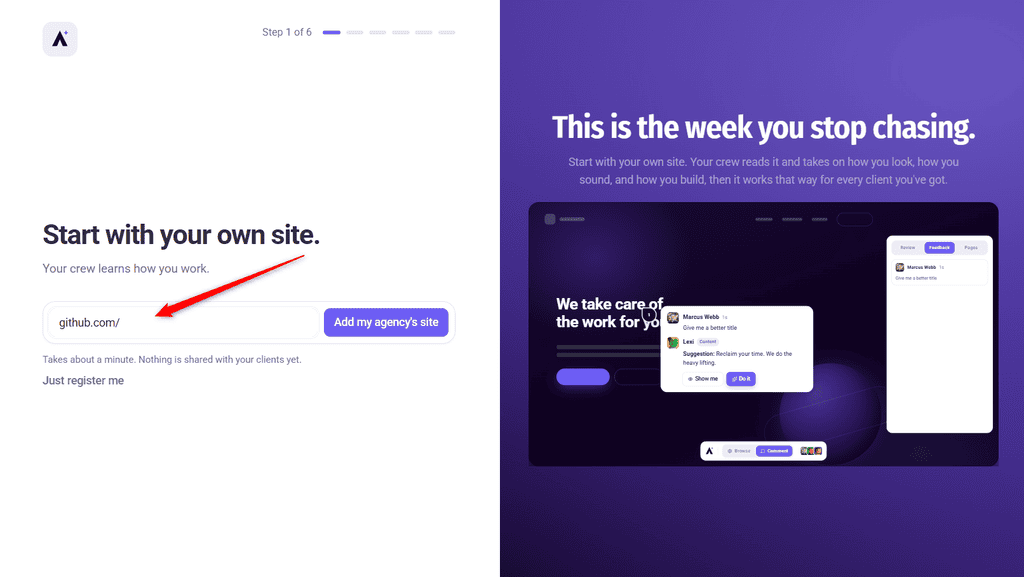
The wizard opens with a single field: your agency’s own website URL (not a client’s). Atarim reads your site and uses it to build your AI team around how you already work.
Instructions:
- Enter your agency’s live website URL in the field on screen.
- Double-check it’s your own domain, not a client’s — the whole agency profile is built from this URL.
- Submit the field to start the read.
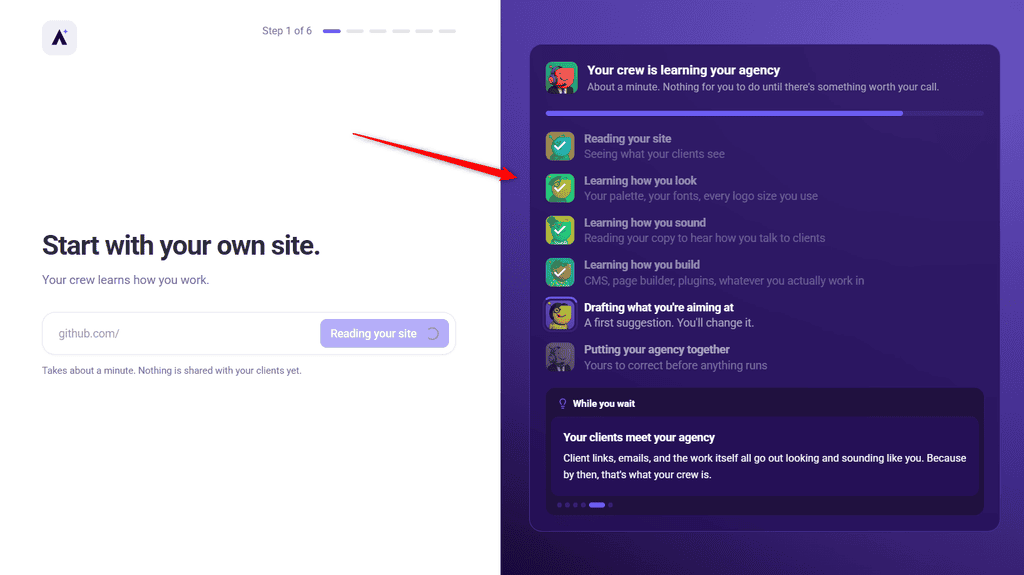
While the Scan Runs: Your Agency Takes Shape
While the scan runs, the right-hand panel shows what it is reading, then reveals the agency it has drafted. The interface re-themes from Atarim’s violet into your own brand colour as it goes.
Instructions:
- Wait while the scan works through its six cards: Reading your site, Learning how you look, Learning how you sound, Learning how you build, Drafting what you’re aiming at, and Putting your agency together.
- Watch the interface take on your brand colour as the read finishes.
- Review what it drafted: your agency name and headline, a preview of your site rendered in your own brand, and a “What we picked up about you” panel.
- Carry on to create your account. The form is already waiting on the left — there is no Next button on this panel.
Wizard Step 2 of 6 — Create Your Account and Verify Your Email
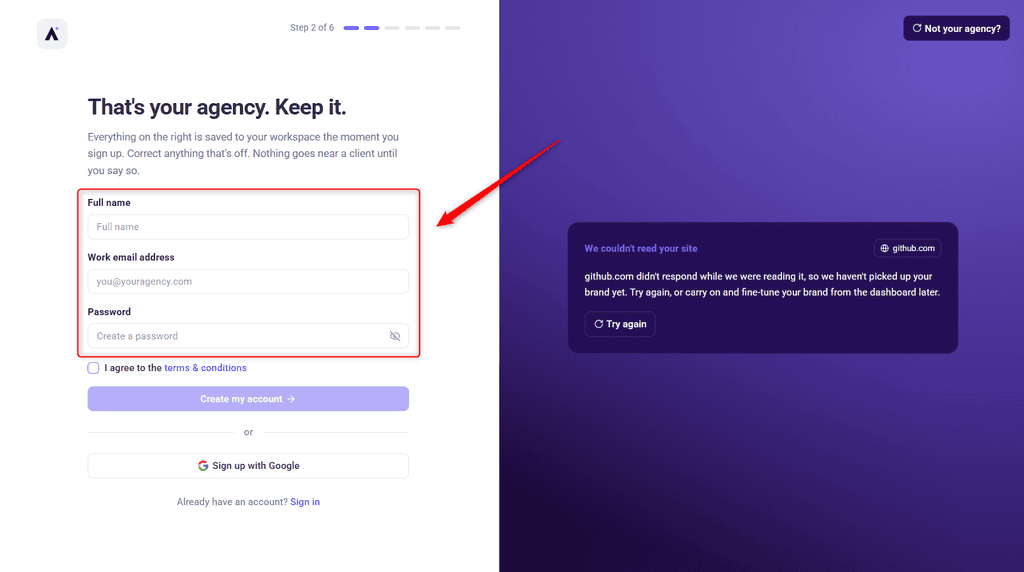
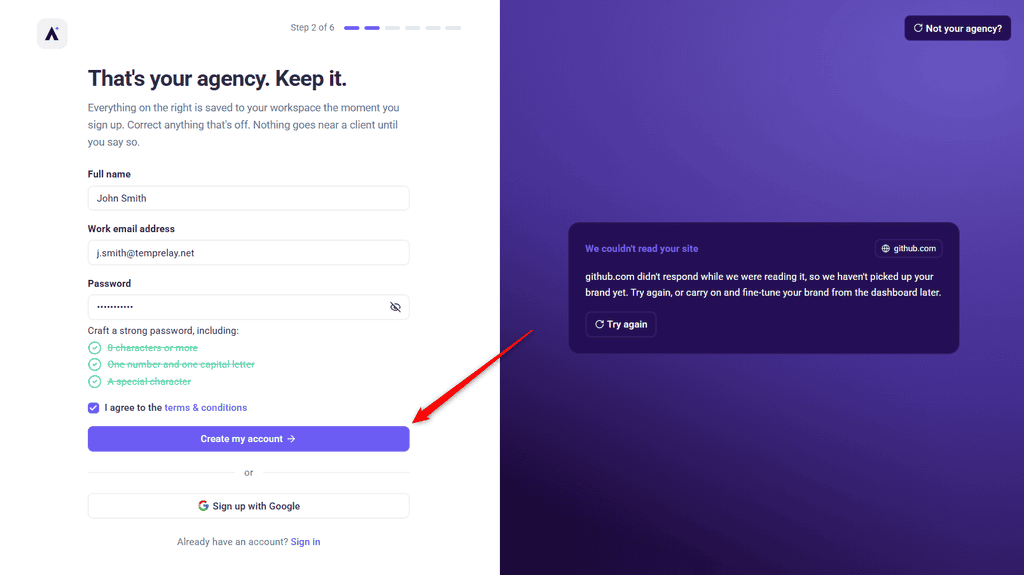
Only now does the wizard ask you to register. Everything up to this point happened without an account.
Instructions:
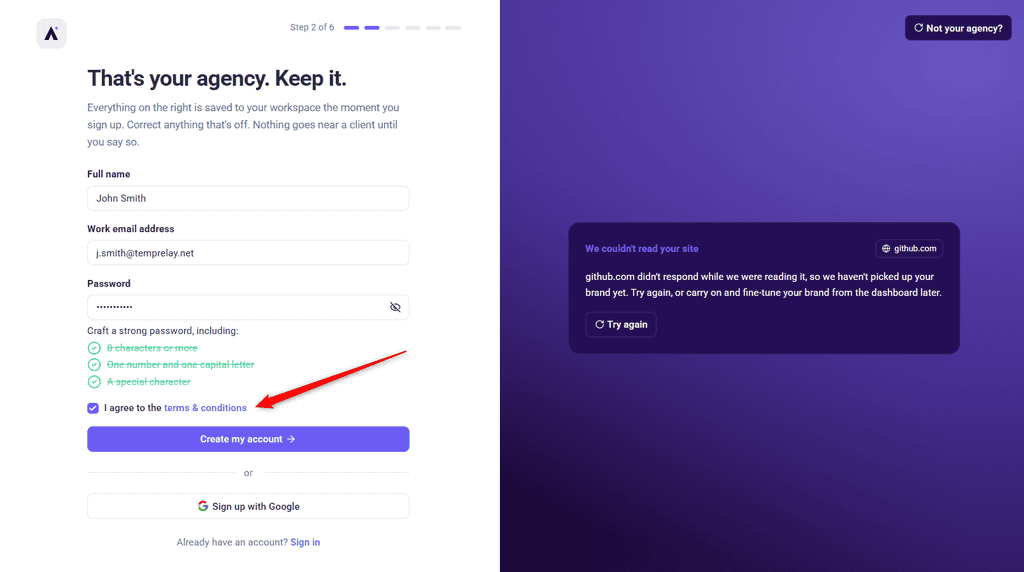
- Enter your full name.
- Enter your work email address.
- Choose a password.
- Tick the terms & conditions checkbox.
- Select “Create my account”. To use your Google account instead, see Signing Up with Google below.
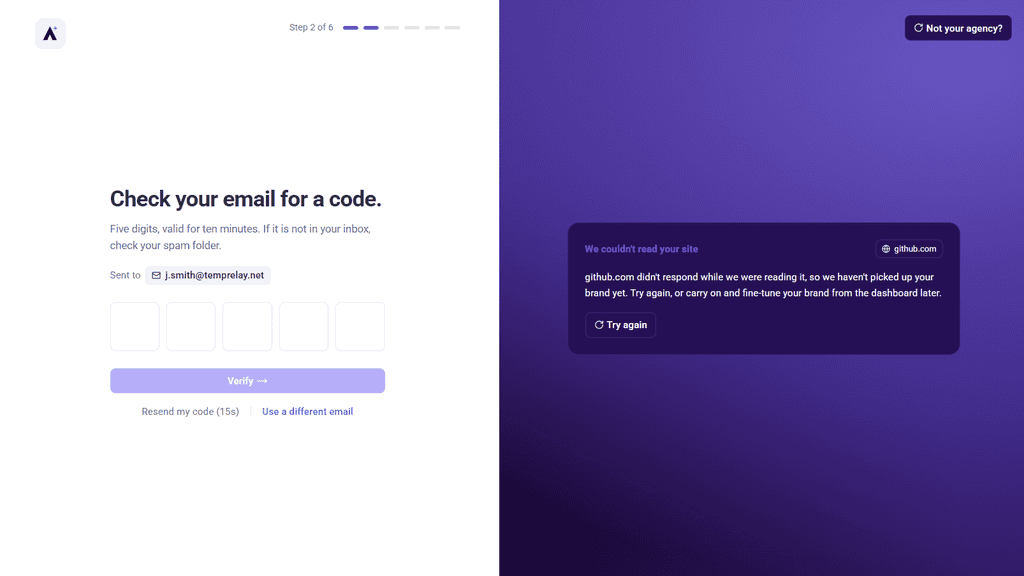
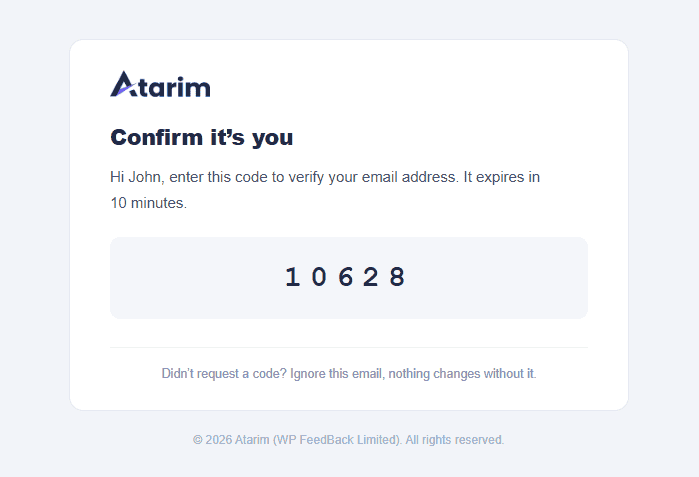
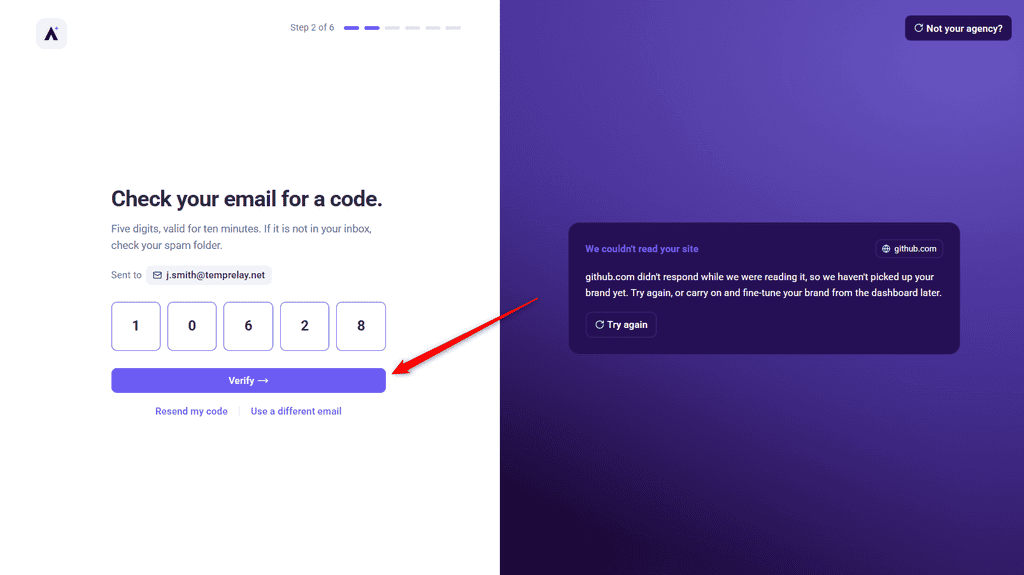
- Open the email Atarim sends and enter the 5-digit verification code.
Two things worth knowing about the code screen:
- The code stays valid for ten minutes — the screen says so itself. After that, use “Resend my code”.
- If you mistyped your address, “Use a different email” lets you correct it without restarting the wizard.
Signing Up with Google
You can create your account with Google instead of filling in the form. Atarim still checks your email address with a code.
Instructions:
- On the sign-up form, select Sign up with Google. You don’t need to fill in the form or choose a password.
- Choose the Google account to use.
- On Check your email for a code., enter the five-digit code Atarim sends to that Google address, then select Verify.
If you see “Google sign-up did not finish. Try again, or sign up with your email.”, select Sign up with Google again, or fill in the form instead. If you see “We could not send your code. Resend it, or use a different email.”, select Resend my code, or select Use a different email to change the address and get the code there.
Wizard Step 3 of 6 — Add Your First Client
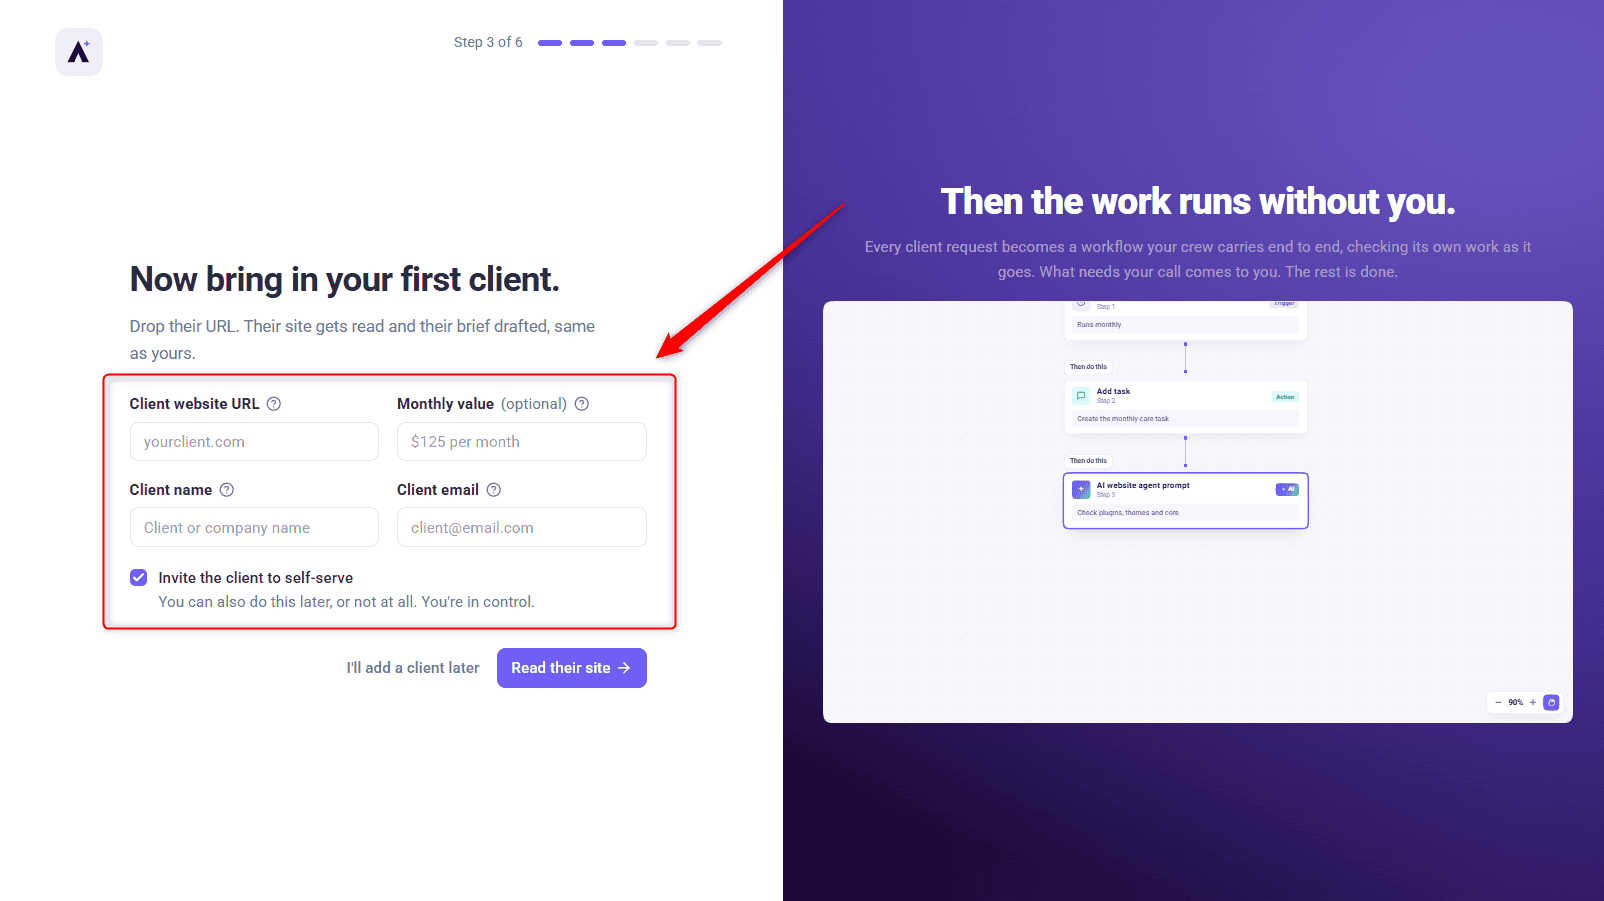
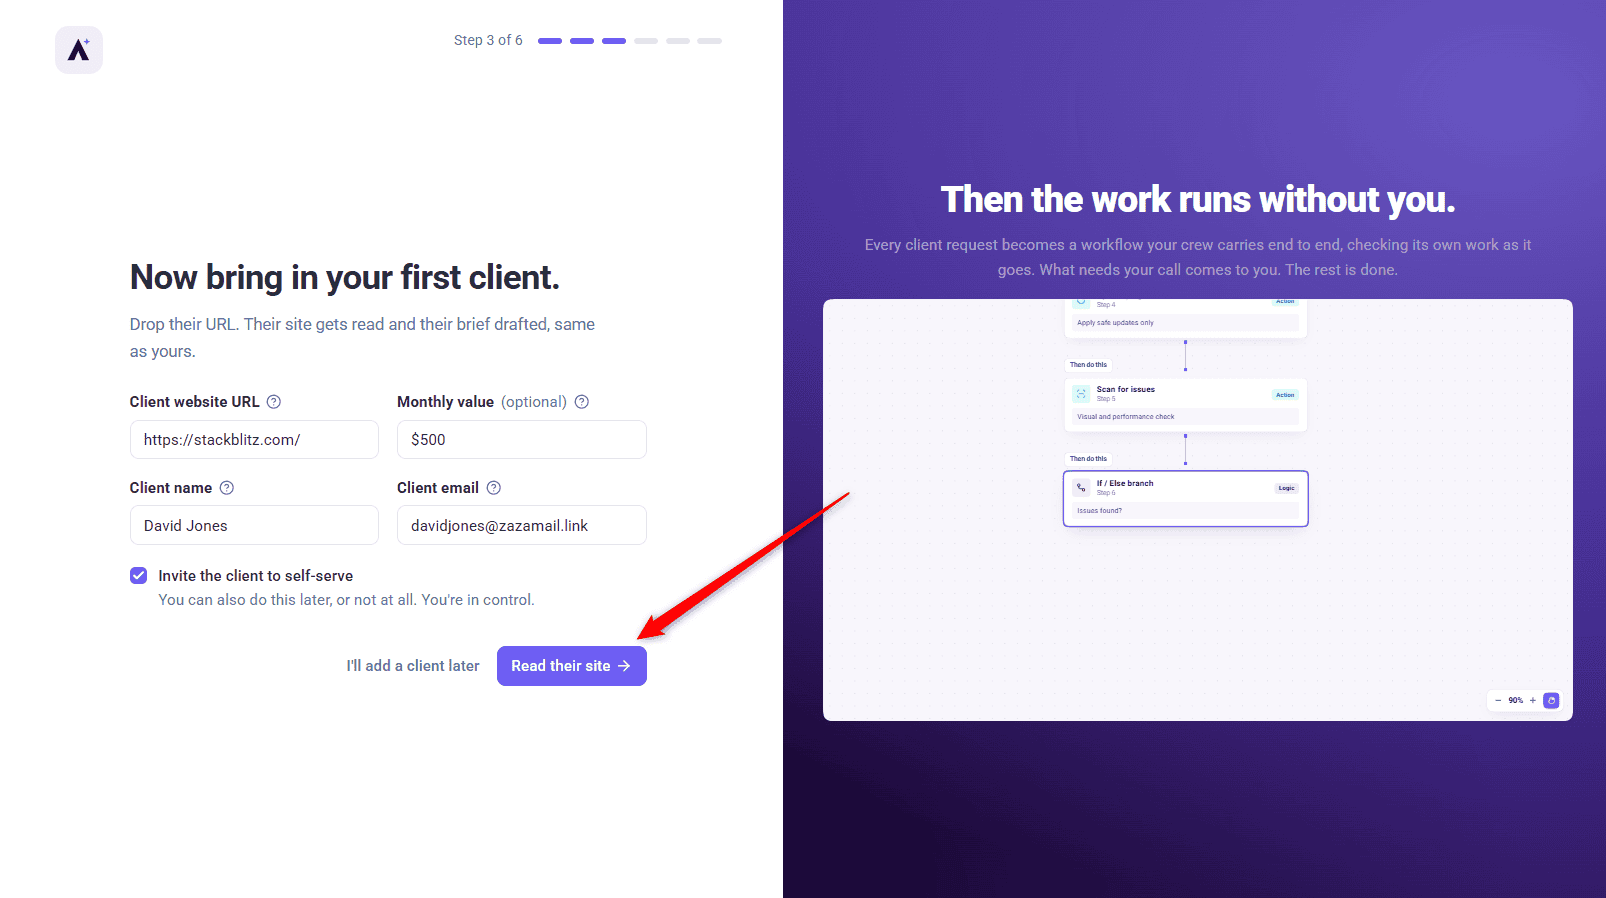
The panel is headed Now bring in your first client., under the line Drop their URL. Their site gets read and their brief drafted, same as yours. Beside it the wizard shows what comes next — Then the work runs without you. — with an illustration of a client request moving through your crew end to end.
Instructions:
- Enter the Client website URL. This is the only field the wizard insists on.
- Monthly value (optional) — the average monthly revenue you earn from this client. Pick the currency, then type the amount as a plain number, such as 125.
- Client name — the person or brand. You can leave it blank.
- Client email — required only while “Invite the client to self-serve” is ticked. Untick it and the field greys out and is skipped.
- Leave “Invite the client to self-serve” ticked — it is pre-checked — or untick it if you would rather not invite them yet.
- Click “Read their site” to continue.
Wizard Step 4 of 6 — Tell Us About You
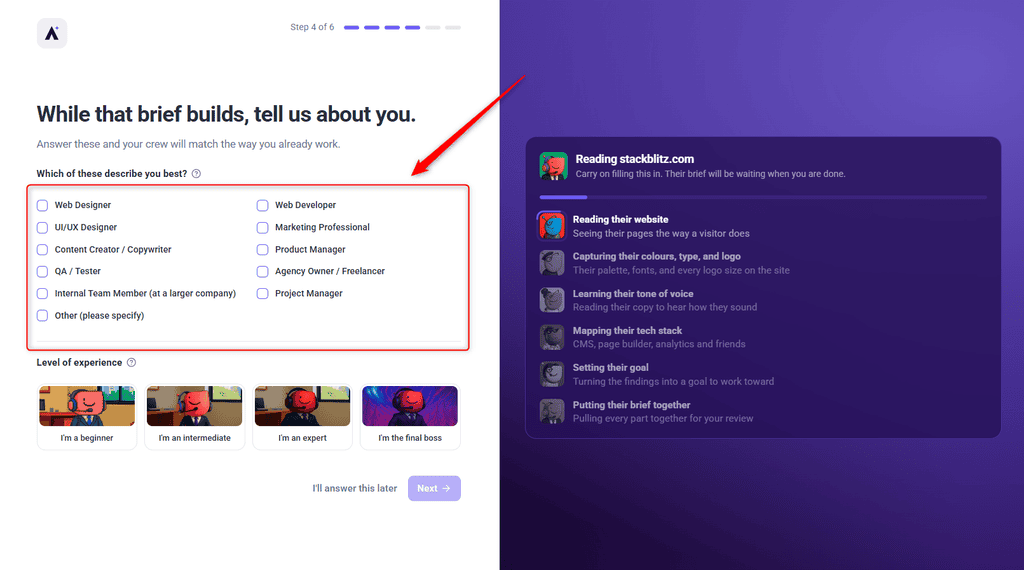
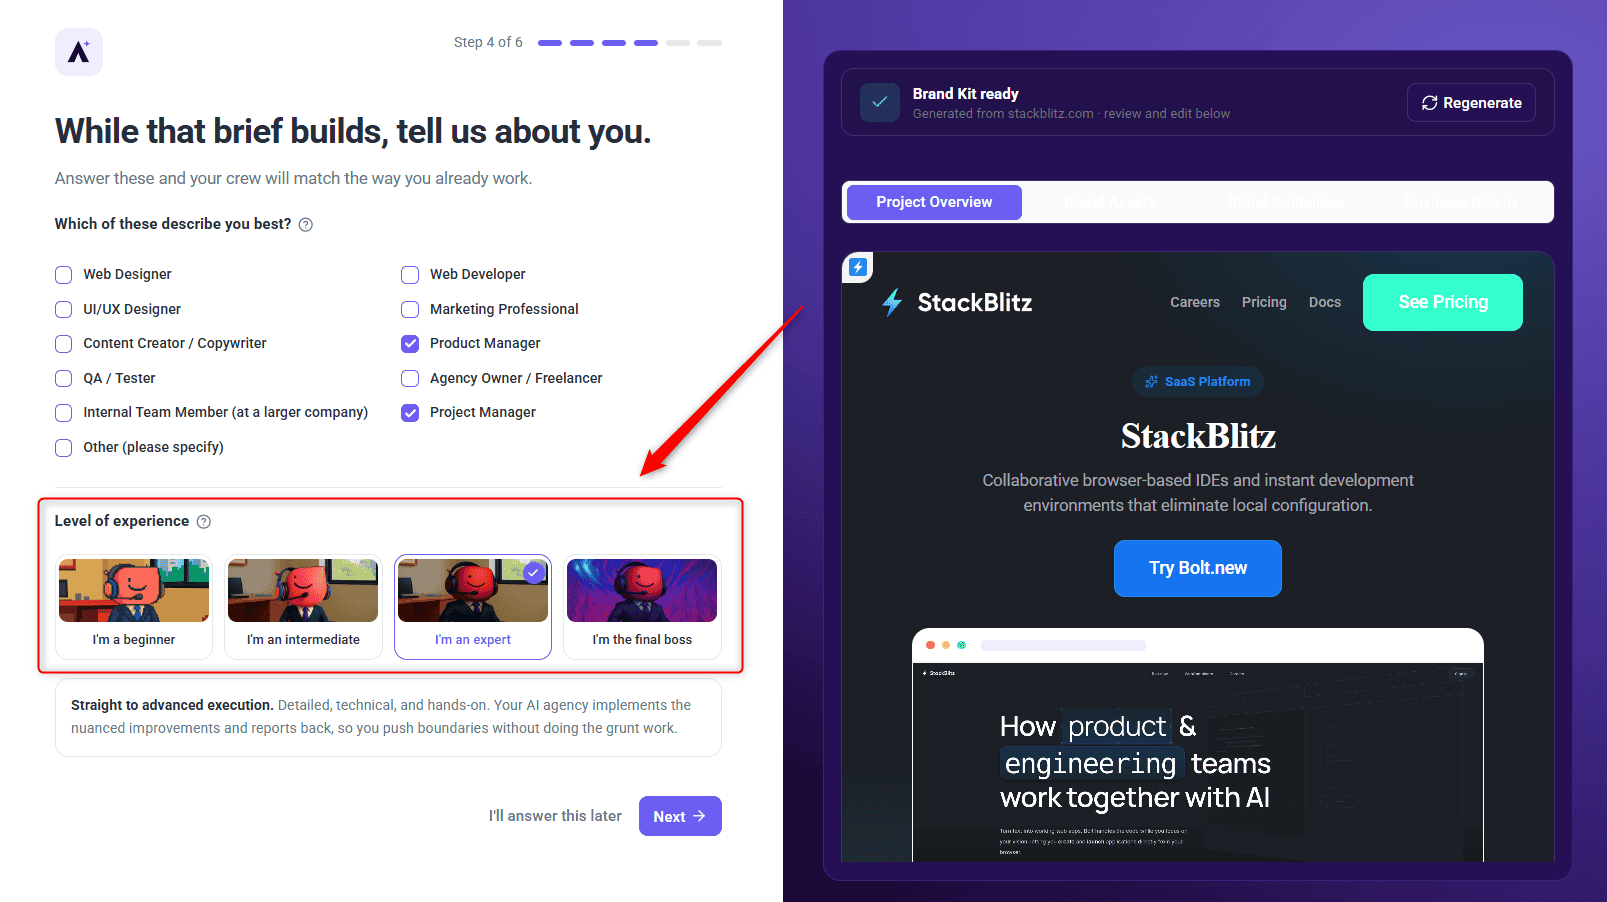
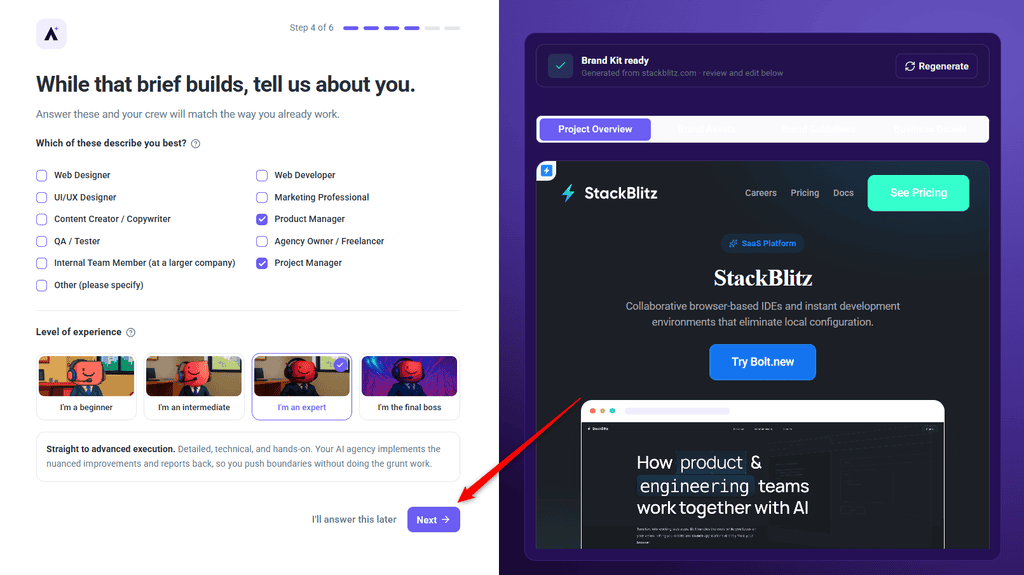
A short profile step: pick every role that describes you, then pick a single experience level.
Instructions:
- Select every role that applies to you — this one is multi-select.
- Pick the one experience level that matches how you want the AI to talk to you.
- Both answers are required before Next becomes available. If you would rather not answer now, I’ll answer this later skips the step.
| Roles available to select — pick every one that applies | ||
|---|---|---|
| Web Designer | Web Developer | UI/UX Designer |
| Marketing Professional | Content Creator / Copywriter | Product Manager |
| QA / Tester | Agency Owner / Freelancer | Internal Team Member (at a larger company) |
| Project Manager | Other (please specify) — reveals a free-text field | |
| Experience level | How your crew works with you |
|---|---|
| I’m a beginner | Clear, friendly, and bite-sized. Your crew explains as it goes, so you learn while the work happens. Every change comes with the why behind it. |
| I’m an intermediate | Peer to peer, and the work gets done. Your agency ships changes with clear recommendations and the context behind them, so you stay the one deciding. |
| I’m an expert | Straight to advanced execution. Detailed, technical, and hands-on. Your AI agency implements the nuanced improvements and reports back, so you push boundaries without doing the grunt work. |
| I’m the final boss | Straight to the point, high-signal, execute-first. Strategic calls only, made and shipped fast. Your AI agency runs at full strength, built for pros who want it done. |
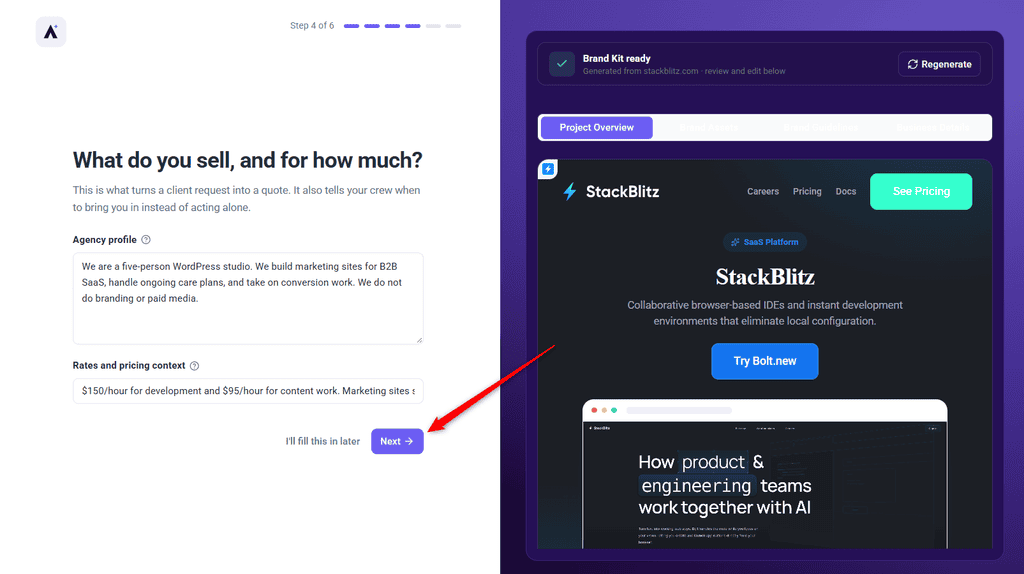
A second part of this step asks about your agency itself — an agency profile, and your rates and pricing context — so the AI has something to quote from when it prices work.
The Client Brief Builds in the Background
The moment you add a client, Atarim starts reading their site the same way it read yours. This is not a step you wait on: it runs in the right-hand panel while you answer the questions in the steps that follow, and the finished brief is waiting when you get there.
Instructions:
- Carry on filling in the steps on the left. The panel on the right shows Reading {their site} while it works.
- Watch it work through six cards: Reading their website, Capturing their colours, type, and logo, Learning their tone of voice, Mapping their tech stack, Setting their goal, and Putting their brief together.
- When it finishes, the panel becomes the brief itself, laid out across Project Overview, Brand Assets, Brand Guidelines and Business Details tabs. On a narrow screen the tabs shorten to Overview, Assets, Guidelines and Details.
- Correct anything that is wrong there and then — the fields are editable in place.
The brief covers:
- Their palette, fonts and logo
- Their tone of voice and the tech their site is built on
- A goal for the work, drawn from what the read found
If the read fails or times out, the panel says so plainly and offers Try again rather than inventing a brief. You can also carry on without one — the later steps still work, they just have less to go on.
Wizard Step 5 of 6 — Connect the Client’s Site
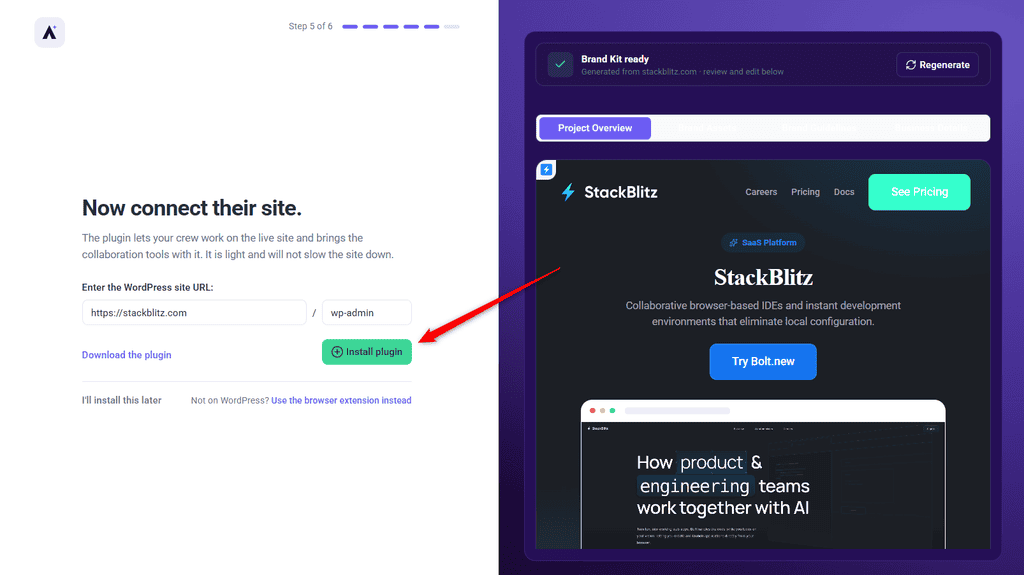
The screen is headed Now connect their site. and makes the case for the plugin inline: it lets your crew work on the live site and brings the collaboration tools with it, without slowing the site down. This step is always shown, whatever the client’s site is built on.
Instructions:
- Under Enter the WordPress site URL: check the address the wizard has filled in. The smaller box after the slash is the admin path — leave it as wp-admin unless the client has renamed that directory, in which case type the real one so the install and connect links land in the right place.
- Choose Install plugin if you have access to the client’s wp-admin. If the plugin is already there, the button reads Connect site instead.
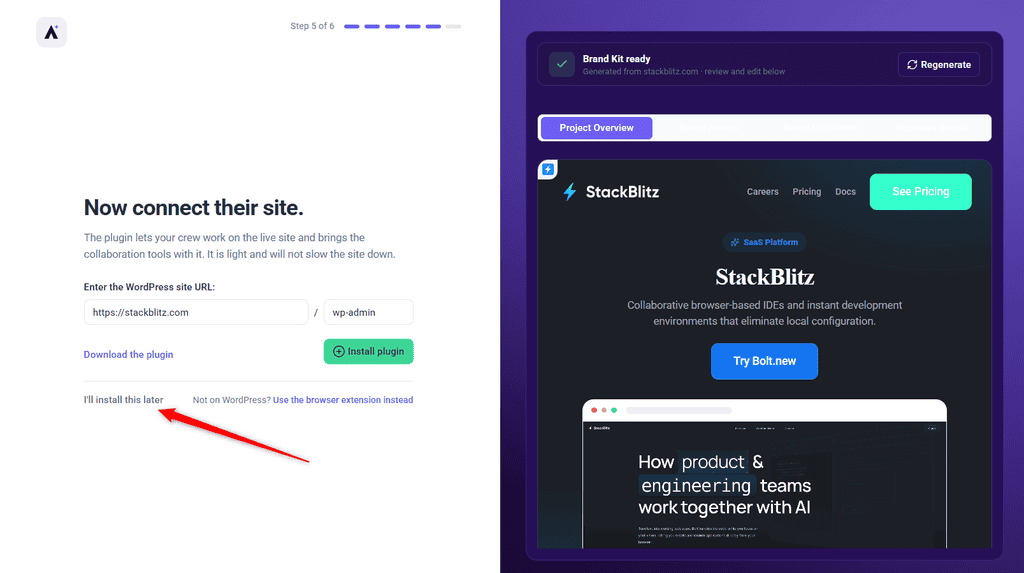
- Use Download the plugin if you would rather install it by hand, or I’ll install this later to move on — you may not control their WordPress at this point.
- On a site that isn’t WordPress, take Use the browser extension instead.
Installing the plugin unlocks:
- The on-site action where your AI team edits the live site directly
- Pixel-perfect visual collaboration on real pages, not just previews
- Automations tailored for WordPress — content, SEO, performance, and uptime
Whichever route you take, the wizard moves on to the last step — there is no deploy loader in between.
Wizard Step 6 of 6 — Approve the Scheduled Work
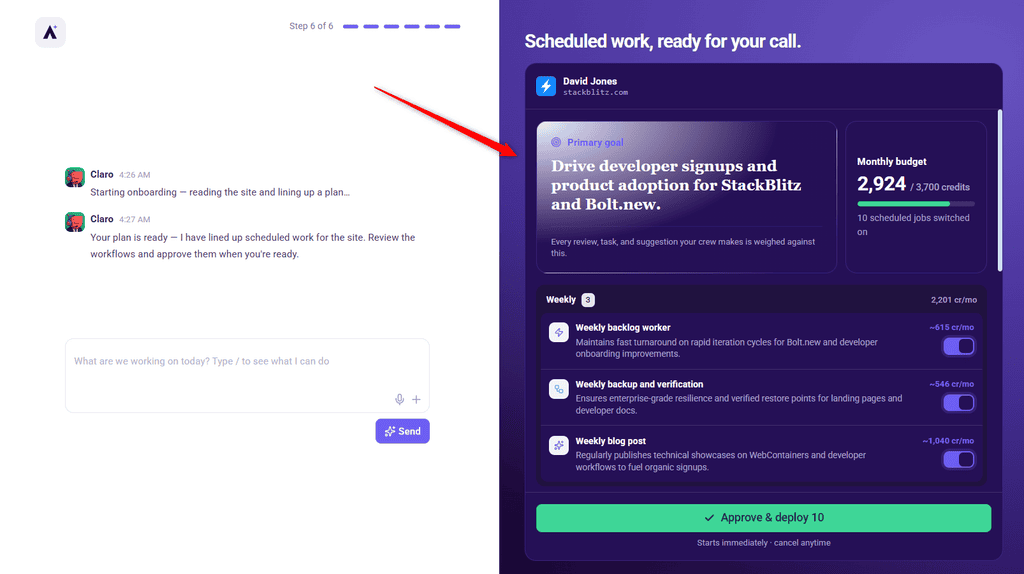
The last step is where you approve the work your AI team will run on its own. It is an ordinary screen in the wizard, not a modal: the left-hand side is a live chat thread with Claro while the plan is drafted, showing Putting your plan together… until it lands, and the right-hand side is headed Scheduled work, ready for your call.
Instructions:
- Wait for the plan to finish drafting. Until it does, the approve button reads Preparing your plan….
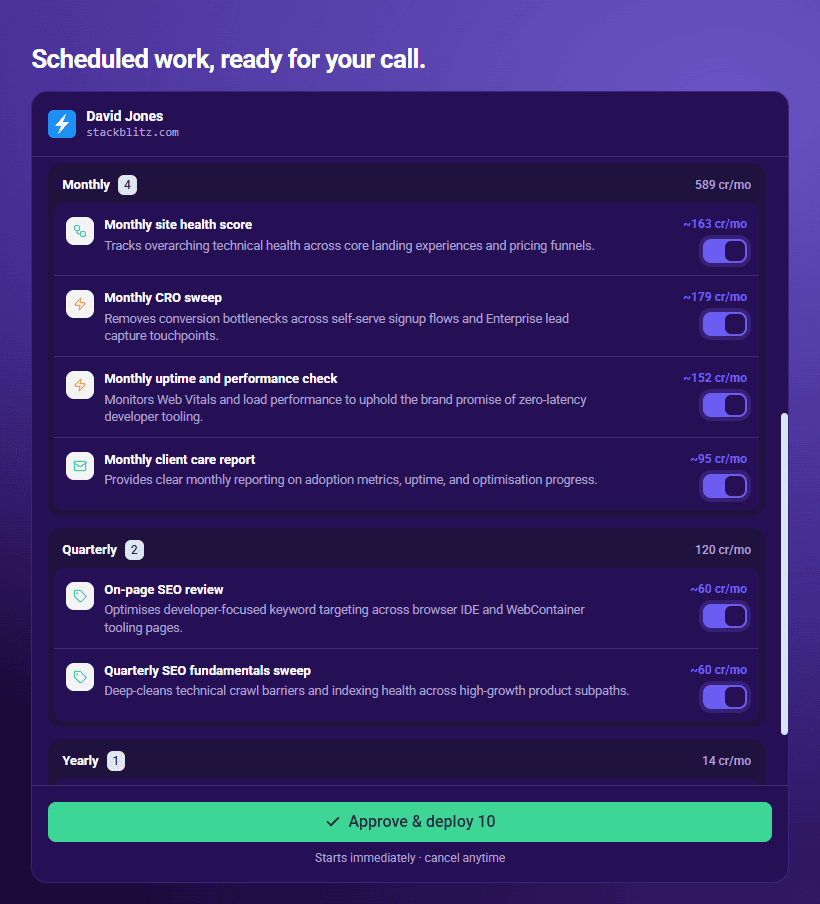
- Work through the proposed workflows and toggle each one on or off. Approving means enabling; deselecting means disabling. Switching a workflow on is your sign-off for what it does, so its runs never stop to ask for approval.
- Check the Monthly budget card, which shows the approved plan’s estimated usage against the recommended monthly amount, with a note of how many scheduled jobs are switched on.
- Click Approve & deploy, followed by the number of workflows you have switched on. Underneath it reads Starts immediately · cancel anytime.
| Workflows are grouped by cadence, always in this order | ||
|---|---|---|
| 1. Weekly | 2. Monthly | 3. Quarterly |
| 4. Yearly | 5. Daily | 6. On demand |
| In each row | What it tells you |
|---|---|
| Name | The workflow’s title. Anything the generator left unnamed appears as Untitled workflow. |
| Description | One line of the AI’s own reasoning for proposing this workflow on this client’s site. |
| Credit cost | A scheduled workflow shows ~N cr/mo; an on-demand one shows ~N cr/run. Hover the figure for the detail: on a scheduled workflow it breaks down as credits per run multiplied by how often it is expected to run, and on an on-demand one it confirms the workflow is triggered rather than scheduled. |
| Toggle | Switches that one workflow on or off before you approve the plan. |
- If the brief could not be read, the workflows arrive switched off rather than on, and the panel says so — the suggestions are based on what you told us rather than on the site itself.
- If the plan comes back empty, the button reads Go to the dashboard instead.
- Typing a reply into the chat on the left also ends onboarding and takes you through to the dashboard.
Nothing here is checked against your credit balance. The Monthly budget card is a read-only summary — the credits your selection adds up to, against a recommended monthly allocation — so approving switches the workflows on whatever that figure says.

If You’re a Website Owner (Invited)
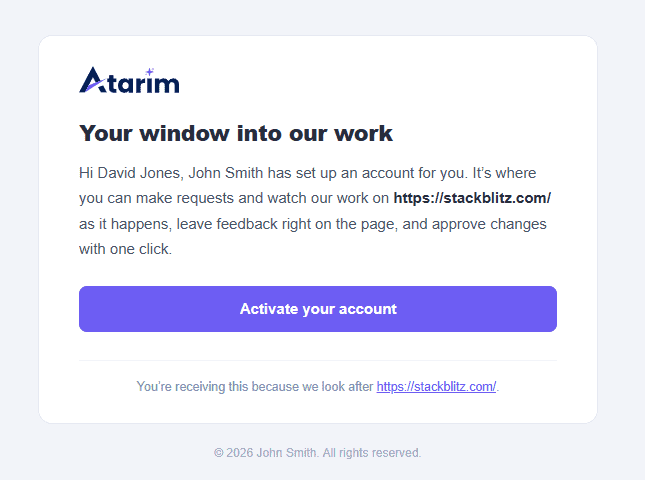
Your invitation email contains a personal link from your agency.
Instructions:
- Click the invite link in the email from your agency.
- Check your name and email — both are pre-filled from the invite.
- Set a password.
- Agree to the terms.
- Click “Create my account”. There is no verification code to enter — accepting the invitation happens as part of creating the account.
- A short two-step setup opens in your workspace. On Step 1, Build Your Dream Team, answer What roles do you play? (Pick all that apply) and choose an experience level, then select Meet the Team.
- On Step 2, Review & Complete Setup, read the introduction to your AI team and select See My Project to open your project.
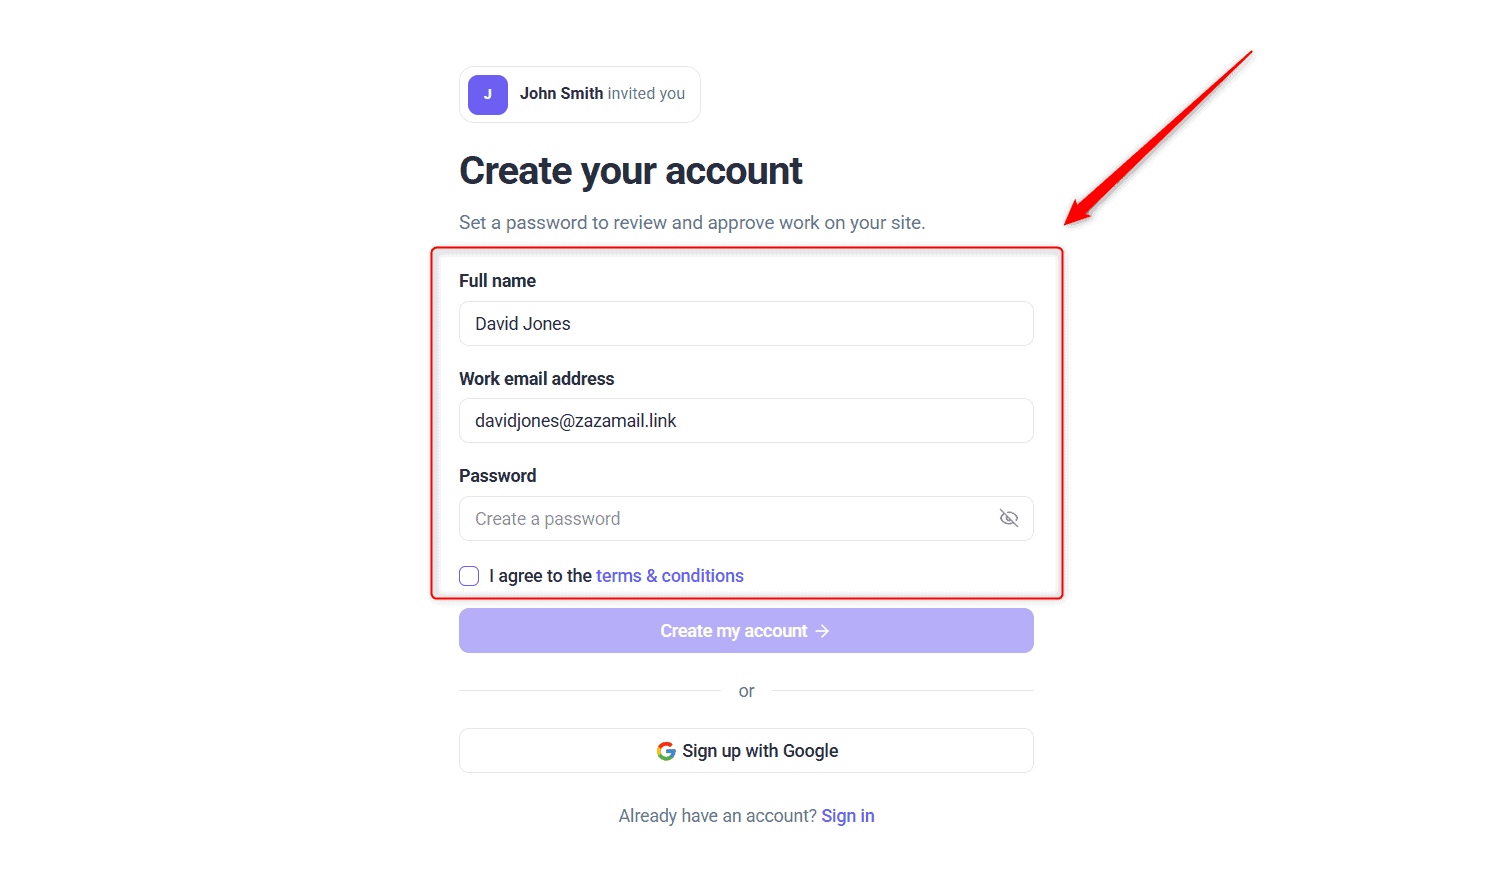
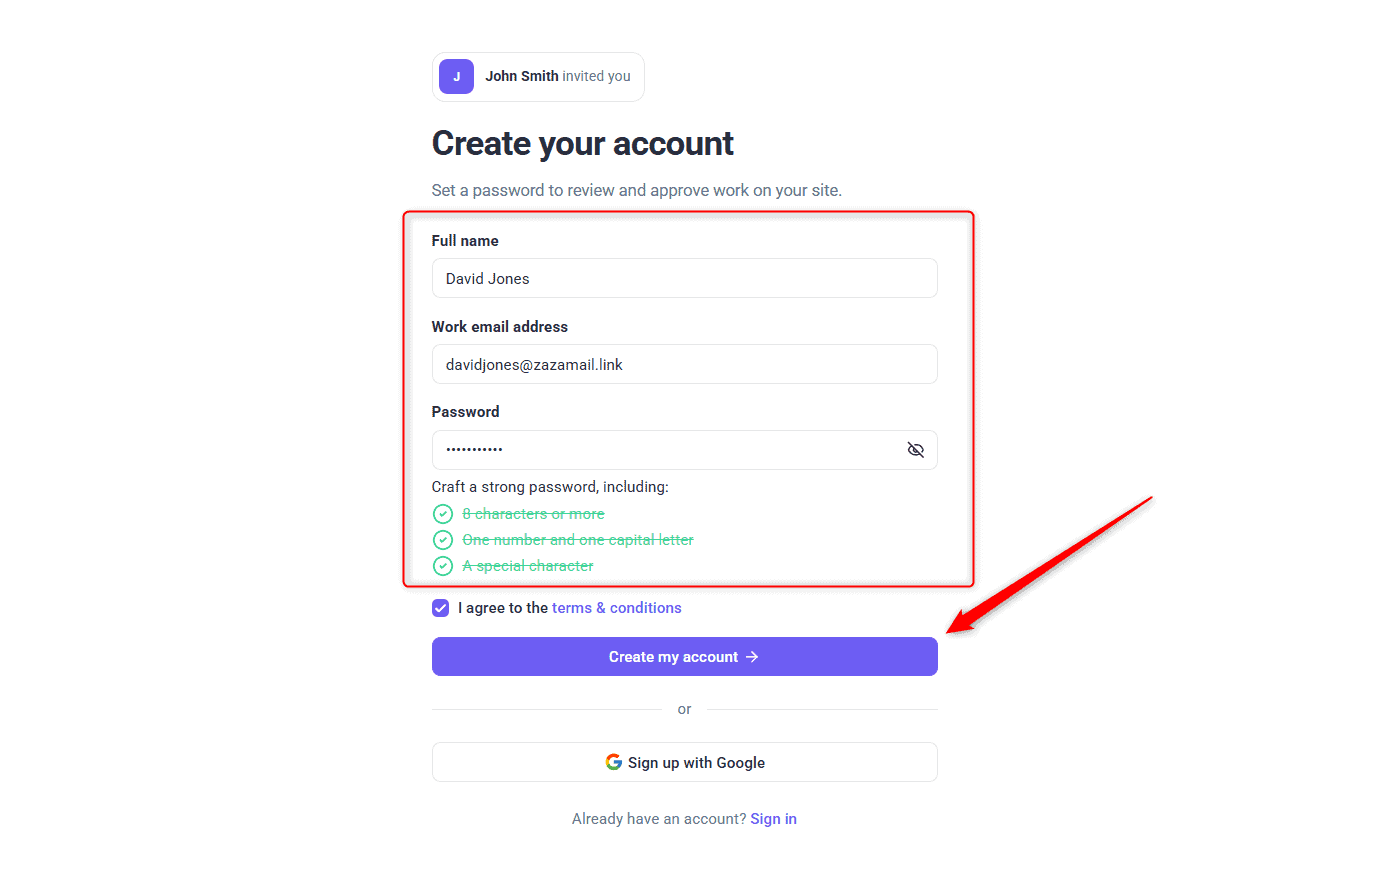
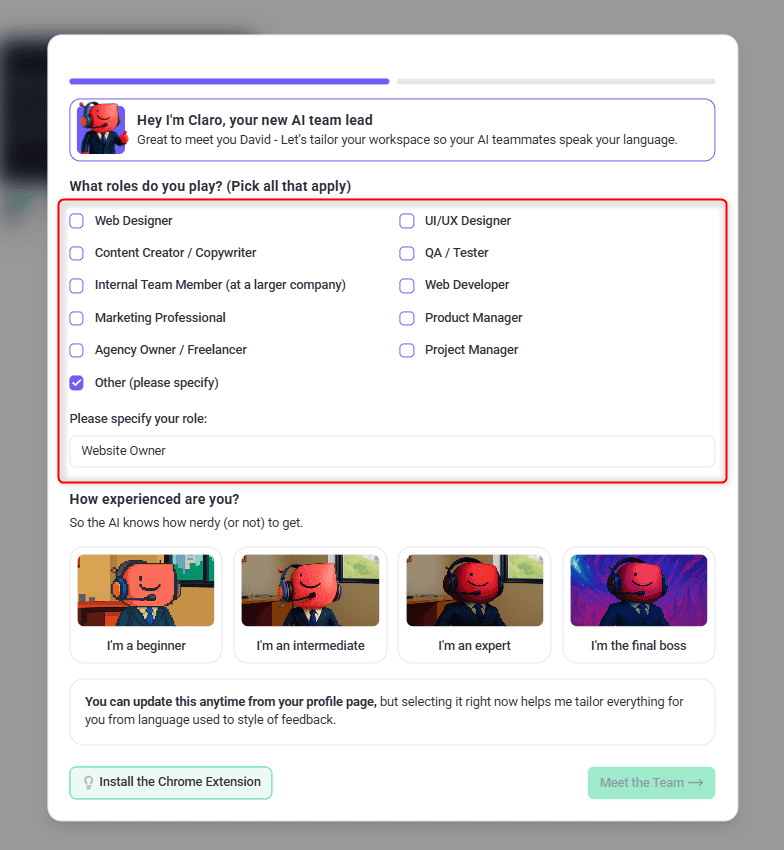
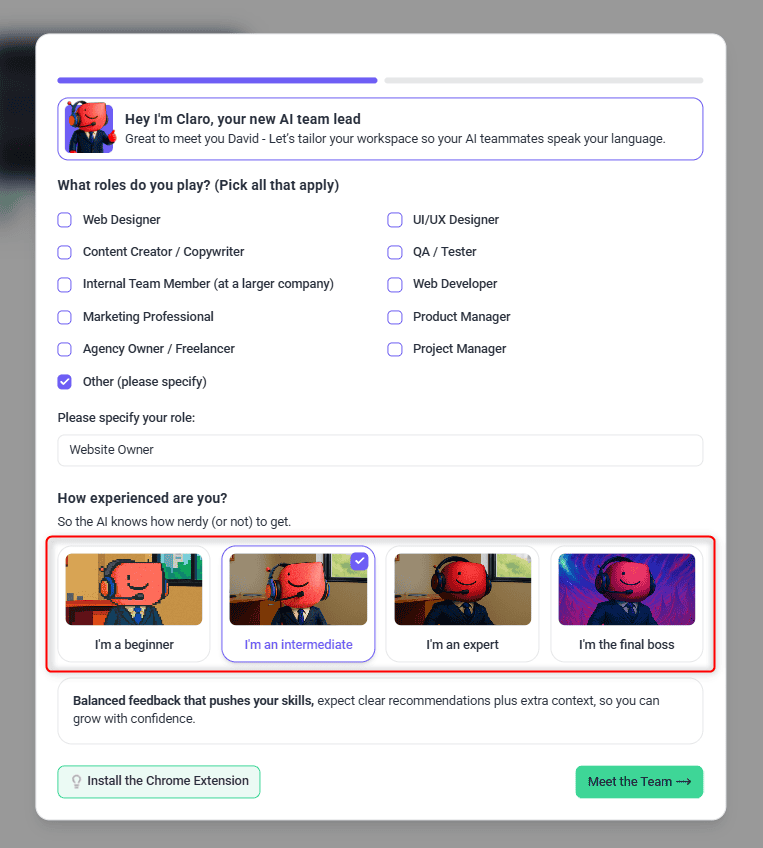
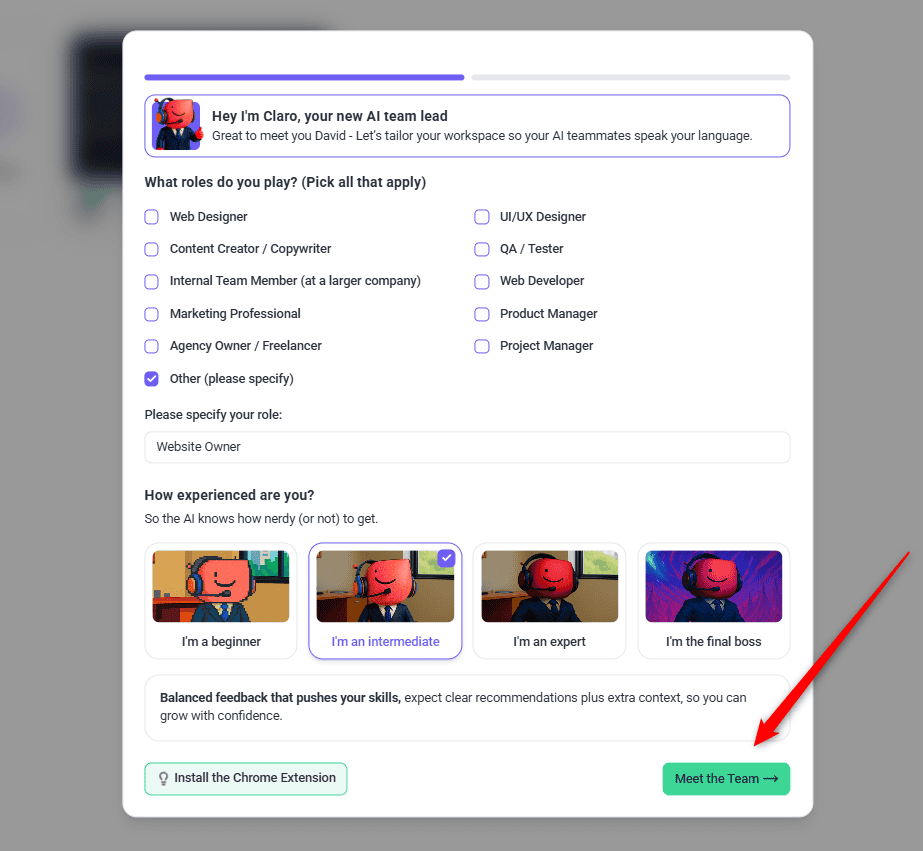


The registration screen itself is a single screen rather than the six-step wizard an agency works through: no step counter, no split panel, and a sub-heading that reads “Set a password to review and approve work on your site.” The inviting agency’s own branding is applied to the button and the terms checkbox. The two-step setup that follows is trimmed for client workspaces — it skips the brand discovery an agency goes through. Once it is done, you land in a scoped client workspace (Beta):
- The sidebar shows Projects and Workflows only, plus Help.
- Inbox, Boards, People, Analytics, and Settings are not shown.
Configuring Your Notifications
Keep everyone in the loop by setting up notifications for key project events.
Instructions:
- Navigate to Settings → Communication → Notifications.
- Switch each notification type on or off. Atarim groups activity on a project into a single email automatically, so there’s no frequency to set.
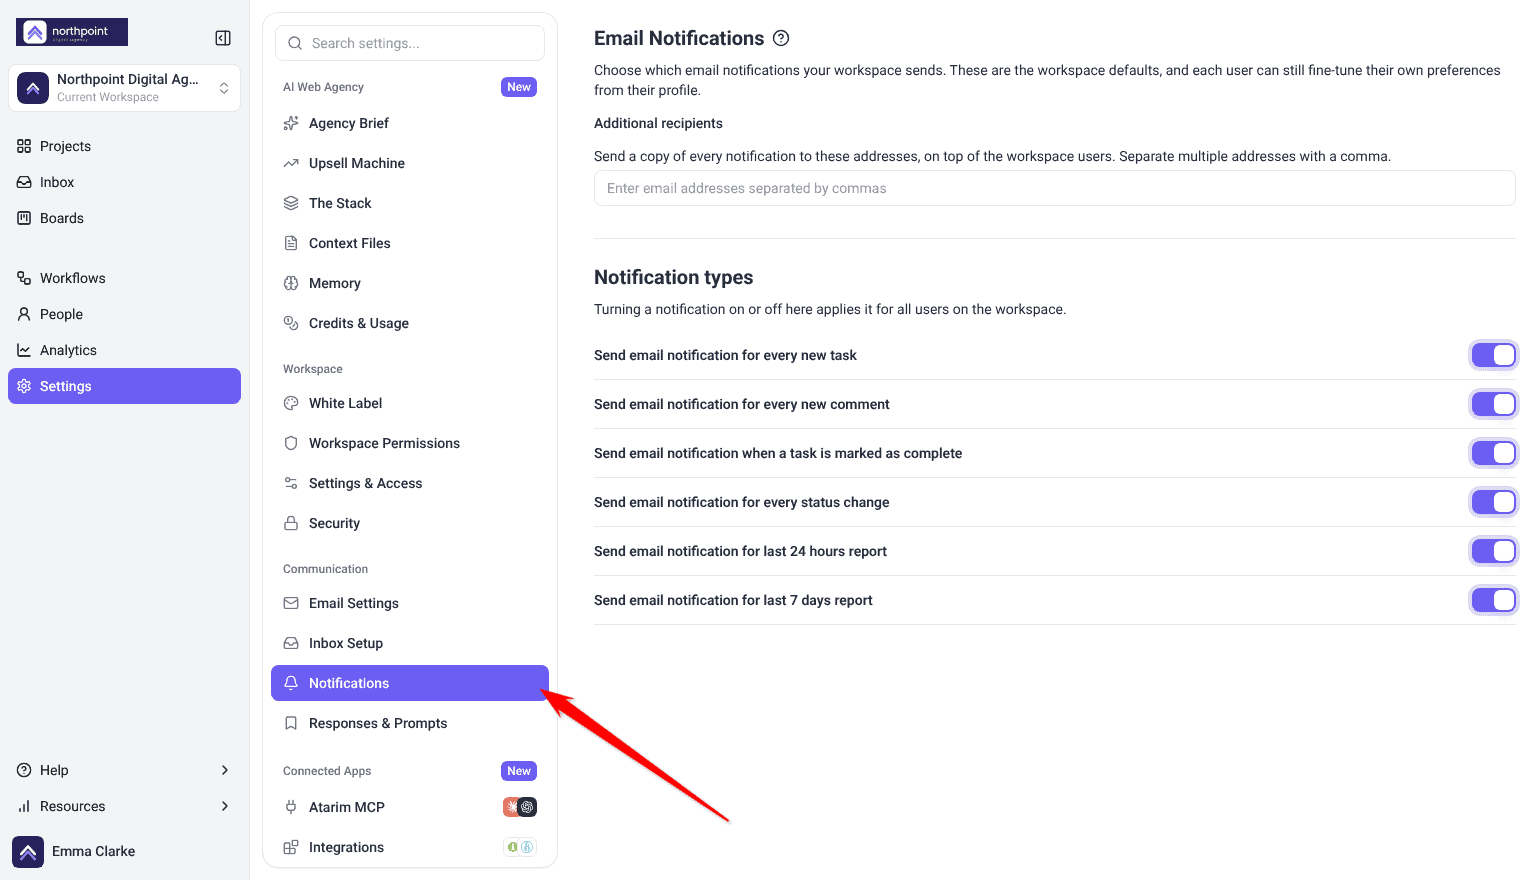
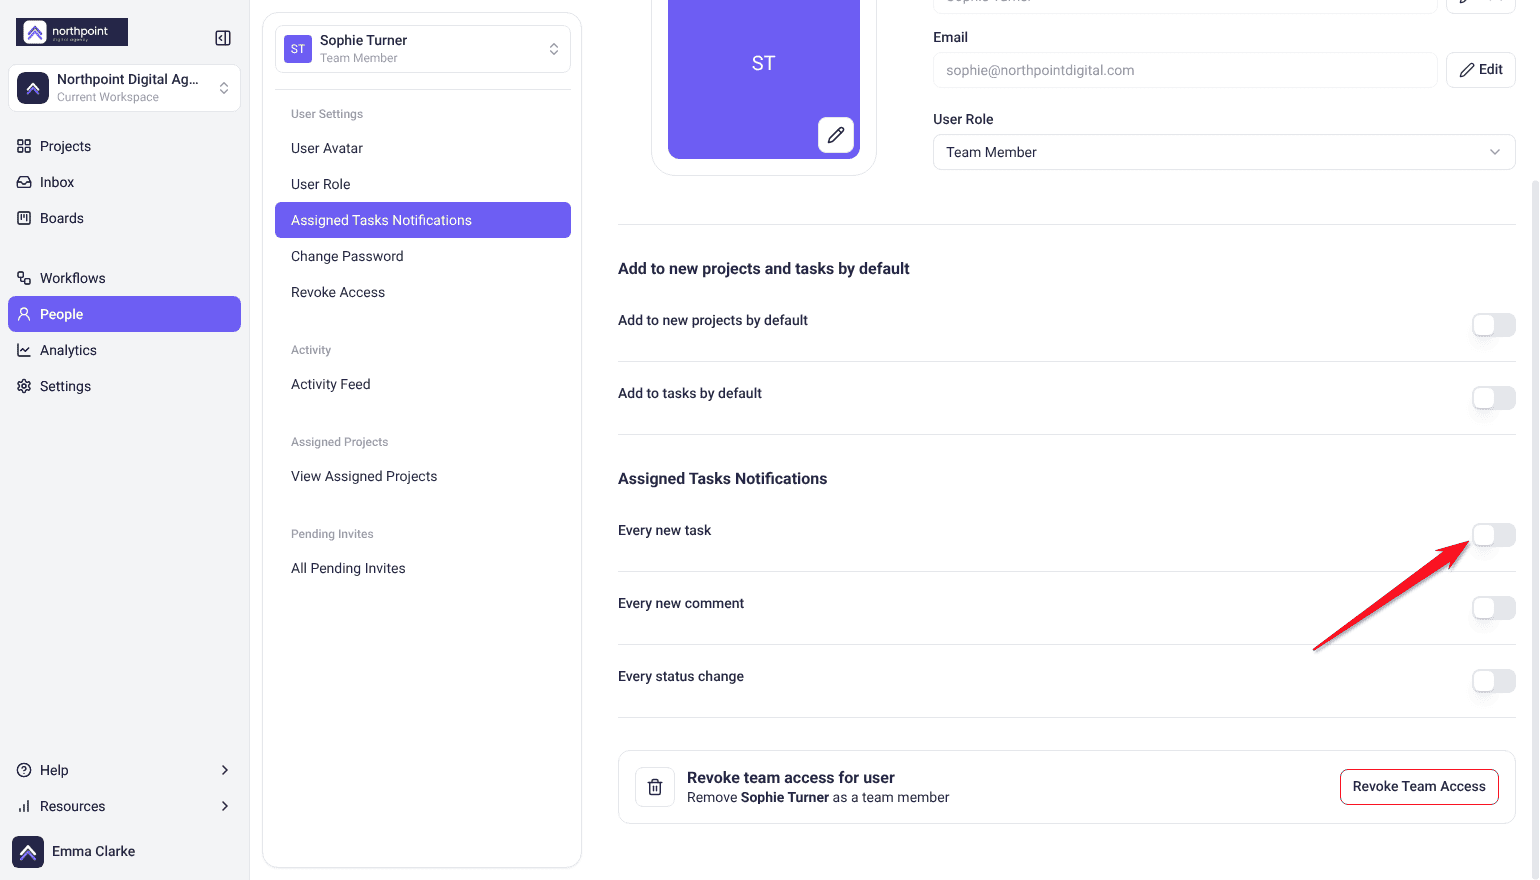
- Administrators can adjust anyone’s notifications from People. Everyone can change their own from their profile (your avatar, then View Profile).
FAQs
Do I need to register before the wizard reads my site?
No — Step 1 reads your agency’s own site and the panel beside it shows you what was found, all before you ever create an account. Registration happens at Step 2.
Does the agency onboarding wizard read my own site or my client’s?
Both, at different points. Step 1 reads your agency’s own website. Your client’s site is not touched until Step 3, when you add your first client — their brief is then drafted in the background while you carry on.
Can I skip adding a client during onboarding?
Yes — “I’ll add a client later” on Step 3 carries on without a client project. You still answer the questions in Step 4, and the wizard hands off to your dashboard from there. The WordPress and scheduled-work steps are skipped, since both need a client site.
What if the wizard reads the wrong company from my URL?
Use “Not your agency?” in the top right of the panel while your agency is being revealed. It asks for a different address and rebuilds from scratch, rather than making you correct every generated field by hand.
Do Website Owners go through the same wizard as agencies?
No. Registration is a single screen with no step counter and no workspace-creation step — creating the account accepts the invitation. A short two-step setup then opens in the workspace, asking your roles and experience level before it hands you your project. Agencies work through six steps instead, including brand discovery, which client workspaces skip.
Can I manage multiple projects within the same workspace?
Yes. A workspace can hold multiple projects, with tasks, comments, and feedback organized under each one. The number of projects available to you is set by your plan and shared across your account — you can add more by upgrading or purchasing additional projects.
What if I don’t receive the email verification code?
Check your spam folder first, then use the option to resend the code from the same screen — don’t create a second account as a workaround.
How do I configure notifications to avoid being overwhelmed by updates?
Go to Settings → Communication → Notifications. Each notification type has its own on or off switch, and everyone can also change their own notifications from their profile. Emails about the same activity are batched automatically, so there is no frequency setting to change.
How do I link Atarim with my team’s tools (e.g., Slack, Jira)?
Go to Settings → Connected Apps → Integrations, and follow the prompts to connect your desired tools.
Conclusion
Whichever side you're on, onboarding is built to get you to a working AI agency fast — for agencies, a read-first, register-later wizard that ends with an approvable workflow plan; for invited clients, a focused dashboard with Claro already waiting. The 6-step wizard is now the default path for new signups, so it is the flow most new accounts will see.
Tips & best practices
- Have your agency's real live URL ready before you start Step 1 — the whole first half of the wizard depends on reading it accurately.
- Answer the experience-level question in Step 4 honestly — it changes how much explanation the AI includes in every future response.
- Use “I'll add a client later” on Step 3 if you're not ready to invite anyone yet — nothing forces you to notify a client before you're ready.