
The democratization of software development has arrived, but it looks different than we expected. It isn’t drag-and-drop. It isn’t low-code. It is vibe coding.
Vibe coding is the art of building software using natural language. You describe the functionality, the aesthetic, and the “vibe,” and an LLM (Large Language Model) handles the syntax. Tools like Cursor, Replit, Bolt, and Lovable have replaced the Integrated Development Environment (IDE) with a conversation window.
However, new vibe coders quickly hit a wall. They type “make a website” and get a generic, broken template. They type “fix the bug,” and the AI introduces three new errors.
The bottleneck is no longer your knowledge of Python or JavaScript. The bottleneck is your ability to communicate intent. In this paradigm, English is the new syntax. If your instructions are vague, your application will be “slop.” It will be technically functional code that is structurally unsound, visually inconsistent, and riddled with edge-case bugs.
Mastering vibe coding prompts is the difference between a hobbyist who builds a demo and a founder who ships a product. This guide dissects the engineering behind the English. It transforms you from a requester into an architect.
The New Syntax: Why Prompts Matter More Than Tools
In traditional programming, the compiler is a strict gatekeeper. If you miss a semicolon or misspell a variable, the code fails to run. You get immediate, binary feedback.
AI coding tools are different. They are eager to please. If you give them a bad prompt, they won’t throw an error. They will hallucinate a solution that looks correct but fails under scrutiny. They act like a brilliant but exhausted junior developer who nods at every request, guesses at the missing details, and hides the mess in the backend.
The Cost of “Context Drift”
Every interaction with an AI tool consumes “context.” The model has a limited window of memory (the context window) where it stores your file structure, previous instructions, and current code.
When you use vague prompts like “change the color” or “it’s not working,” you force the AI to guess. When it guesses wrong, you have to correct it. This back-and-forth burns through your context window. Eventually, the model “forgets” the beginning of the conversation. It starts rewriting code it already fixed or deleting features you added an hour ago. This is known as context drift.
High-quality vibe coding prompts act as compression algorithms. They convey maximum context with minimum ambiguity. This allows you to build complex features in a single “shot” rather than ten iterative corrections. This preserves the model’s intelligence for the hard problems rather than wasting it on clarifying your intent.
The Anatomy of an Effective Prompt
A prompt is not a casual text message. It is a technical specification wrapped in prose. To get production-ready code from tools like Cursor or Bolt, your prompt must contain three structural pillars: Context, Specificity, and Format.
1. Context (The “Where” and “Why”)
The AI does not know what is in your head. Often, it doesn’t even know what is in your other files unless you tell it. You must establish the ground truth before asking for changes.
- Project State: Are we starting from scratch or adding to a legacy codebase?
- Tech Stack: “React” is not enough. Are we using Next.js 13 (Pages router) or Next.js 14 (App router)? Are we using raw CSS, Tailwind CSS, or Styled Components?
- Goal: What is the user trying to achieve?
The Naked Prompt:
“Add a login page.”
The Dressed Prompt:
“I am building a job board for remote workers using Next.js 14 and Supabase. I need a login page located at /app/login/page.tsx. It needs to authenticate users via the existing Supabase client in /lib/supabase.ts.”
2. Specificity (The “What” and “How”)
Ambiguity is the enemy. When you leave a decision open, the AI defaults to the path of least resistance. This is usually the most generic implementation possible.
- Constraints: What should the AI not do? (e.g., “Do not use external UI libraries.”)
- Edge Cases: What happens when things go wrong? (e.g., “If the API fails, show a toast notification, not a console log.”)
- Visual Language: Be specific about spacing, colors, and responsiveness.
The Naked Prompt:
“Make the form validate.”
The Dressed Prompt:
“Add client-side validation using Zod and React Hook Form. The email field must be a valid email string. The password must be at least 8 characters. If validation fails, display red error text below the specific input field, not at the top of the form.”
3. Format (The Output)
Tell the AI how to present the solution. Vibe coders often struggle when the AI explains the code for five paragraphs instead of just writing it.
- Action: “Write the full file code.” vs. “Show me the diff.”
- Explanation: “Explain your logic first” (good for complex logic) or “No explanation, just code” (good for quick styling fixes).
Prompt Templates for Common Scenarios
We have analyzed interactions in the vibe coding ecosystem to find patterns that work. Below are the specific prompt patterns that consistently yield production-grade results.
Constructing a Production-Ready Component
This is the “Hello World” of vibe coding. Most people get a functional form that looks like it is from 1998 and doesn’t actually send data. You need to specify the interactive states upfront.
The Bad Prompt:
“Create a contact form for my website.”
Why it fails:
The AI will likely create a standard HTML <form> tag. It will reload the page upon submission (bad UX). It will probably use standard browser alerts for errors. It won’t match your brand.
The Pro Prompt:
“Create a ContactForm component using React and Tailwind CSS.
Requirements:
- Fields: Name (text), Email (email type), Subject (dropdown: ‘Support’, ‘Sales’, ‘Other’), and Message (textarea).
- Validation: Use Zod for schema validation. Email is required; Message must be > 10 chars.
- State: Use useState to handle ‘loading’, ‘success’, and ‘error’ states.
- UX: Disable the submit button while loading. Show a loading spinner.
- Styling: Use a modern card layout with bg-white, rounded-xl, and shadow-lg. Inputs should have focus:ring-2 and focus:ring-blue-500.
- Action: Mock the submission with a setTimeout of 2 seconds that resolves successfully.
Output the full code for the component file.”
The Result:
You get a fully interactive, styled, validated component that feels professional immediately. You save the 45 minutes it would have taken to ask for styling, then ask for validation, then ask for a loading state.
The Scientific Method for AI Debugging
“It’s broken” is the most useless phrase in software development. To fix a bug, you must replicate the Scientific Method in your prompt. You must provide the hypothesis and the evidence.
The Bad Prompt:
“The login isn’t working. Fix it.”
Why it fails:
The AI has to guess. It might rewrite your API routes when the problem was actually a CSS z-index issue covering the button. It changes code blindly. This potentially introduces new bugs.
The Pro Prompt:
“I am encountering a bug in the SignUp component.
Expected Behavior:
When I click ‘Sign Up’, the user should be created in Supabase, and the router should push to /dashboard.
Actual Behavior:
The button spins for a second, stops, and nothing happens. No redirection, no error message on screen.
Evidence:
I checked the browser console and found this error: AuthApiError: Database error saving new user.
Context:
Here is my current SignUp.tsx file: [Paste Code]
Here is my supabase/config.ts file: [Paste Code]
Analyze the error and the code. Explain why this mismatch is happening, then provide the corrected code block.”
The Result:
The prompt forces the AI to look at the relationship between the frontend and the backend configuration. It will likely identify that your database permissions (RLS policies) are blocking the write operation, rather than arbitrarily rewriting your frontend form.
Defining Design Tokens for Consistent Vibes
Visuals are hard to describe. “Make it pop” means nothing to a computer. You need to speak in the language of design systems. You must define your “tokens” (colors, spacing, fonts) before you ask for changes.
The Bad Prompt:
“Make this page look better and more modern.”
Why it fails:
“Modern” is subjective. The AI might give you a stark minimalist design when you wanted a colorful SaaS look. It might use arbitrary CSS values that clutter your stylesheet.
The Pro Prompt:
“Refactor the styling of the Landing Page to match a ‘Dark Mode SaaS’ aesthetic.
Design Tokens:
- Background: Very dark blue (#0f172a), not pure black.
- Text: White for headings, Slate-400 for body text.
- Accents: Use an electric purple (#8b5cf6) for primary buttons and links.
- Typography: Use the ‘Inter’ font family.
Layout Changes:
- Increase the whitespace between sections to at least py-24.
- Make the Hero H1 font size text-6xl on desktop and text-4xl on mobile.
- Add a subtle gradient glow behind the main product image using a blurred div with absolute positioning.
Do not change the functionality, only the Tailwind classes.”
The Result:
You get a specific visual outcome. By defining the “Design Tokens” upfront, you ensure the AI applies the same colors and spacing rules consistently across the entire page. It stops mixing and matching shades of blue.
Implementing Secure Authentication Logic
When adding system-level features, you must define the Happy Path and the Sad Path. Security is often an afterthought for AI models optimized for speed.
The Bad Prompt:
“Add user authentication.”
Why it fails:
The AI creates a login form but doesn’t protect your routes. Users can still type /dashboard and see the page without logging in.
The Pro Prompt:
“Implement an Authentication Flow using Supabase Auth.
Scope:
- Middleware: Create a Next.js Middleware file that checks for a session. If no session exists, redirect protected routes (starting with /dashboard) to /login.
- Context: Wrap the application in an AuthProvider that exposes the user object and a signOut function globally.
- UI: Update the Navbar component. If a user is logged in, show their avatar and a ‘Sign Out’ button. If logged out, show ‘Login’ and ‘Get Started’ buttons.
I have already installed the @supabase/auth-helpers-nextjs package. Use that library.”
The Result:
This prompt ensures security is handled at the routing level (Middleware), state level (Context), and UI level (Navbar). It connects the dots that a novice builder might miss.
Common Prompt Mistakes (And How to Fix Them)
Even experienced engineers fall into prompt traps. When you are moving fast, it is easy to get sloppy.
1. The “Assumption Gap”
This is the most common error. You assume the AI knows you are using TypeScript because you used it yesterday.
- The Fix: If you are in a new chat session, assume the AI knows nothing. Paste your package.json file at the start of a session so the AI knows exactly what libraries are installed.
2. Prompting for “Everything Everywhere All At Once”
Asking the AI to “Build a dashboard with charts, a settings page, and stripe integration” in one go guarantees failure. The complexity overwhelms the model’s reasoning capabilities.
- The Fix: Chain your prompts.
- Step 1: “Build the dashboard layout shell with a sidebar.”
- Step 2: “Add the charts to the main content area.”
- Step 3: “Connect the settings page form.”
3. Ignoring the “Hallucination of Libraries”
AI loves to invent libraries that don’t exist. It also loves to use deprecated versions of libraries, like using import { Switch } from ‘@headlessui/react’ when the API has changed.
- The Fix: Explicitly tell the AI to “Check the documentation for [Library Name] version X.” If you are using a new tool, paste the relevant documentation snippet into the prompt.
4. The “Lazy Debugger”
Pasting code and saying “What’s wrong?” is risky. The AI will find something to change, even if the code was fine and the error was in your database.
- The Fix: Always paste the error message. The error message is the map. The code is the terrain. The AI needs both to navigate.
Advanced Techniques: Getting from 80% to 100%
The first 80% of an app is easy with vibe coding. The last 20%—the polish, the edge cases, the performance—is where projects die. Use these advanced techniques to cross the finish line.
The “Pseudo-Code First” Technique
Before asking for code, ask for a plan. This forces the AI to “think” before it “types.” This is often called “Chain of Thought” prompting in AI research.
Prompt: “I want to build a recurring subscription system with Stripe. Before writing any code, outline the step-by-step logic flow. Include the database schema changes, the API webhooks we will need, and the frontend states. Ask me clarifying questions if any part of the flow is ambiguous.”
This often reveals holes in your own logic (e.g., “Oh, I forgot to handle failed payments”) before you waste tokens generating code.
The “Reference Mimicry”
If you can’t describe the visual style, provide a reference. Note that LLMs can’t “see” a URL. However, they can interpret text-based descriptions of other sites or, in some multimodal models like GPT-4o or Claude 3.5 Sonnet, analyze uploaded screenshots.
Prompt: “Analyze this screenshot of the Airbnb search bar. Note the shadow usage, the border-radius, and the separation between the ‘Location’ and ‘Date’ inputs. Replicate this exact component using Tailwind CSS.”
The “Linting” Prompt
Once the code is written, ask the AI to critique its own work. This is a powerful way to catch “silent” errors like accessibility violations or performance bottlenecks.
Prompt: “Review the code you just wrote. Are there any accessibility violations? Are there any hard-coded strings that should be constants? Is there a more performant way to handle the re-renders? Refactor the code to address these issues.”
The Reality Check: Prompts Can’t Fix Everything
You can write the perfect prompt. You can provide the perfect context. You can use the most advanced model.
Your application will still have problems.
AI is excellent at syntax and logic, but it lacks intuition. It doesn’t know that the button is too small for a thumb on a mobile screen. It doesn’t realize that the “Success” message flashes too quickly for a human to read. It doesn’t know that your copy sounds robotic.
A prompt can build the feature, but it cannot judge the quality of the experience.
This creates a dangerous gap in the vibe coding workflow. You build at lightning speed, but you ship “slop.” These are products that work technically but fail experientially. You become blind to your own bugs because you are so focused on the prompt logic.
Closing the Quality Gap
To bridge the gap between “code that runs” and “products that work,” you need a validation layer. You need a way to review the visual output, click through the flows, and spot the issues that the AI missed. Importantly, you need a way to feed that feedback back into the AI.
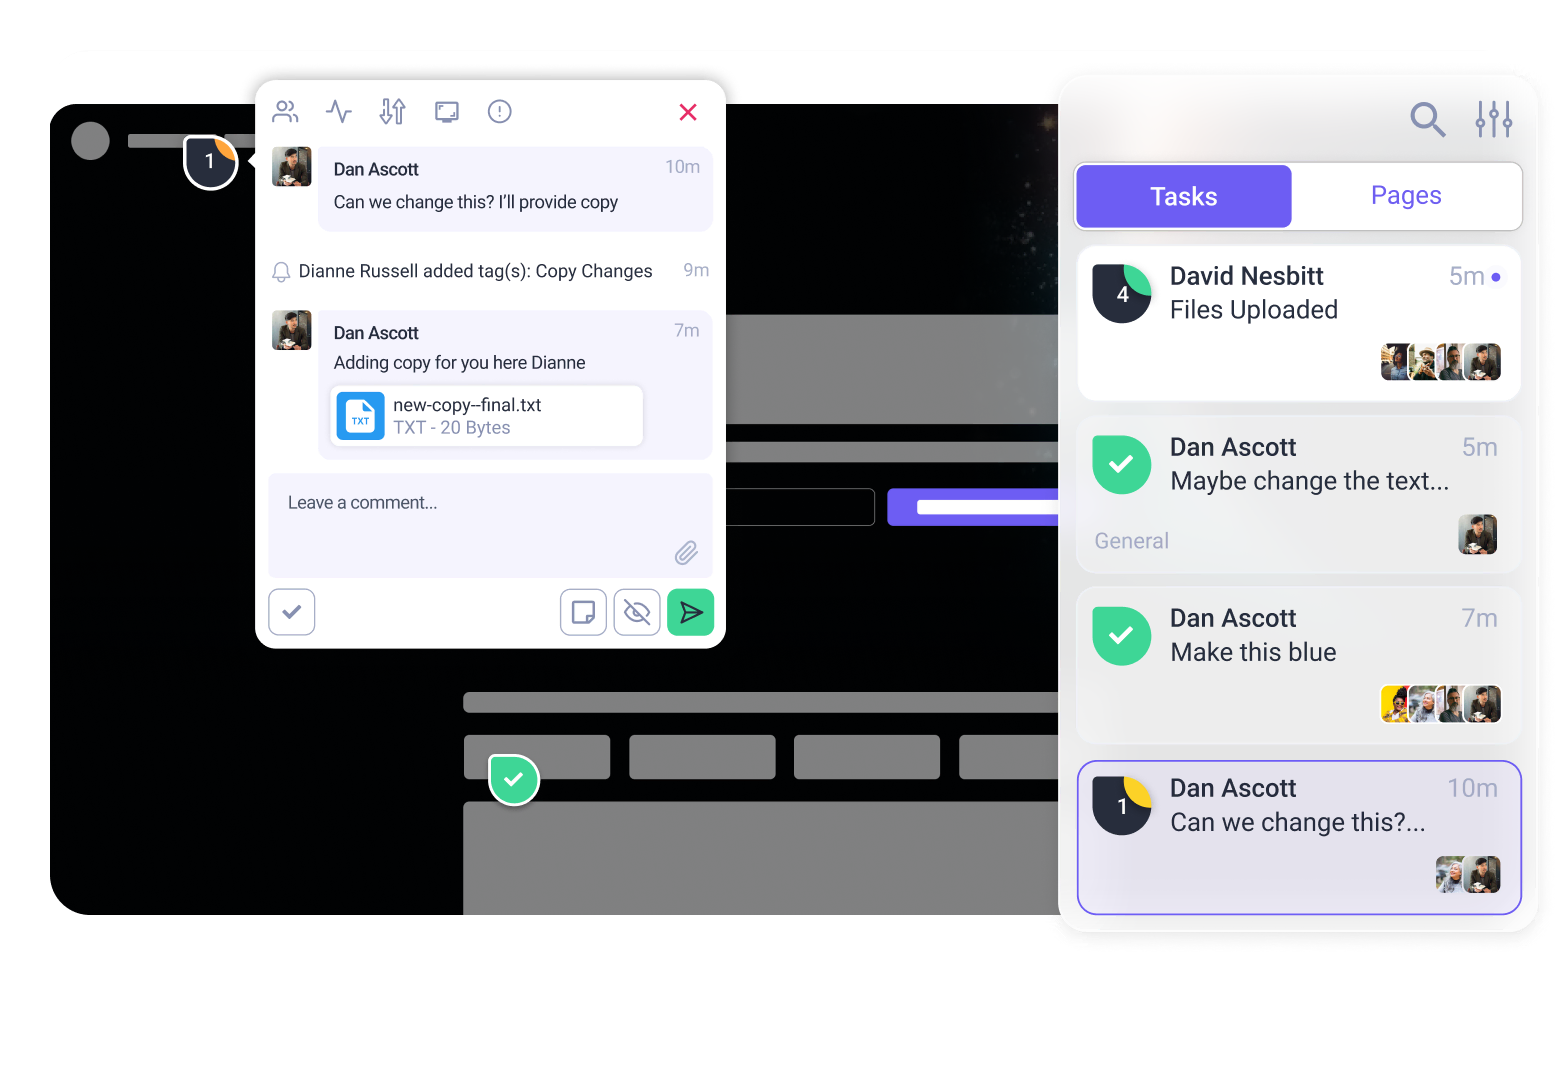
This is where Atarim fits into the vibe coding stack.
Atarim acts as your visual QA layer. Instead of trying to describe a visual bug in a text prompt (“the button is kind of off to the left”), you simply click on the live element in Atarim and leave a comment. You can then copy that specific, contextual feedback and feed it back to your AI coder.
The Workflow of a Pro Vibe Coder:
- Prompt: Use the templates above to generate the feature in Cursor/Replit.
- Build: Deploy the preview.
- Audit: Use Atarim to click through the site. Let Atarim’s AI agents scan for accessibility issues and visual bugs.
- Refine: Take the structured feedback from Atarim and paste it back into your coding tool as a new prompt.
“Atarim flagged that the contrast ratio on the ‘Submit’ button is too low for accessibility. Fix this by darkening the blue background to #1e40af.”
By combining precision prompting with visual auditing, you stop guessing and start shipping software that feels human-made, even if an AI wrote every line.
Built something with these prompts? See what you might have missed.
Try Atarim for free and turn your vibe coding experiments into shipping products.