Project Stages
Set dated milestones on a project so your team and your clients can both see what is due, what is close, and what has slipped.
Project stages break a project into dated checkpoints — discovery, design, development, launch, or whatever phases your work actually has. Each one carries a name and a due date, and Atarim shows how close it is at a glance.
The point is not scheduling for its own sake. It is that a client looking at a project can see where it has got to without emailing to ask, and your team can see what is about to slip before it does.

Stages are not statuses
This is the distinction worth getting straight before you start, because the two are easy to confuse and do completely different jobs.
| Tracks | Set on | Example | |
|---|---|---|---|
| Task status | One piece of work | Each task | “Fix the header spacing” is In Progress |
| Project stage | The project as a whole | The project | “Design sign-off” is due in nine days |
A project can have every task complete and still be mid-stage, or be approaching a deadline with plenty of tasks open. They answer different questions and neither replaces the other.
Who can set stages
Stages sit behind two gates, so check both if the option is not where you expect.
- They are a paid feature. On plans that do not include them, selecting the option opens an upgrade panel headed Project Stages, describing them as a way to keep your team and stakeholders aligned so no deadlines are missed.
- They are also permission-gated. If your role does not carry the set-stages permission, the option will not appear in the project’s menu at all.
Opening the stages panel
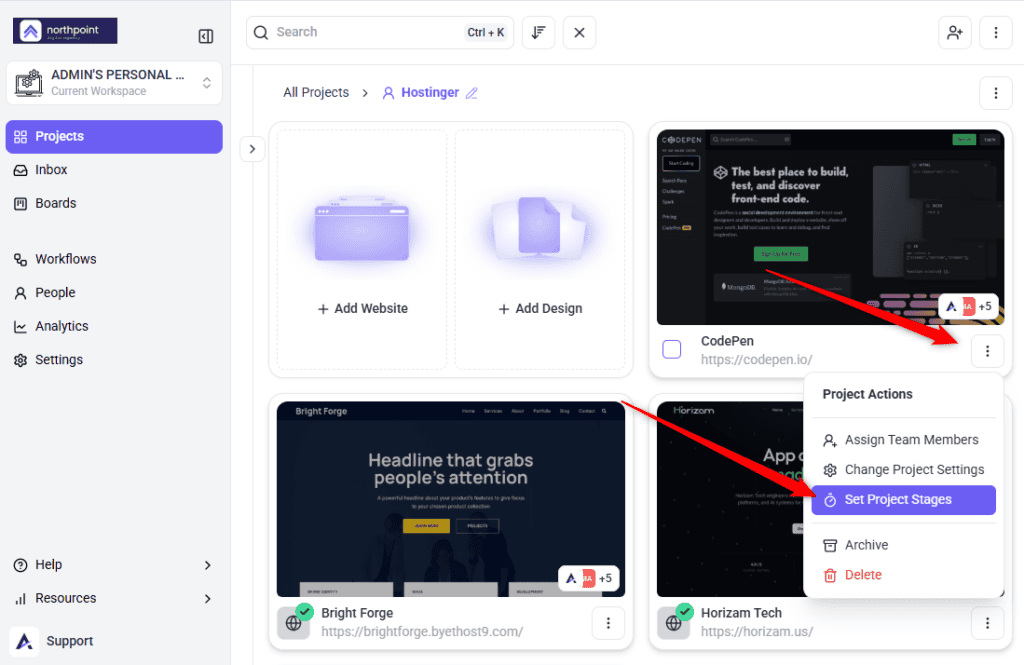
Stages are set per project, from the project’s own actions menu on the Projects screen.
- Go to Projects and find the project you want.
- Open its Project Actions menu.
- Select Set Project Stages. A panel opens headed Milestones for followed by the project name, with a help icon beside it.

Adding a stage
The panel opens with a Create a new Milestone form at the top. It takes two pieces of information.
| Field | What to enter |
|---|---|
| Milestone Title | The name of the stage. The field suggests a working example such as Sprint 1. |
| Due Date | When this stage should be reached. Only future dates can be chosen. |
- Enter a Milestone Title. Name it after the outcome rather than the work — “Design sign-off” reads better to a client than “Phase 2”.
- Choose a Due Date. The picker only allows dates in the future, so a stage cannot be created already overdue.
- Confirm to add it. The stage appears under Active Milestones with a coloured badge showing how far away it is.
- Repeat for each stage in the project.


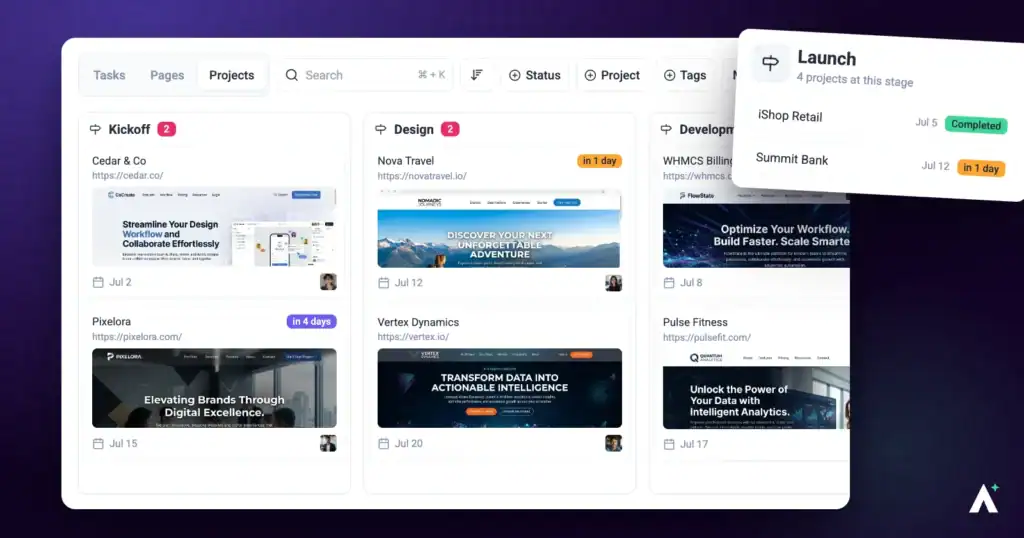
Reading the badges
Each stage carries a badge that changes colour as its date approaches, so a glance tells you where a project stands without reading any dates.
| Badge | Means | Shows |
|---|---|---|
| Green | The stage is complete. | Completed |
| Purple | More than two days away. | How far off, such as in 12 days |
| Orange | Due within the next two days. | in 1 day, in 6 hours |
| Red | The date has passed and it is not complete. | How long ago, such as 3 days ago |
Updating and completing stages
Existing stages are listed under Active Milestones, each with its own controls. Changes apply to that stage only.
| Control | What it does |
|---|---|
| Mark as complete | Marks the stage done. Its badge turns green and reads Completed. |
| Mark as incomplete | Reopens a completed stage, in case it was closed early. |
| Save changes | Applies an edited title or date. |
| Cancel editing | Discards your edits without saving. |
| More actions | Opens a menu headed Actions with Edit Milestone and Delete Milestone. |
- Find the stage under Active Milestones.
- Edit its title or date in place. The controls switch to Save changes and Cancel editing while you are editing.
- Select Save changes to apply, or Cancel editing to discard.
- When a stage is finished, select Mark as complete. Its badge turns green, and the project reads as having cleared that checkpoint.
- To remove a stage entirely, open More actions and select Delete Milestone. The stage is removed immediately — there is no confirmation step.


Where stages show up
Once set, stages are not confined to the panel you created them in. They surface in four places, which is what makes them worth maintaining.
| Where | What is shown |
|---|---|
| Project cards | The nearest active stage, with its name and how far away it is, in its badge colour. |
| The Collaborate bar | A dedicated control on the site itself — see below. |
| Analytics | A Project Stage column on the Projects tab, so every project’s stage reads in one table. |
| Workflows | Milestone events can trigger automations, including creation, completion, and expiry. |

Stages in Collaborate
This is the one that matters for clients. While viewing a site in Collaborate, a control in the bottom bar shows the project’s stages without anyone leaving the page they are reviewing.
- Open the project in Collaborate.
- Select the stages control in the bottom bar. Its tooltip reads Track project stages and deadlines.
- Read the panel, headed Project Stages and Deadlines. Outstanding stages appear under Active Stage with their badge and time remaining. Finished ones appear under Completed Stages with a Complete badge and their due date struck through.

Time remaining is written plainly — as remaining while a stage is still ahead, and as overdue once its date has passed — using whichever unit fits, from seconds up to days.
Analytics and workflows are covered separately. Explore Analytics And Metrics, or Learn More About Workflow Automation.
Known limitations
Where stages stop:
- Stages are per project. There is no shared template to apply the same set across several projects at once.
- Due dates must be in the future when created, so past milestones cannot be backfilled.
- Stages are a paid feature and permission-gated on top of that.
- Stages do not change task statuses. Completing a stage does not close its tasks, and closing tasks does not complete a stage.
- There is no dependency between stages. Each stands alone; completing one does not affect another.
- Stages do not send reminders by themselves. Use a workflow triggered on milestone expiry if you want to be told.
- Tasks cannot be attached to a stage. Stages track the schedule, not the work items.
- Deleting a stage is immediate and has no confirmation step.
FAQs
What is the difference between a stage and a milestone?
Nothing. The menu says Project Stages and the panel says Milestones, but they are the same feature.
How is a stage different from a task status?
A status tracks one task; a stage tracks the whole project. A project can be mid-stage with every task complete, or approaching a deadline with plenty open.
Can I set the same stages across all my projects at once?
No. Stages are set per project, so a standard set has to be recreated on each one.
Can I add a stage with a date in the past?
No. The date picker only allows future dates.
Do clients see project stages?
Yes, if they are signed in. A logged-in client reviewing the site in Collaborate can open the stages control in the bottom bar and see active and completed stages with their dates. Anonymous visitors do not see it.
Do milestones send automatic reminders?
Not on their own. To be told when a stage is due or has passed, build a workflow triggered on the milestone expiring.
Can I delete a stage?
Yes — open More actions on the stage and select Delete Milestone. It is removed immediately with no confirmation, so use Mark as complete if you simply want to close it off.
Can I attach tasks to a stage?
No. Stages track the project’s schedule; they are not containers for tasks, and completing one has no effect on any task.
Does completing a stage close its tasks?
No. Stages and tasks are tracked separately — completing one has no effect on the other.
Can a workflow react to a stage?
Yes. Milestone events including creation, completion, and expiry can be used in workflow automations.
Common issues
- Set Project Stages is missing from the menu. Your role does not carry the permission. An administrator can grant it under Settings → User Permissions.
- Selecting it opens an upgrade panel. Stages are not included on your plan. The panel names the minimum plan required.
- You cannot choose a past date. Expected — the picker only allows future dates. Create the stage with a future date, or leave it out.
- A badge is red. The due date has passed and the stage is not complete. Either mark it complete or move the date.
- A stage badge is not on the project card. Only active stages appear there. A completed stage will not show.
- A client cannot see the stages in Collaborate. The control only appears to signed-in viewers. Ask them to log in.
- Your edit did not stick. Editing needs Save changes to apply. Navigating away or selecting Cancel editing discards it.
Conclusion
Stages work best kept few and honest. Three to five dated checkpoints per project, moved openly when they need moving, tell a client more than any status report — and the colour on the badge means nobody has to ask how it is going.
Stages sit alongside the rest of a project’s configuration, which is covered separately.
Learn More About Setting Up And Customizing Projects
Tips & best practices
- Name stages after outcomes, not phases. “Design sign-off” means something to a client; “Phase 2” does not.
- Act on orange, not red. Two days is enough warning to move a date honestly or push the work through.
- Keep it to three to five stages. More than that and maintaining them costs more than they are worth.
- Move a date openly rather than letting it slip. A moved date reads as management; a red badge reads as neglect.
- Set a workflow on expired milestones so a slip tells you rather than waiting to be noticed.
- Check the Projects tab in Analytics to read every project’s stage in one place.