Managing Team Members & Collaborators
Invite people into a workspace, decide what they can reach, put them on the right projects, and take access back cleanly when they leave.
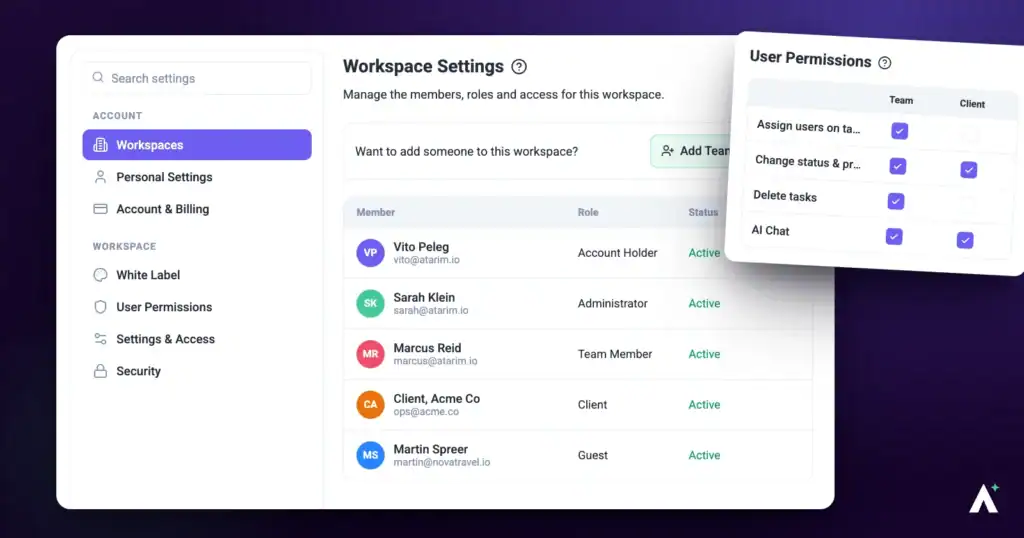
Adding someone to Atarim is two decisions, not one. First, what should they be able to reach across the whole workspace — that is their role. Second, which projects should they actually see — that is their assignment. Getting the first right and forgetting the second is the most common reason a new team member signs in to an empty dashboard.
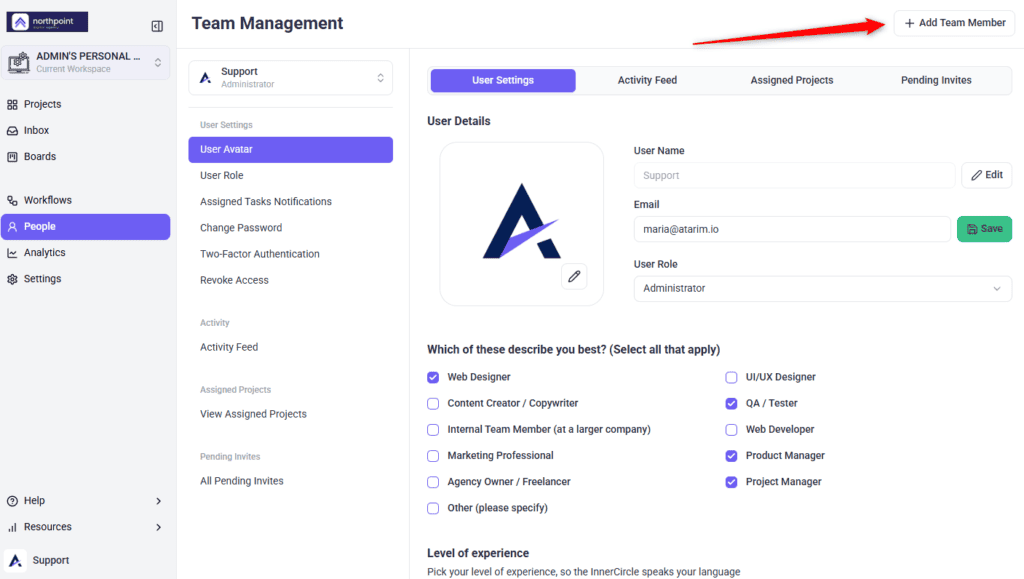
The left column chooses who you are looking at; the tabs on the right show that person’s settings, activity, and projects.
Adding someone to Atarim is two decisions, not one. First, what should they be able to reach across the whole workspace — that is their role. Second, which projects should they actually see — that is their assignment. Getting the first right and forgetting the second is the most common reason a new team member signs in to an empty dashboard.
Everything below applies to the workspace you currently have selected. Roles, assignments, and access are held per workspace, so someone who works across two of your workspaces is managed separately in each.
Where the People Screen Lives
People is per workspace, so check the switcher first — the list changes with it.
Instructions:
If your access is limited to your own account, the header reads User Details instead and the page opens straight onto your own settings, with no team list. Everything on your own profile still works.
Getting the workspace itself set up first makes the rest of this simpler. Explore Navigating The Atarim Dashboard
Who Can Manage the Team
| Role in the selected workspace | What they can do here |
|---|---|
| Owner | Everything. Invite, change roles, manage assignments, revoke access for anyone, and manage their own two-factor authentication. |
| Administrator | Invite people, change roles, manage assignments and notification defaults, and revoke access for team members and collaborators. |
| Team Member | No access to the team list. People is hidden from the sidebar. |
| Collaborator | No access. Opening the screen directly shows an upgrade prompt rather than the team. |
Your own profile, password, and preferences live in the same panel as everyone else’s. Learn More About Managing Your Account Settings
The Four Roles
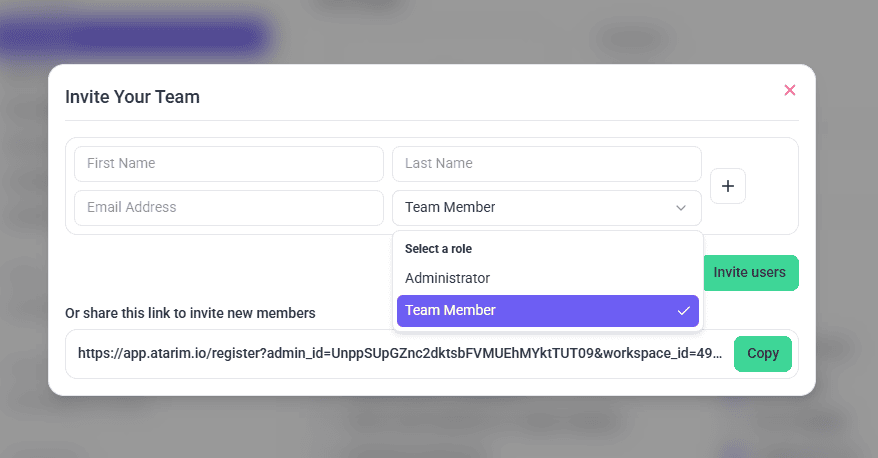
Two of the four can be handed out from this screen. The other two are set elsewhere.
| Role | What it reaches | Uses a seat | Where it is set |
|---|---|---|---|
| Owner | Owns the workspace and cannot be removed from it. | Yes | Fixed when the workspace is created. |
| Administrator | The whole workspace — projects, settings, billing, and team management. | Yes | The invite form, or the User Role field. |
| Team Member | Only the projects they are assigned to. No People, Settings, Analytics, or Workflows. | Yes | The invite form, or the User Role field. |
| Collaborator | Only the projects they were shared into, for reviewing and leaving feedback. | No | Shared in from a project. Can be changed later from the User Role field. |
Each role carries a different reach across the rest of Atarim. Read Understanding User Roles And Permissions
How Seats Are Counted
Your plan includes a number of user seats. Administrators and team members each take one. Collaborators do not, so there is no billing reason to hold back on the number of clients and reviewers you bring into a project.
Seats sit alongside your plan and invoices in one place. Explore Managing Your Account And Billing
Inviting Team Members
Use this for anyone who needs their own login and their own project assignments — staff, contractors, and freelancers.
Instructions:
What the Invitee Receives
Each person is emailed an invitation with the subject line <your name> invites you to collaborate. Where white labelling is configured for the workspace, the email carries your logo and sending address rather than Atarim’s.
What the link does depends on whether that email address already has an Atarim account:
There is more than one route into a workspace, depending on who you are bringing in. See How To Invite Team Members, Clients, And Guests
Sharing the Workspace Invite Link
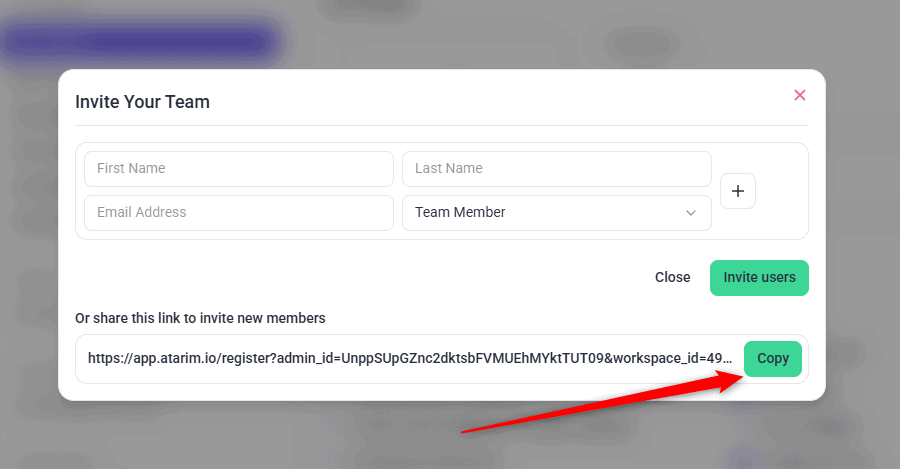
Beneath the invite rows, the same window carries a shareable link under the label Or share this link to invite new members. Anyone who opens it lands on a registration screen that joins them to this workspace.
Instructions:
Walking a new starter through their first hour is worth doing deliberately. Start With The Account Setup And Onboarding Guide
Managing Pending Invitations
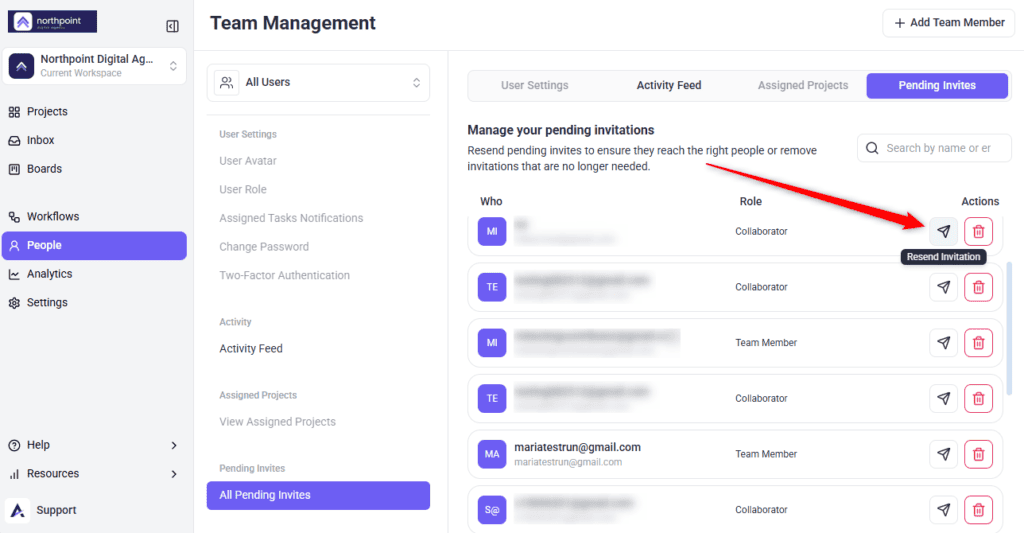
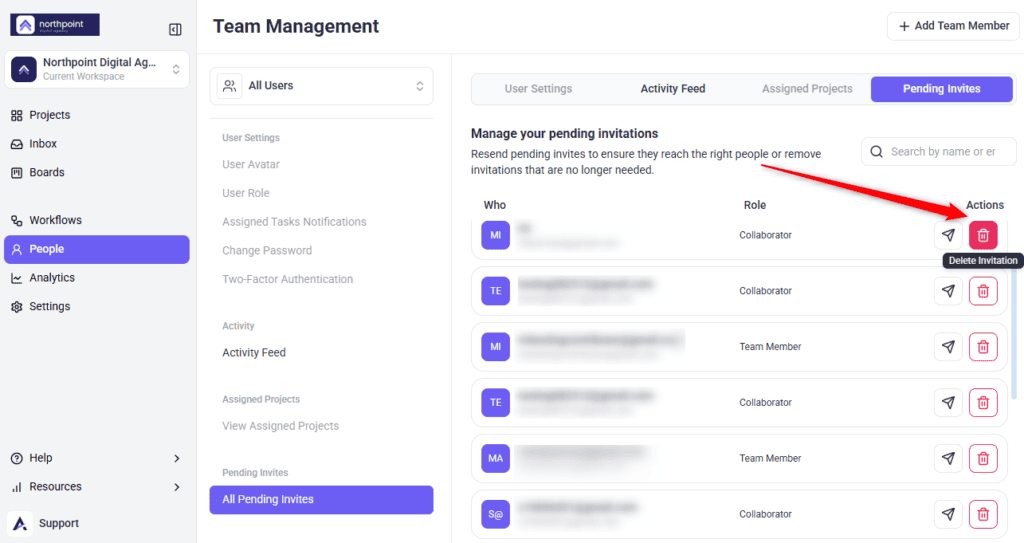
The Pending Invites tab lists everyone invited but not yet joined. It is visible to administrators only.
Instructions:
Each row shows the invitee under Who, their invited role under Role, and the two actions under Actions. When nothing is outstanding, the tab shows No pending invitations with an Invite Team Members button.
If someone reports that they cannot get in at all, the cause is usually elsewhere. Read What To Do If You Can’t Access Atarim
Selecting Someone to Manage
The picker at the top of the left column decides whose details the tabs are showing.
Instructions:
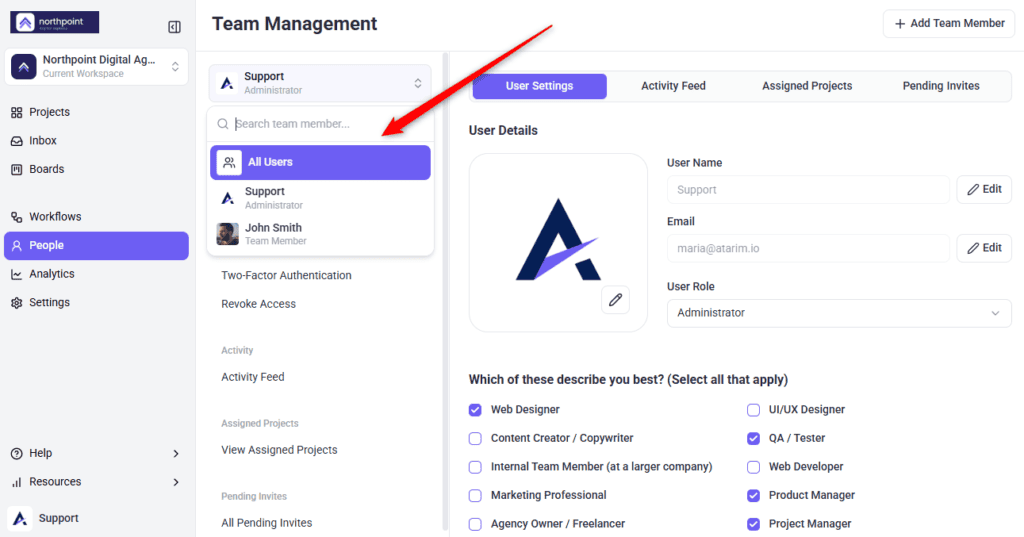
Until someone is selected, those two tabs stay disabled and carry the tooltip Select a user above to activate this section. Activity Feed and Pending Invites are available at all times.
Editing Details and Changing a Role
Role is the field that changes what someone can actually do, so it is worth settling before the rest.
Instructions:
Changing a password is done from this same panel. See How To Reset Your Atarim Account Password
Default Assignment Behaviour
Below the profile, administrators see a section headed Add to new projects and tasks by default. Both switches start off, and both save the moment you toggle them.
| Switch | What happens when it is on |
|---|---|
| Add to new projects by default | This person is added automatically to every new project created in the workspace, without anyone assigning them. |
| Add to tasks by default | This person is assigned automatically to newly created tasks. |
Project and task assignment has a few routes beyond this screen. Learn More About Assigning Projects And Tasks
Choosing Task Notifications
The Assigned Tasks Notifications section controls what this person is emailed about. All three start off, and each switch saves immediately. Administrators can set these for anyone; everyone can set their own.
| Notification | Sent when |
|---|---|
| Every new task | A task is created. |
| Every new comment | Someone adds a comment. |
| Every status change | A task moves to a different status. |
What your workspace emails out is controlled separately. Explore Email Notifications
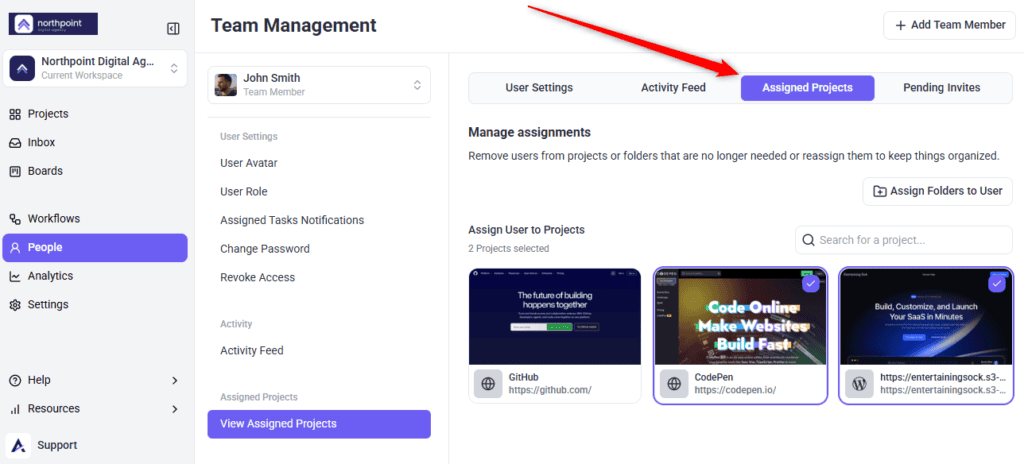
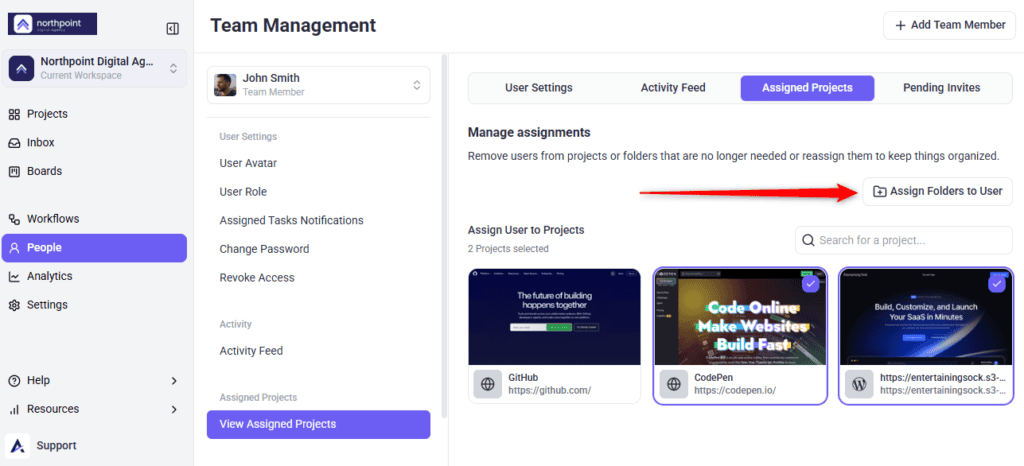
Assigning Someone to Projects
Adding a person to the workspace gives them no projects at all. Until they are assigned, a new team member signs in to an empty dashboard.
Instructions:
Reviewing What Someone Has Been Doing
The Activity Feed tab shows a running history. With All Users selected in the picker it covers the whole workspace; with one person selected it narrows to them. Selecting an entry takes you to the task it refers to.
Reporting across the workspace goes further than a single person’s feed. Explore Activity Tracking And Reporting
Revoking Team Access
Revoking removes the person from the workspace and asks twice, because it cannot be undone from this screen.
Instructions:
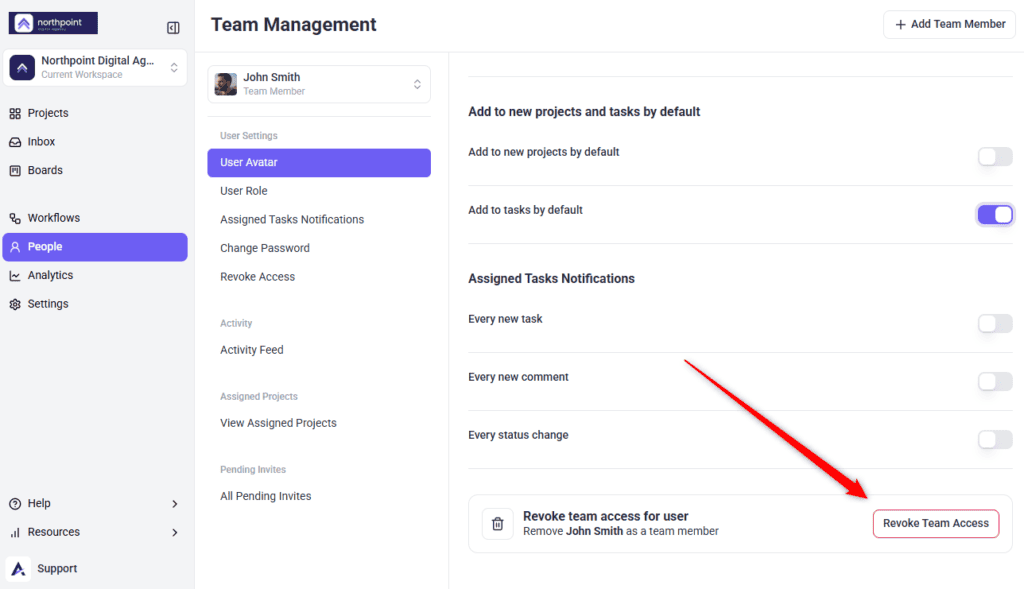
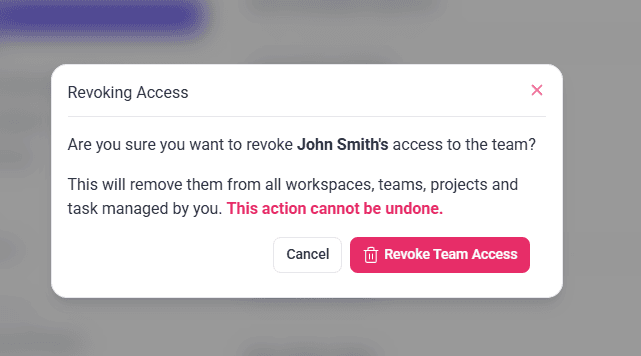
The option appears only when you are viewing someone else, and only when you are the Owner, or an administrator viewing a team member or collaborator. Nobody can remove the Owner from their own workspace, and you cannot revoke your own access from this screen.
Access is held per workspace, so it is worth knowing how workspaces divide your work. Read Managing Your Workspaces
Adding Collaborators
Collaborators — clients, stakeholders, reviewers — are added from a project rather than from this screen, because their access is scoped to particular projects rather than to the workspace as a whole. That is why the invite form here deliberately offers two roles instead of four.
Once a collaborator has joined a project they do appear in the People list, and an administrator can manage their role, assignments, and access from here like anyone else.
Two-Factor Authentication
The Two-Factor Authentication section appears only when you are viewing your own profile as the workspace owner. You cannot switch it on or off on someone else’s behalf — each person manages their own. While it is enabled on an account, signing in with Google is not available for that account.
Two-factor authentication is set up per account. See How To Enable Two-Factor Authentication
Benefits
| Benefit | In practice |
|---|---|
| People land somewhere useful | Assigning projects at the same time as inviting means nobody signs in to an empty dashboard and asks what to do. |
| Seats go where they matter | Collaborators are free, so clients and reviewers never eat into the seats your team needs. |
| Access matches reality | Revoking access when someone leaves keeps a workspace from quietly accumulating people who no longer work with you. |
| Notifications stay meaningful | Defaults set deliberately, per person, mean alerts are worth reading rather than worth muting. |
| Folders do the repetitive work | One folder assignment replaces a dozen individual project assignments, and stays right as projects are added. |
| Roles are workspace-specific | A contractor can be trusted with one client’s workspace without gaining anything in the others. |
Example Use Cases
| Situation | What to do |
|---|---|
| Onboarding a new designer | Invite as Team Member, then assign the folder covering their clients before their first day. |
| A freelancer on one project only | Invite as Team Member and assign that single project. Revoke access when the engagement ends. |
| A client who now edits rather than reviews | Change their User Role from Collaborator to Team Member. Check you have a seat first. |
| Onboarding several people at once | Add a row per person in one invite submission, up to twenty, rather than sending them individually. |
| Hitting the user limit unexpectedly | Clear stale invitations on Pending Invites before upgrading — they hold seats too. |
| Someone leaving the company | Revoke access in every workspace they belonged to. Removing them from one does not remove them from the others. |
Known Limitations
FAQs
Can I change someone’s role after inviting them?
Yes. Select them in the picker, open User Settings, and change User Role. It saves immediately.
Why can’t I invite a Collaborator from the People screen?
Collaborator access is scoped to particular projects rather than the whole workspace, so it is granted from a project. Once they have joined, you can manage them here like anyone else.
Do collaborators use up my plan’s seats?
No. Only administrators and team members consume seats. Promoting a collaborator to either of those roles does.
Does a pending invitation count against my user limit?
Yes, from the moment it is sent. Deleting an unaccepted invitation returns the seat straight away.
How many people can I invite at once?
Up to 20 in a single submission, with a limit of 5 submissions every 10 minutes.
What happens to someone’s tasks when I revoke their access?
Their tasks, comments, and activity history stay in place. Only their access is removed.
Does revoking access remove them from my other workspaces?
No. It applies to the workspace you have selected. Revoke them in each workspace they belong to.
Can I resend an invitation?
Yes, from the Pending Invites tab. It sends the same link again, so any copy they already have still works.
Can I remove the Owner?
No. The workspace owner cannot be removed from their own workspace by anyone.
Can I turn on two-factor authentication for my team?
No. Each person enables it on their own account. You cannot do it on their behalf from this screen.
Common issues
- People is missing from the sidebar — your role in this workspace is Team Member or Collaborator. Ask an administrator.
- The page opens on your own settings with no team list — your access is limited to your own account here. Your profile, password and notifications still work normally.
- “Please review your input!” — a row failed validation, usually a missing first name or a malformed email. The affected fields are highlighted.
- “Some email(s) are already taken!” — that address already belongs to someone in this workspace. Check the team list and Pending Invites.
- Invitations stop sending — you have hit 5 requests in 10 minutes. Wait, and batch people into one submission next time.
- “User limit reached” when changing a role — delete unused pending invitations, revoke access for people who have left, or upgrade your plan.
- The invitee says the link did nothing — they already had an Atarim account, so the link joined them silently. Ask them to sign in and switch workspaces.
- User Settings and Assigned Projects are greyed out — nobody is selected. Choose a name in the picker.
- Revoke Team Access is not shown — you are viewing yourself, the account holder, or another administrator.
- A new team member signs in and sees nothing — they have joined the workspace but have no projects. Assign projects or a folder.
Conclusion
Invite with the right role, assign the projects in the same sitting, and revoke access the week someone leaves rather than the quarter after. Three habits, and the People screen stops being something you audit and starts being something you trust.
Folders make the assignment half of that almost free. Explore Adding And Managing Folders
Tips & best practices
- Assign projects in the same sitting as the invitation. An unassigned team member has nothing to log in to.
- Default to Team Member. Administrator reaches billing and settings, which most people never need.
- Use folders rather than individual project assignments — new projects in the folder are covered automatically.
- Audit Pending Invites monthly. Forgotten invitations quietly hold seats.
- Keep collaborators as collaborators unless they genuinely need a seat’s worth of access.
- Revoke access in every workspace when someone leaves, not just the one you happened to be in.
- Turn on Add to new projects by default for one or two people at most.