Manage Your Account and Billing
Review your plan and usage, update payment details, change or cancel your subscription, and download past invoices.
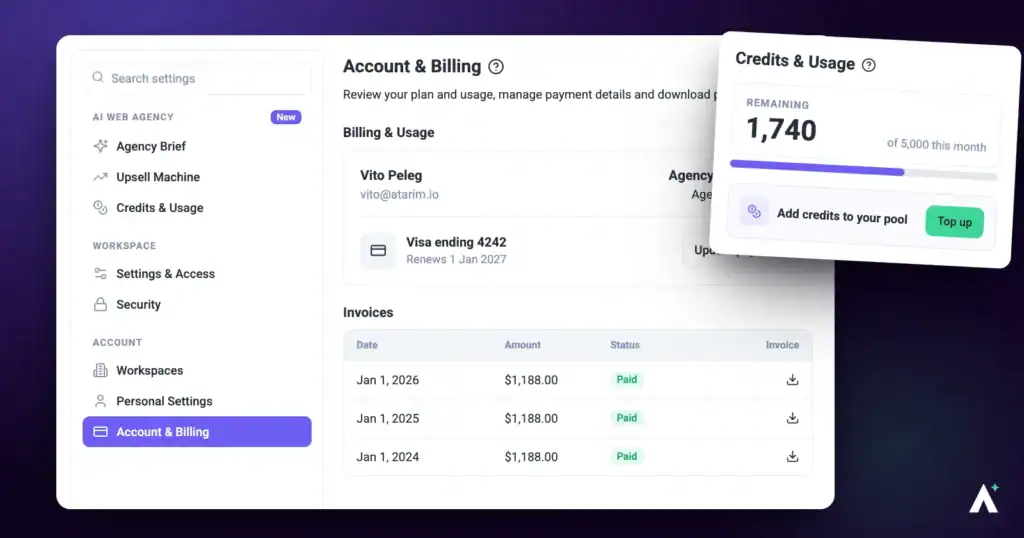
Account & Billing is the single place to see what you are paying for and what you are actually using. It shows your current plan and price, how close you are to your seat, workspace, and project limits, how many AI credits you have consumed, the card and address on file, and every invoice Atarim has issued you.
Everything on this screen is account-level rather than workspace-level. Switching workspaces does not change what you see here — there is one subscription per account, and it covers every workspace on it.
Account & Billing lives inside Settings, which is administrator-only. It appears only when your role in the currently selected workspace is Owner or Administrator. Team Members and Collaborators will not see Settings in the sidebar at all, and therefore cannot reach billing.
In practice that means the people who need this screen are the ones who own the subscription: whoever decides the plan, adds or removes seats, keeps the card current, and pulls invoices for accounting. If that is not you, the person to ask is your Owner.
How to open Account & Billing
Account & Billing sits at the bottom of settings, apart from the workspace settings, because it covers the account as a whole.
Instructions:
- From the main dashboard, select Settings in the left navigation.The Settings screen opens. Settings is administrator-only — if it is not in your sidebar, your role does not have access.
- Scroll to the Account group at the bottom of the settings navigation.
- Select Account & Billing.The panel opens, headed Account & Billing with the description “Review your plan and usage, manage payment details and download past invoices.”
What the panel contains
| Section | What it covers |
|---|---|
| Billing & Usage | Your account name and email, current plan and price, licence count, usage meters, AI credit consumption, and the Cancel Plan and Change Plan buttons. |
| Payment Information | The card on file, the billing address, and your billing interval. |
| Invoice Information | A sortable table of every invoice, each with a download action. |
Reading the Billing & Usage card
The card opens with your name and email on the left, and your plan on the right — the plan name followed by its price and billing cycle. Some older free accounts show Free Forever instead of a price.
If you have an AI credit add-on, it appears as a second line beneath the plan with its own price and cycle. Where your account carries more than one subscription, a small chevron button appears next to the plan — selecting it expands an itemised breakdown showing each subscription and its individual price.
Below that sits your licence count, shown as the plan name followed by Licenses and a number.
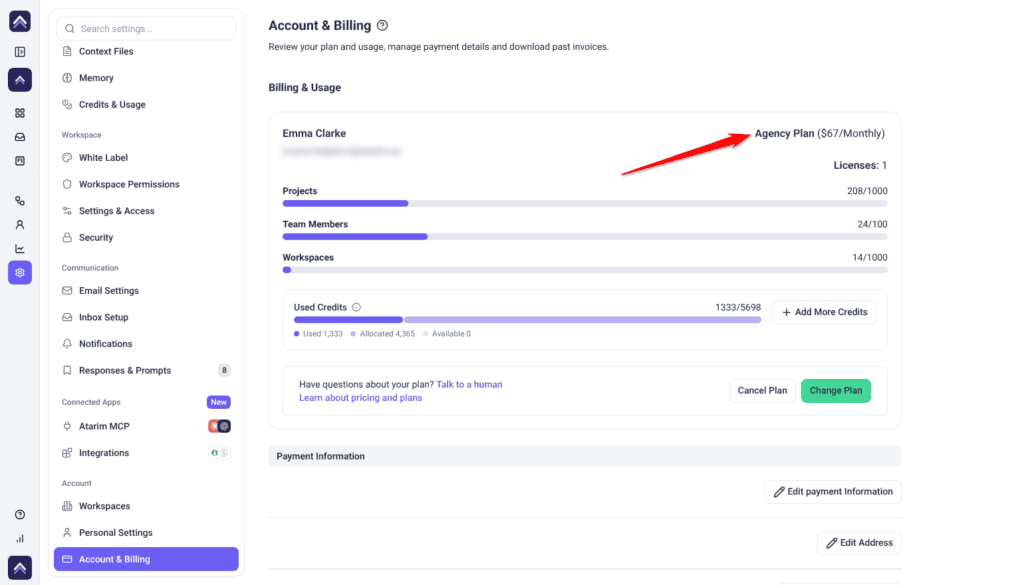
The usage meters
Three meters show how much of your plan allowance you have consumed:
| Meter | What it counts |
|---|---|
| Projects | Websites and projects created across every workspace on the account. |
| Team Members | People occupying a seat on the account. This is the same figure the cancellation flow calls Seats. |
| Workspaces | Workspaces created on the account, including your default one. |
Beneath the meters is your AI credit usage for the current period. To buy more, select Add More Credits beside it; the steps are in Topping Up Your Credits. For a full breakdown of what consumes credits, see the Credits & Usage article.
Getting help from the card
At the bottom of the card, Talk to a human opens a live chat with the Atarim team, and Learn about pricing and plans opens the public pricing page in a new tab.
Payment Information
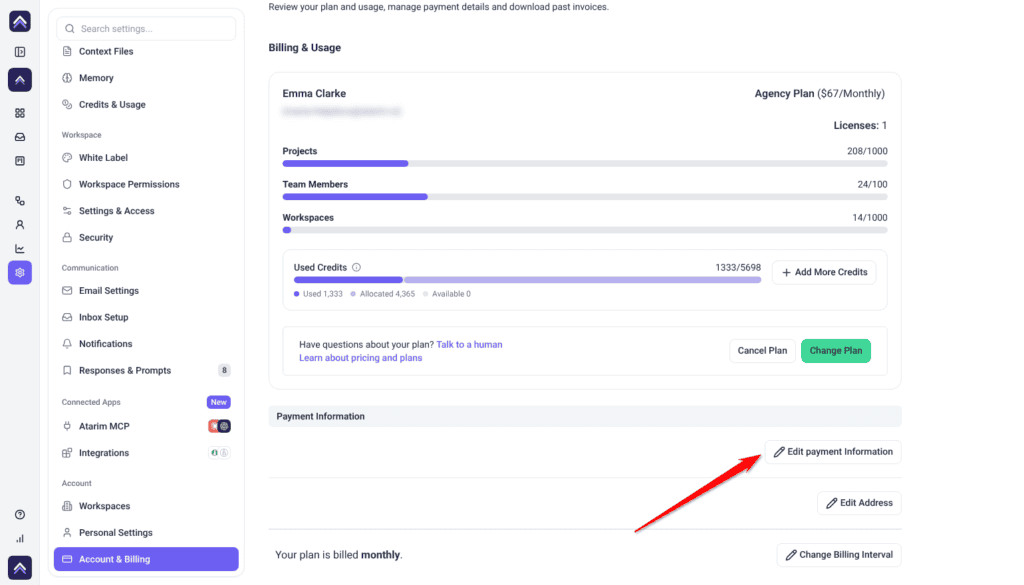
This section holds three rows, each with its own edit button on the right.
| Row | What it shows | Button |
|---|---|---|
| Card | Your card brand logo and the masked card number. | Edit payment Information |
| Address | Your billing address — street, city, state, and country. Stays blank until an address is saved. | Edit Address |
| Billing interval | “Your plan is billed monthly” or annually. Accounts with no subscription show “You have no plan.” | Change Billing Interval |
Updating your card
Card details are handled inside the payment provider's own window, so Atarim never sees the number.
Instructions:
- In the Payment Information section, select Edit payment Information.A secure payment portal opens in a separate window, on the payment methods section.
- Add, replace, or remove a card inside that window, then close it.The card row updates to show the new brand and masked number.
Updating your address follows the same pattern using Edit Address, which opens the address section of the same window.
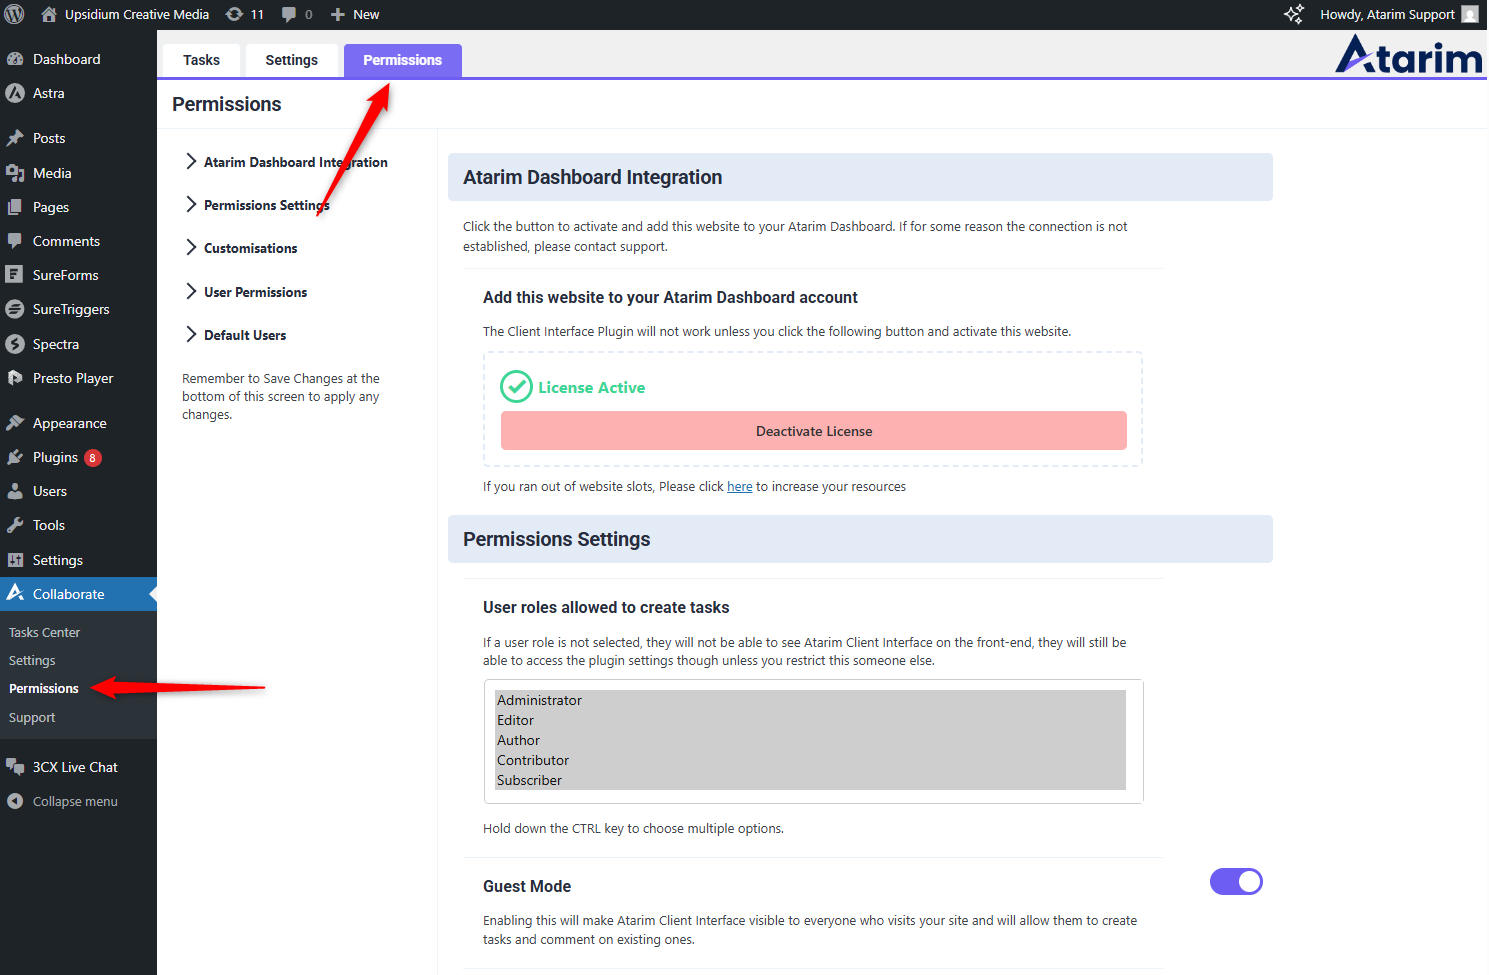
Finding and downloading invoices
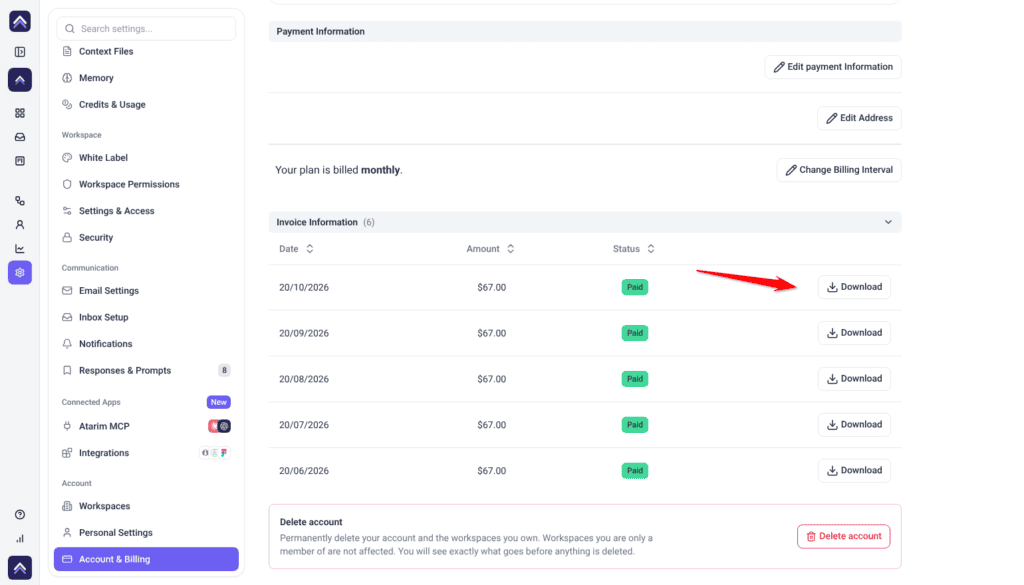
The Invoice Information table lists every invoice on the account with four columns — Date, Amount, Status, and a download action. Amounts are shown in the currency of each invoice, and the status appears as a colored badge. The section heading shows how many invoices there are, and an unpaid badge if any are unpaid.
Instructions:
- Scroll to Invoice Information, below Payment Information. If the section is closed, select its heading to open it. Invoices load newest first.
- Select the Date, Amount, or Status heading to sort by that column. Selecting the same heading again reverses the direction.
- Select Download on the invoice you need.The invoice PDF downloads through your browser.
Changing your plan
The change takes effect as soon as payment completes, rather than waiting for your next renewal. Only the workspace Owner can upgrade.
Instructions:
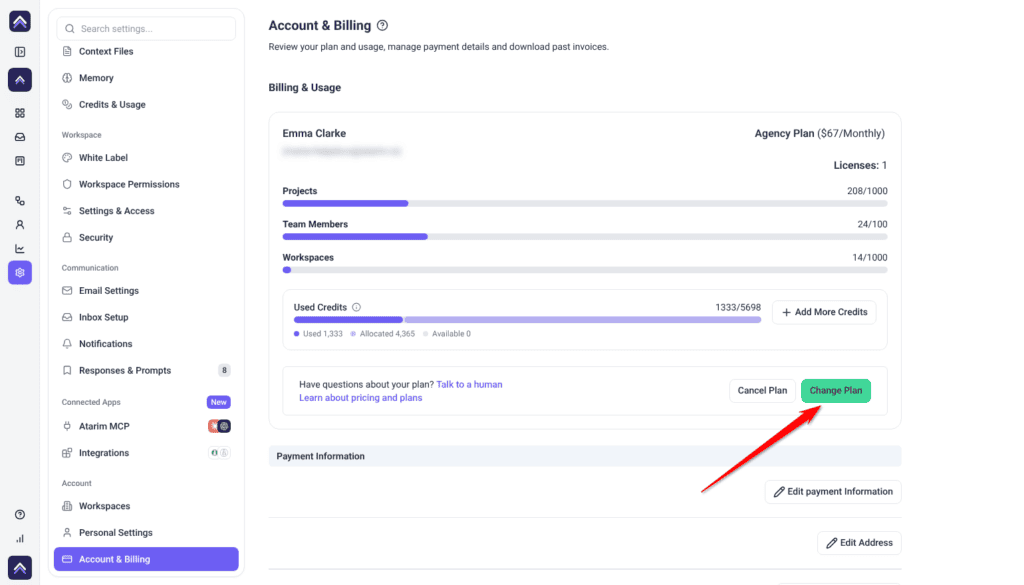
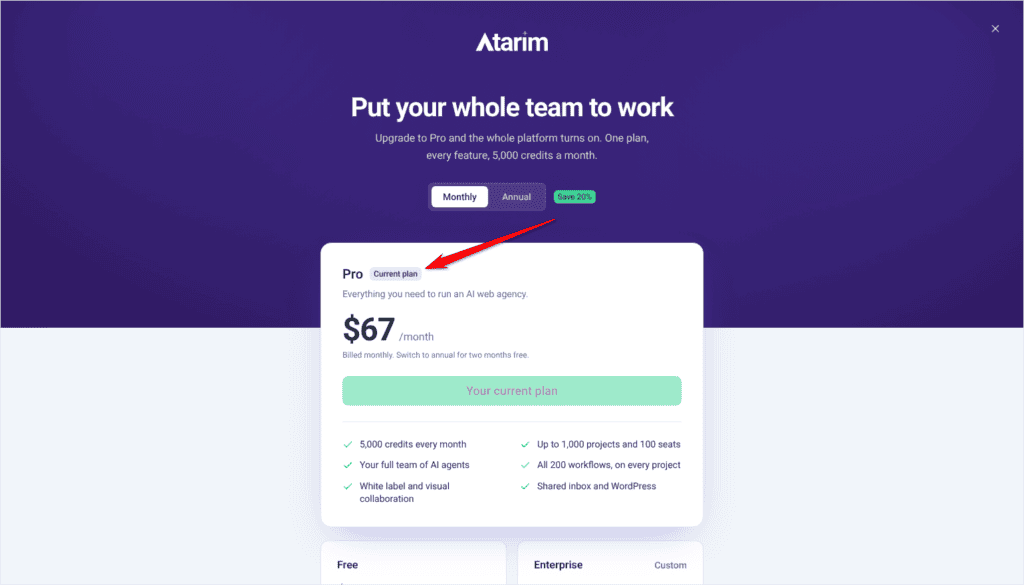
- In the Billing & Usage card, select Change Plan.The plan selection window opens, showing the plans available to your account alongside what each includes.
- Choose the plan you want and follow the checkout steps. Enterprise offers Book a call instead of checkout. On a legacy plan, contact Support to move to a current plan first. Once payment completes, your plan, limits, and usage meters update. An upgrade also unlocks any workspaces that were locked for exceeding your previous allowance.
When a feature is locked
Some features are only on paid plans. A locked control carries a small badge naming the plan that includes it, such as Pro. Hovering over the badge, or selecting the feature, shows what it does and a Subscribe to Pro button. The full upgrade window, Upgrade to Pro, also has a Compare plans link.
Only the workspace owner can subscribe from these. For anyone else, Administrators included, the button is greyed out and its tooltip reads “Contact your admin to unlock this feature”, so pass the request to your owner. On the highest plan, the window offers Book a call instead.
Your plan also shows up in a few other places:
- Free trial. A Trial card at the bottom of the sidebar shows which day of the trial you are on, with Upgrade Your Account. Once the trial is over, Upgrade Account appears in the sidebar instead.
- Expired subscription. A card marked Expired says “Your subscription has expired”. Restore Access Now opens the plan options.
- Out of project slots. Adding a project at your limit opens You Ran Out of Project Slots. If you have more active projects than your plan allows, the extra ones show Project Locked and Upgrade Now. Archiving a finished project frees its slot. Explore Archiving Projects
- Locked workspaces. A workspace over your allowance shows Workspace locked in the workspace switcher.
- Checking your usage. Resources at the bottom of the sidebar shows how many projects, team members, workspaces and AI credits you have used. Administrators also see Increase Resources, which opens the plan options. Learn More About Navigating the Dashboard
Cancelling your plan
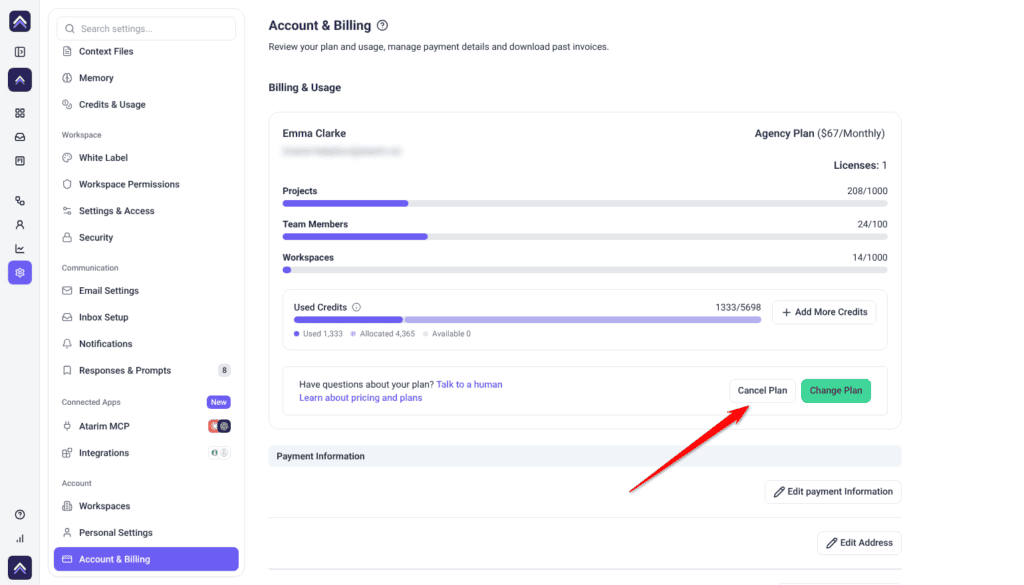
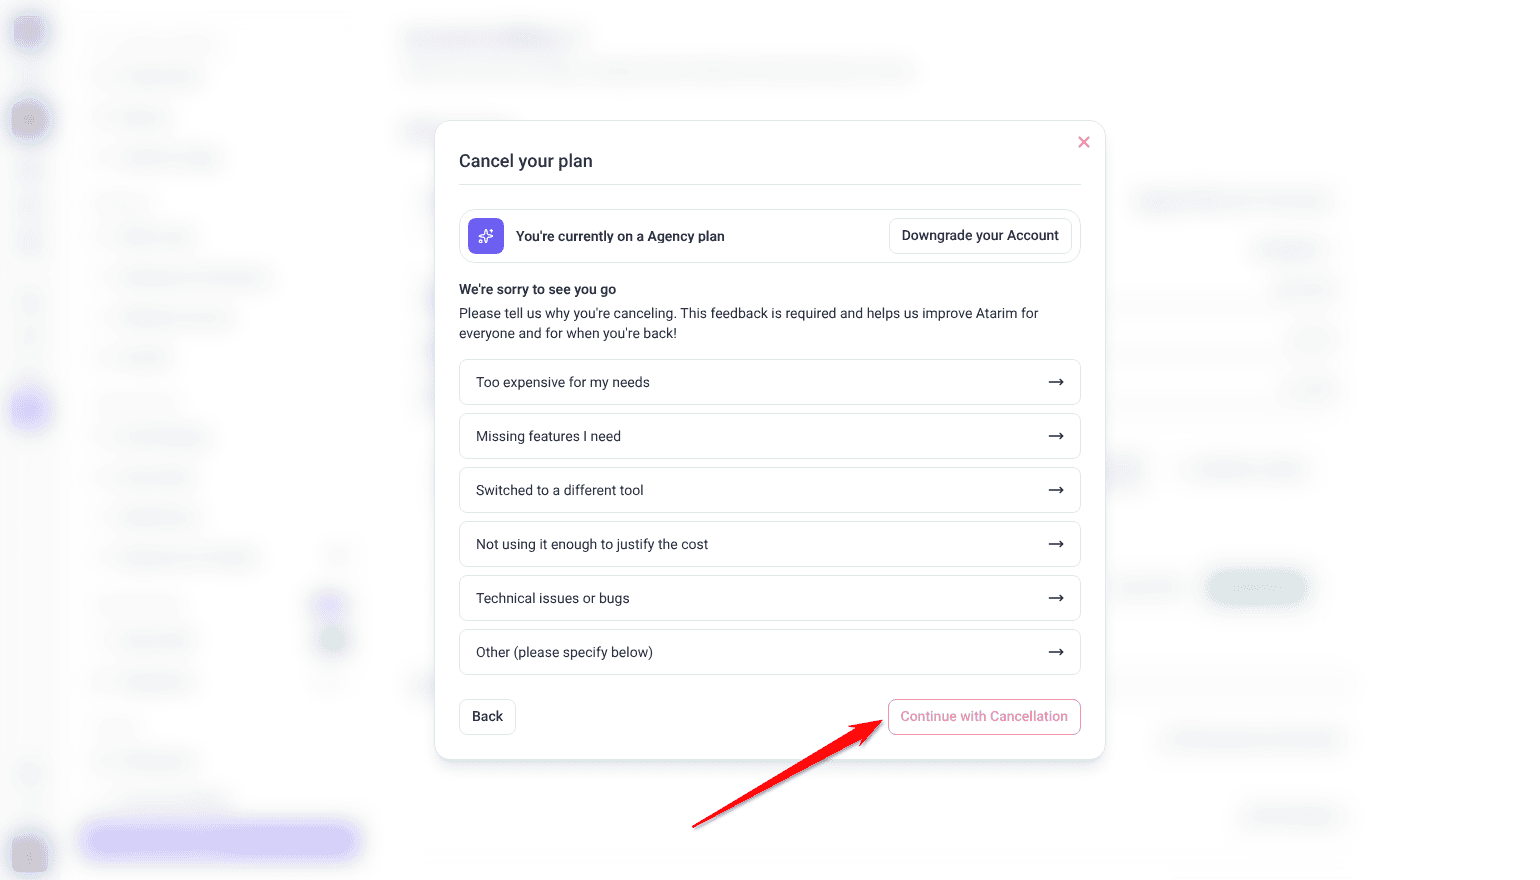
Cancel Plan sits next to Change Plan in the Billing & Usage card. It opens a three-step flow rather than cancelling immediately.
| Step | What it asks | Action button |
|---|---|---|
| 1. Cancel your plan | Opens with “We’re sorry to see you go” and asks why you are cancelling. Choosing a reason is required before you can continue. | Continue with Cancellation |
| 2. Cancel your plan | Asks “Are you sure you want to cancel?” and spells out which plan you will move to and exactly how many projects, seats, and workspaces you would lose. | Yes, Cancel Plan |
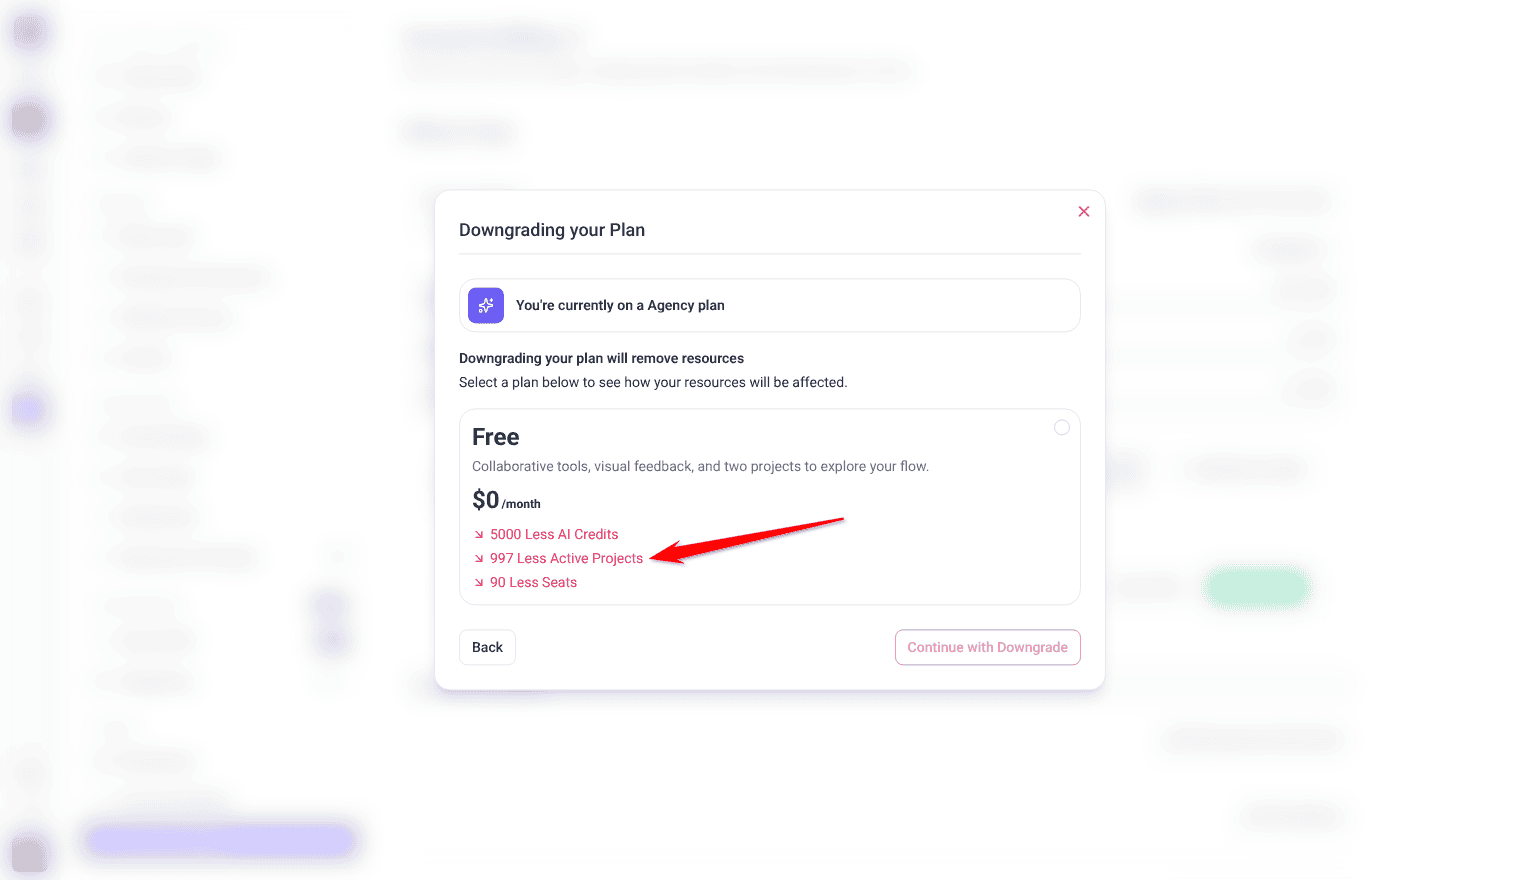
| 3. Downgrading your Plan | Offers a cheaper plan as an alternative to cancelling outright, with the same over-limit comparison for each option. | Continue with Downgrade |
The cancellation reasons
Step one offers six options: Too expensive for my needs, Missing features I need, Switched to a different tool, Not using it enough to justify the cost, Technical issues or bugs, and Other (please specify below). Choosing Other reveals a free-text box, which you need to fill in before you can continue.
Downgrading instead of cancelling
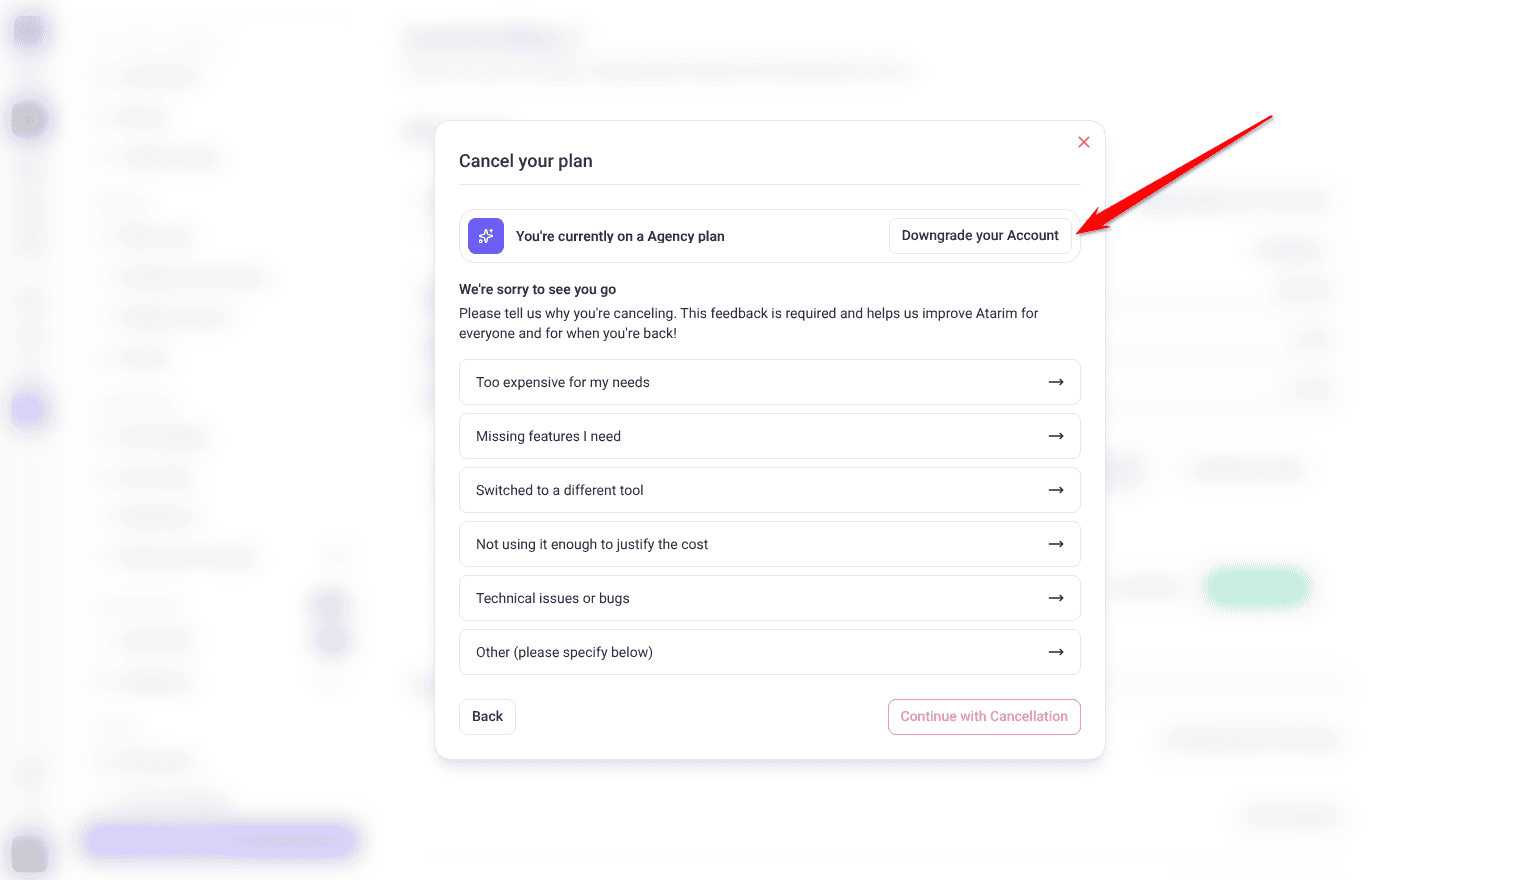
Every step of the cancellation modal carries a banner at the top reading “You’re currently on a [plan] plan”. On the right of that banner is Downgrade your Account, which switches the modal into the downgrade view at any point — including immediately, before you have picked a cancellation reason.
Instructions:
- In the cancellation modal, select Downgrade your Account.The modal changes to Downgrading your Plan and prompts you to “Select a plan below to see how your resources will be affected.”
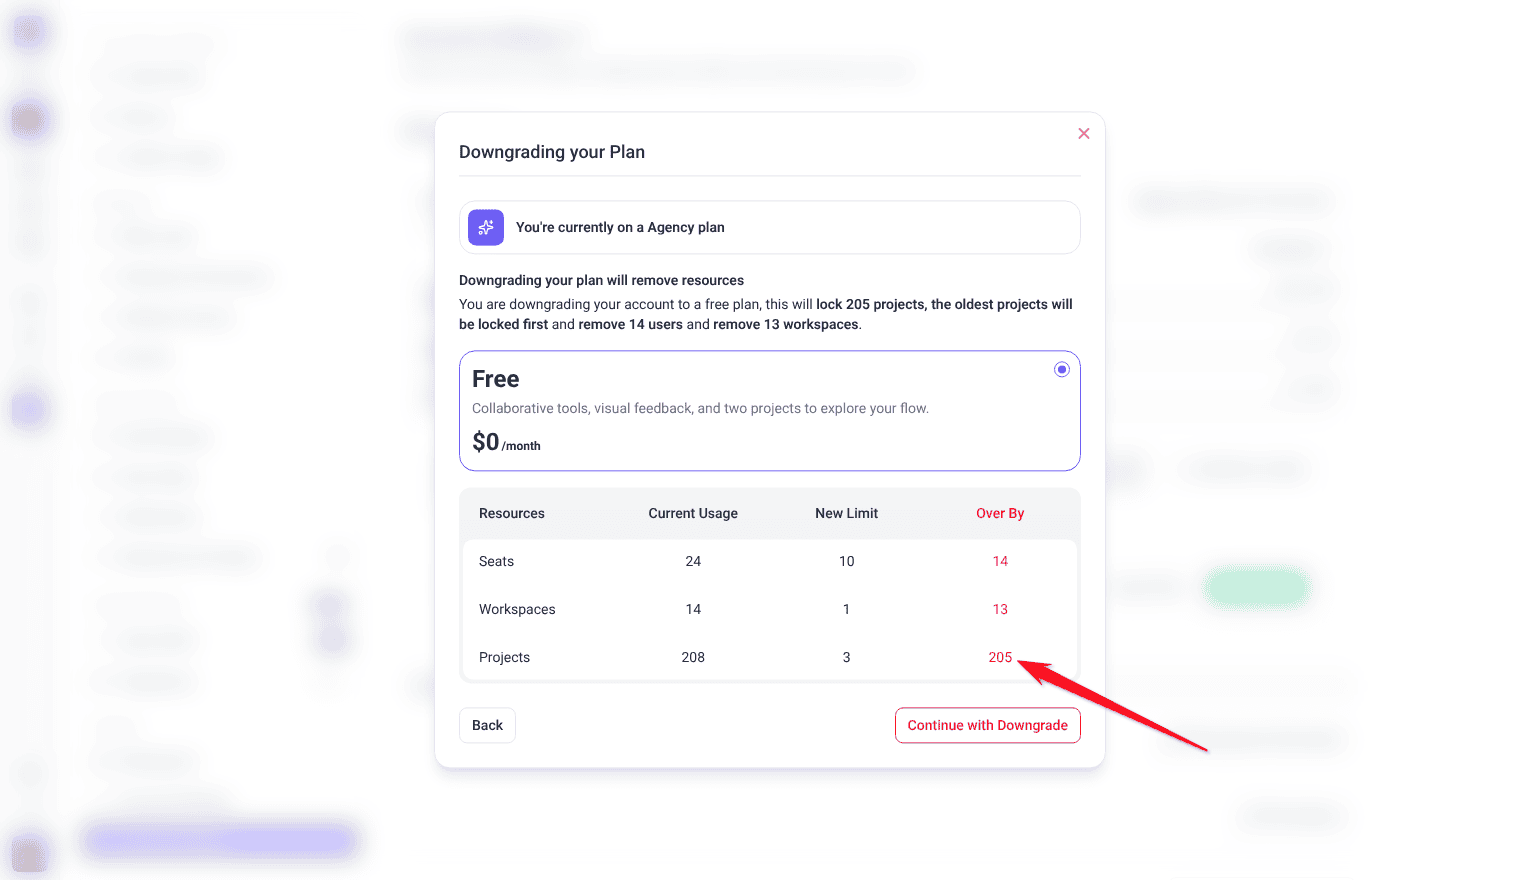
- Select one of the plan cards. Each shows the plan name, a short description, and its price.A comparison table appears with four columns — Resources, Current Usage, New Limit, and Over By — covering seats, workspaces, and projects. The Over By column is highlighted in red wherever you exceed the new plan.
- Read the summary sentence above the table, which spells out how many projects you would lose access to and how many seats and workspaces would be removed.
- Select Continue with Downgrade to proceed to checkout, or Back to return to the previous step.The button stays disabled until a plan is selected.
Leftover AI credit subscriptions
AI credit packs are billed as their own separate subscription. Cancelling to Free cancels any recurring credit pack as well, but a downgrade to a paid plan keeps your packs. If a pack is still renewing on a free account, a warning appears in the Billing & Usage card noting the recurring credit subscription and offering a Cancel credit packs button to stop it directly.
What you see on different account types
Not every control appears on every account:
| Account type | What is different |
|---|---|
| Free | Cancel Plan is hidden — there is no paid subscription to cancel. Change Plan remains available. |
| Legacy plans | Cancel Plan is hidden. Contact Support to make changes to a legacy subscription. |
| Enterprise | The entire Payment Information section is hidden, along with both Cancel Plan and Change Plan. Enterprise billing is handled directly with the Atarim team. |
| Licence-based | Plan name and cycle are drawn from the licence rather than a subscription, and the licence count is shown beneath the plan. |
Known limitations
- Billing is account-wide, not per workspace. You cannot bill workspaces separately or split an invoice across clients.
- There is no in-app refund request. Cancelling moves you to the Free plan straight away. Anything else needs Support.
- The card and address cannot be edited without the payment portal loading. If it is blocked, no fallback form is offered.
FAQs
Does Atarim store my card details?
Card and address details are entered into a secure payment portal that opens in a separate window, not into an Atarim form.
What happens the moment I cancel?
Your account moves to the Free plan straight away, with the limits of the Free plan, and you are not charged for the paid plan again. Paid features do not run on to the end of the term you have paid for. If you need the rest of that term, contact Support before you confirm the cancellation.
Can I get a refund for the rest of my term?
Not through the dashboard. Cancelling stops the next renewal rather than refunding the current period.
Will I lose my projects if I downgrade?
You lose access to any projects over the new plan’s limit. They are locked, not deleted. The confirmation step tells you how many before you commit. Reduce your usage first if you want to keep working on everything.
Can I switch from monthly to annual billing?
Yes, using Change Billing Interval in the Payment Information section.
Why can’t I see Payment Information at all?
Enterprise accounts have that section hidden, since billing is managed directly with the Atarim team.
Do I need a separate subscription for each workspace?
No. One subscription covers the whole account, and your plan’s workspace allowance determines how many you can run.
My invoice total doesn’t match my plan price. Why?
The total can include more than your base plan. Credit packs and add-ons are billed on top of it, and a mid-term plan change is prorated, so the invoice reflects those line items too. Open the invoice to see the breakdown.
Can I add more users without changing my plan?
Yes, on a paid plan. If you invite more team members than you have free seats, the extra seats are added to your current plan at a per-seat price. The invite window shows the extra cost and takes you through checkout before the invitation is sent. On the Free plan or a trial, you need to upgrade first. Pending invitations count towards your seats, but clients, collaborators and guests do not use one. Check the Team Members meter in Billing & Usage to see where you stand.
Conclusion
Account & Billing is worth visiting before you need it rather than after. The usage meters are the early warning for a plan that no longer fits, the invoice table is where a failed payment shows up first, and the cancellation flow will tell you exactly what a downgrade costs you before you commit to it.
Tips & best practices
- Check the usage meters monthly. Hitting a seat or project ceiling mid-project is far more disruptive than planning an upgrade ahead of it.
- Keep the billing address current — an out-of-date address is a common cause of card declines on renewal.
- Download invoices as you go rather than at year end. It is faster than sorting through a long table when your accountant asks.
- If you cancel, come back to this screen afterwards and confirm no AI credit subscription is still renewing on its own.
- Before any downgrade, reduce projects, seats, and workspaces to fit the target plan yourself, so you decide what stays available.
- Use Talk to a human for anything involving refunds, legacy plans, or Enterprise billing — those cannot be resolved from the dashboard.