Hosting: rocket.net and InstaWP
Manage the hosting your sites run on from inside Atarim — rocket.net and InstaWP, including spinning up staging environments in a click.
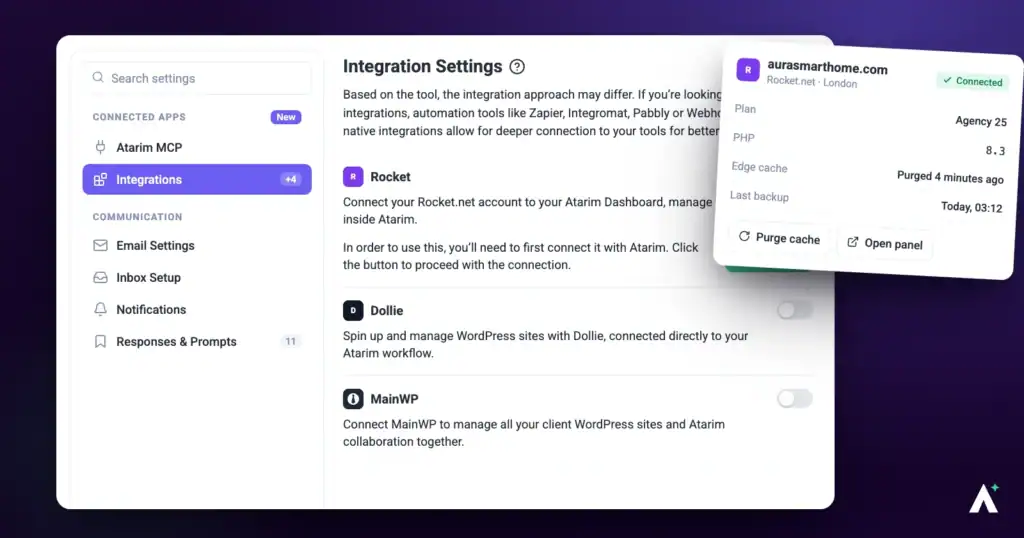
Two of Atarim’s integrations sit apart from the rest. Where the others push tasks to a project tool, rocket.net and InstaWP connect the hosting underneath your sites — so you can create staging environments and manage those sites from your Atarim dashboard rather than switching between control panels.
Most of this article covers rocket.net, which has the deeper set-up. InstaWP is further down, and the last section covers what Atarim’s AI can and cannot do on either host.
| What it gives you | Why it helps |
|---|---|
| Hosting management inside Atarim | Your hosting sits alongside the projects and feedback it relates to. |
| One-click staging environments | Spin up a staging site without leaving the dashboard. |
| Atarim plugin installed for you | Choose Install Atarim WP Plugin when you create the site, then connect it from the site’s WordPress admin. |
Connect Rocket.net
Rocket.net manages hosting rather than pushing tasks, so the setup looks different from the project tool integrations.
Instructions:
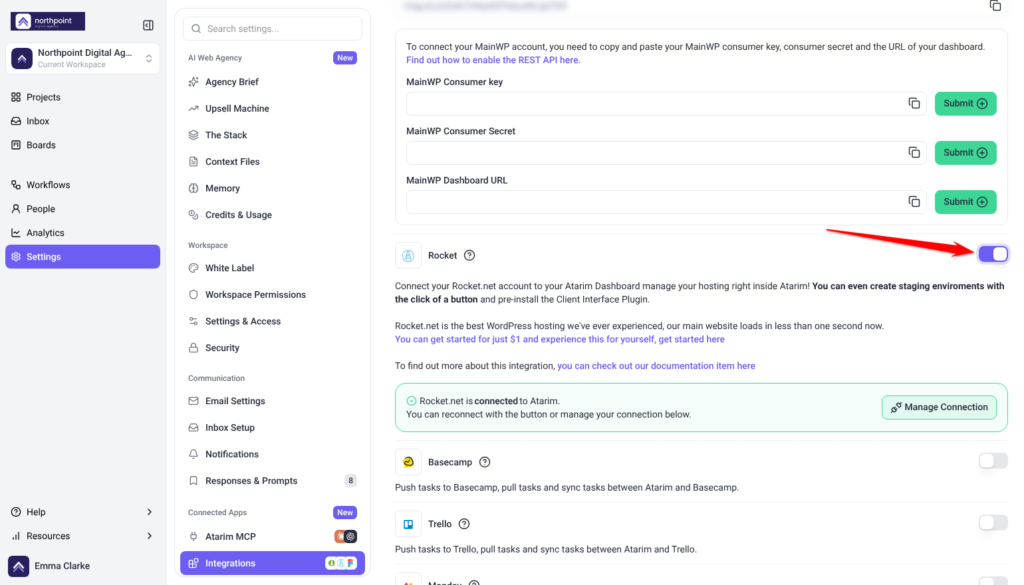
- In Atarim, go to Settings.
- Under Connected Apps, select Integrations.
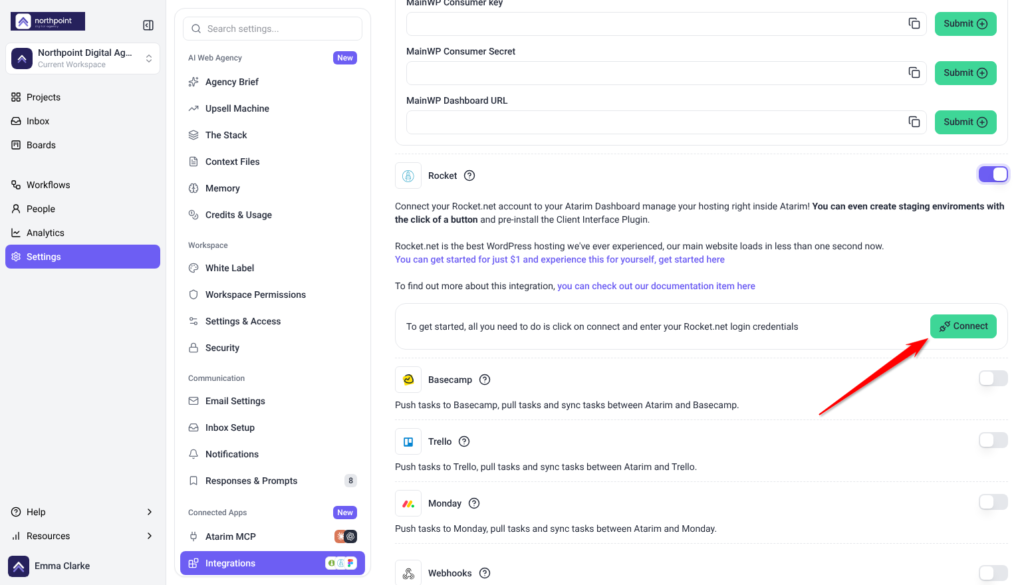
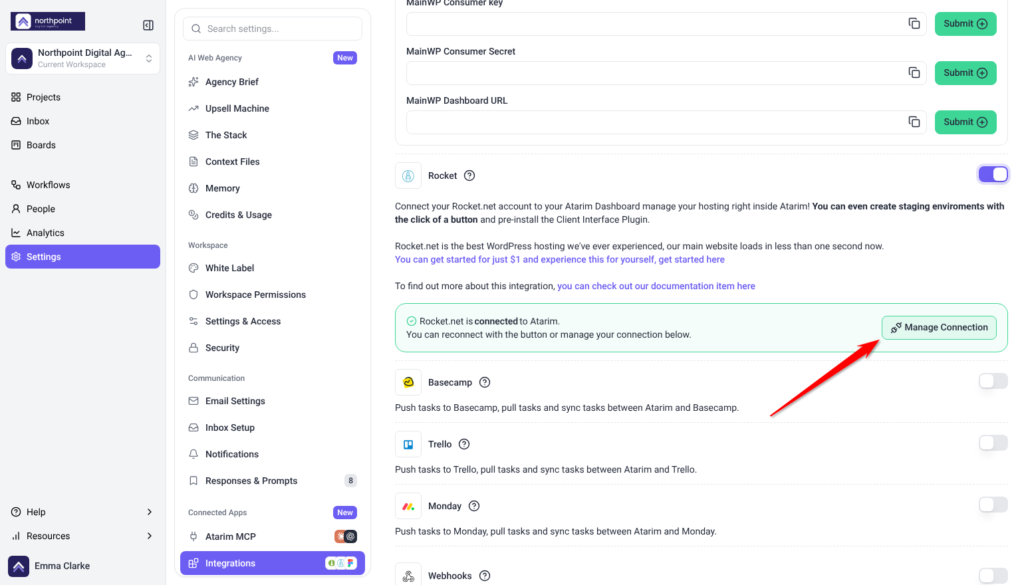
- Find Rocket in the list and switch its toggle on.
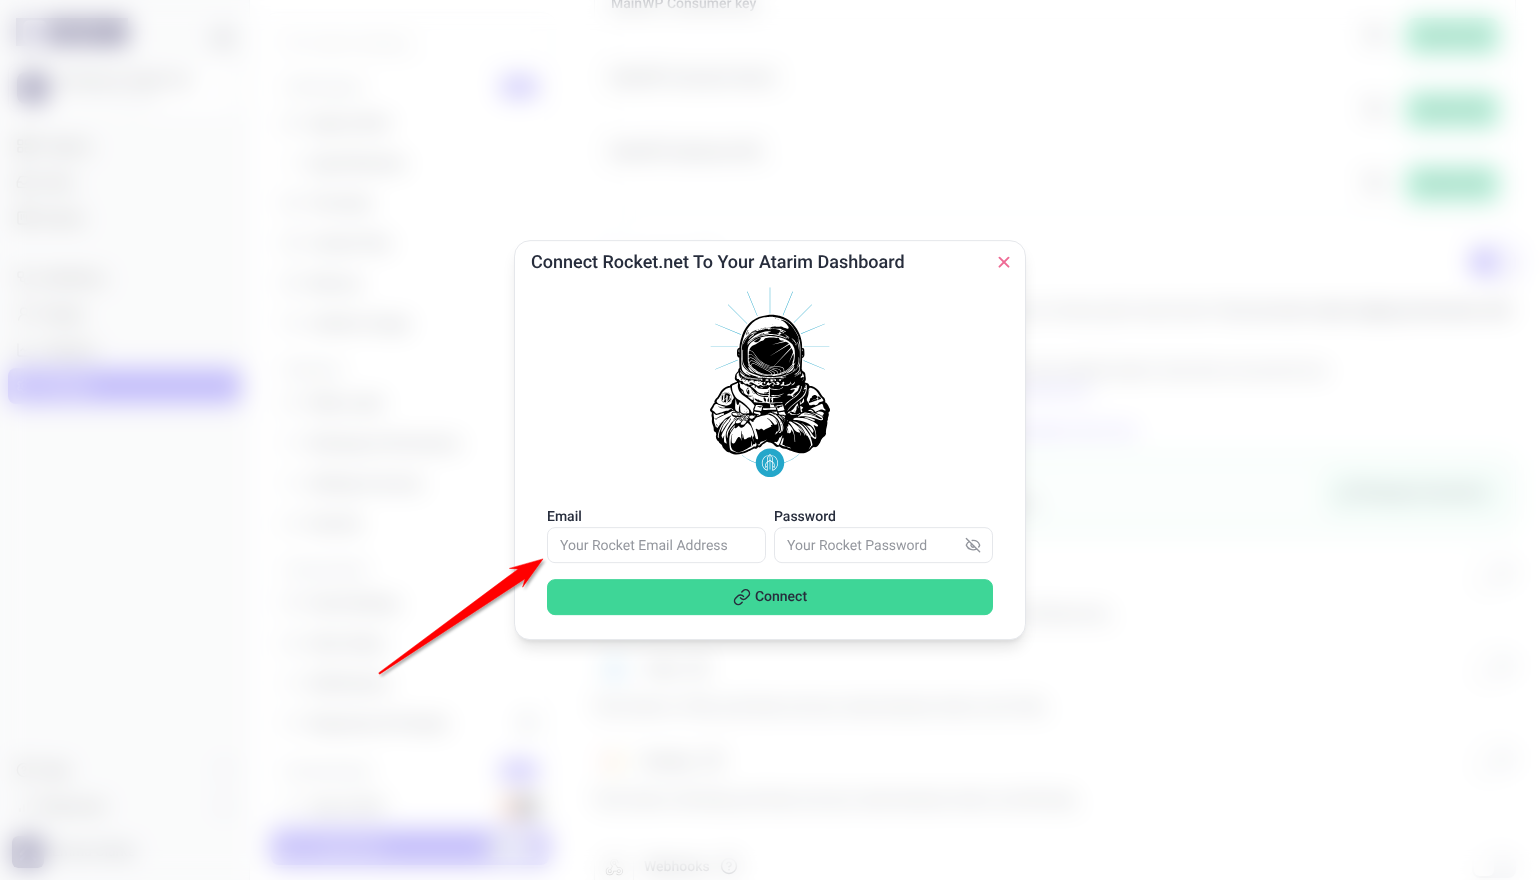
- Select Connect. The Connect Rocket.net To Your Atarim Dashboard window opens.
- Enter the Email and Password you use to sign in at rocket.net.
- Select Connect. The card then says Rocket.net is connected to Atarim, and the button reads Manage Connection.
Create a Staging Environment
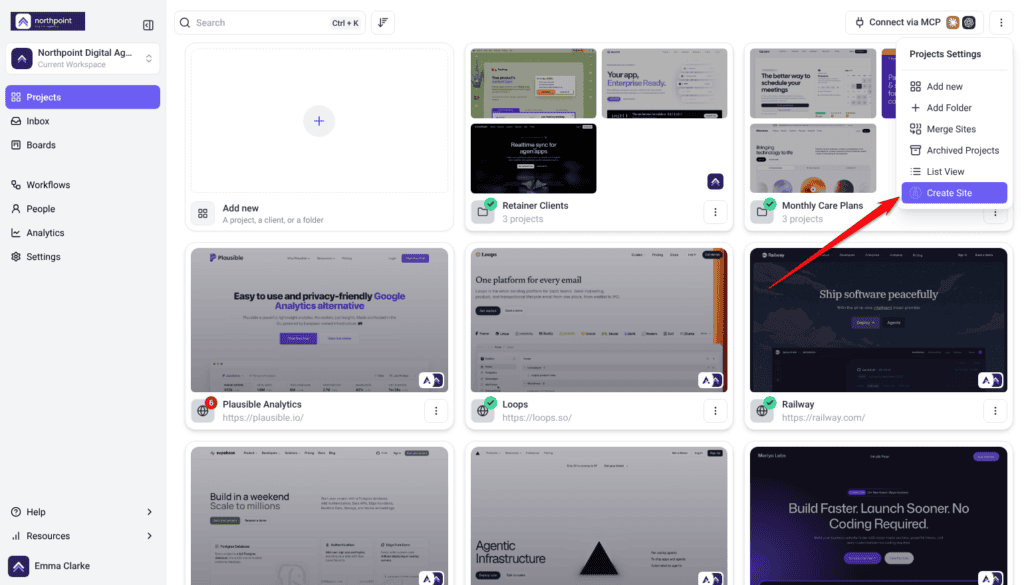
Once rocket.net is connected and switched on, Create Site appears in the Projects screen’s Project actions menu.
Instructions:
- Go to Projects.
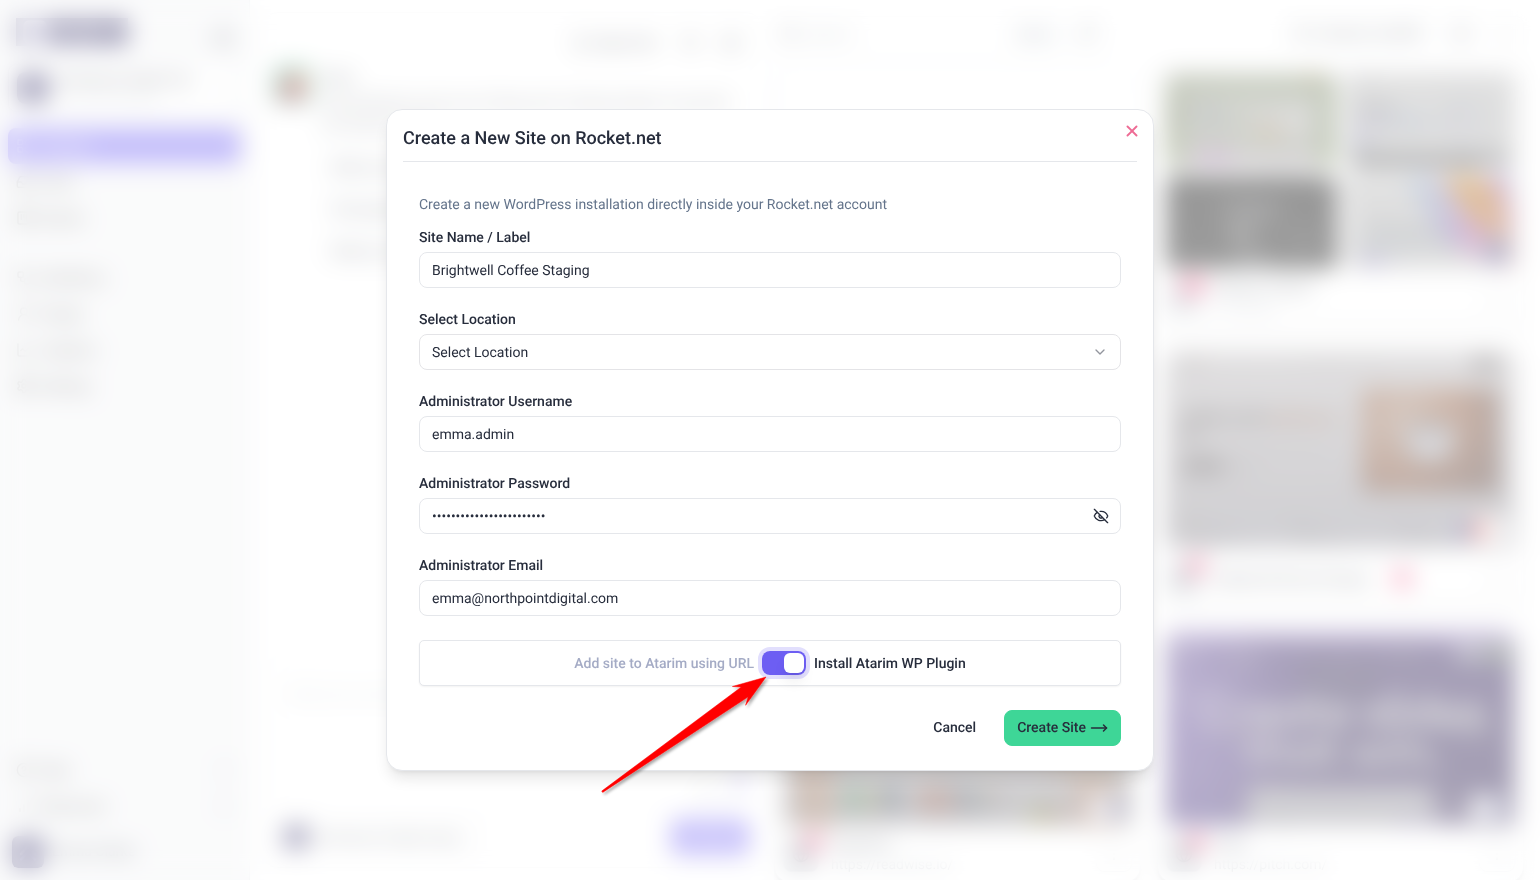
- Open the ⋮ Project actions menu and select Create Site. The Create a New Site on Rocket.net window opens.
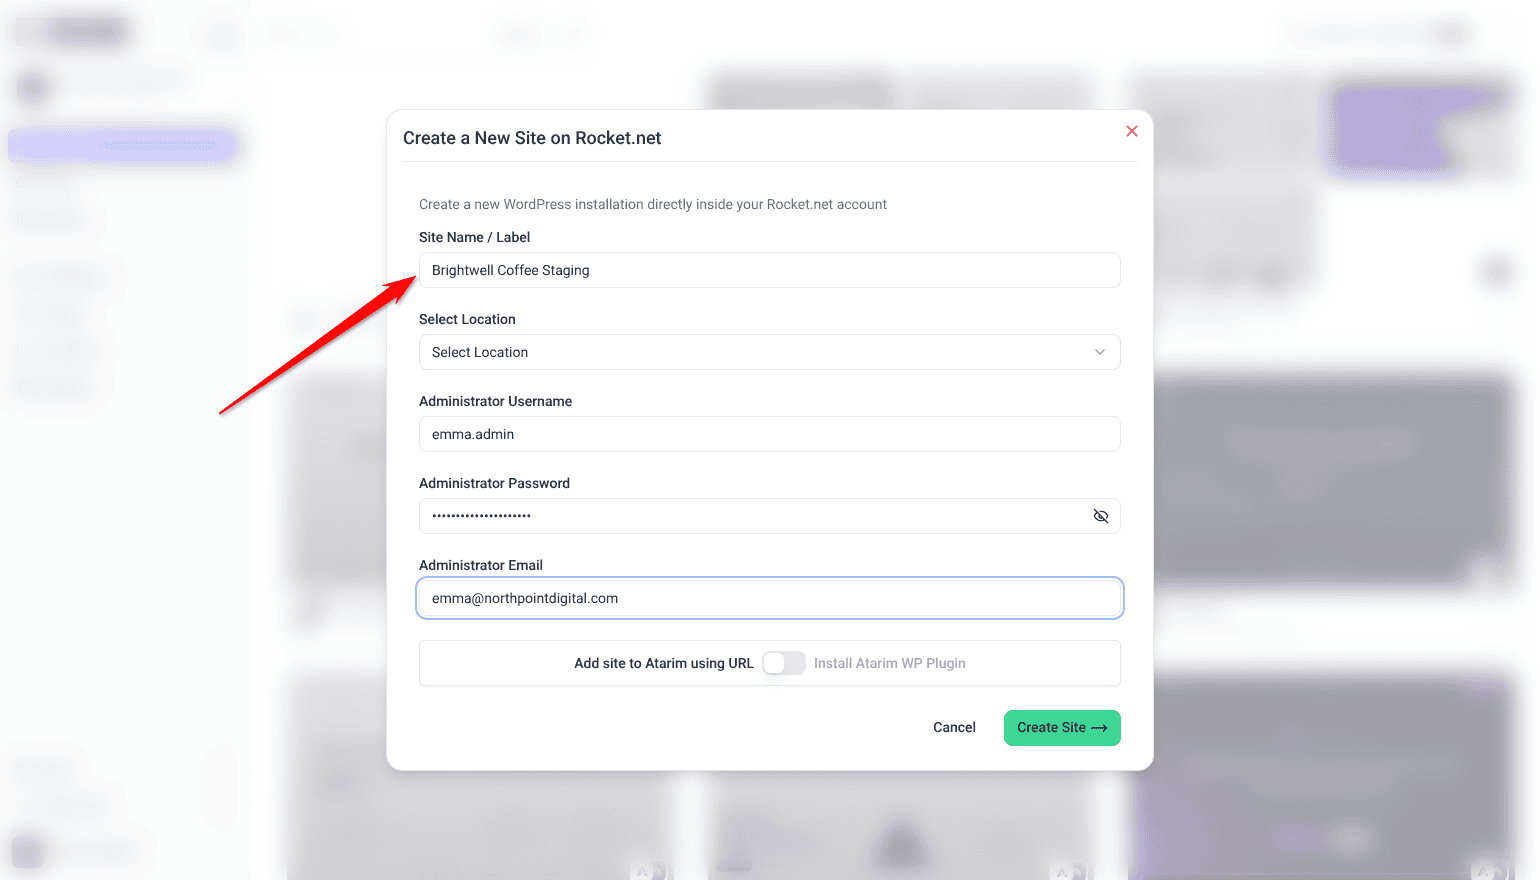
- Enter a Site Name / Label. This name is used in your Atarim dashboard and as the label in your Rocket.net dashboard.
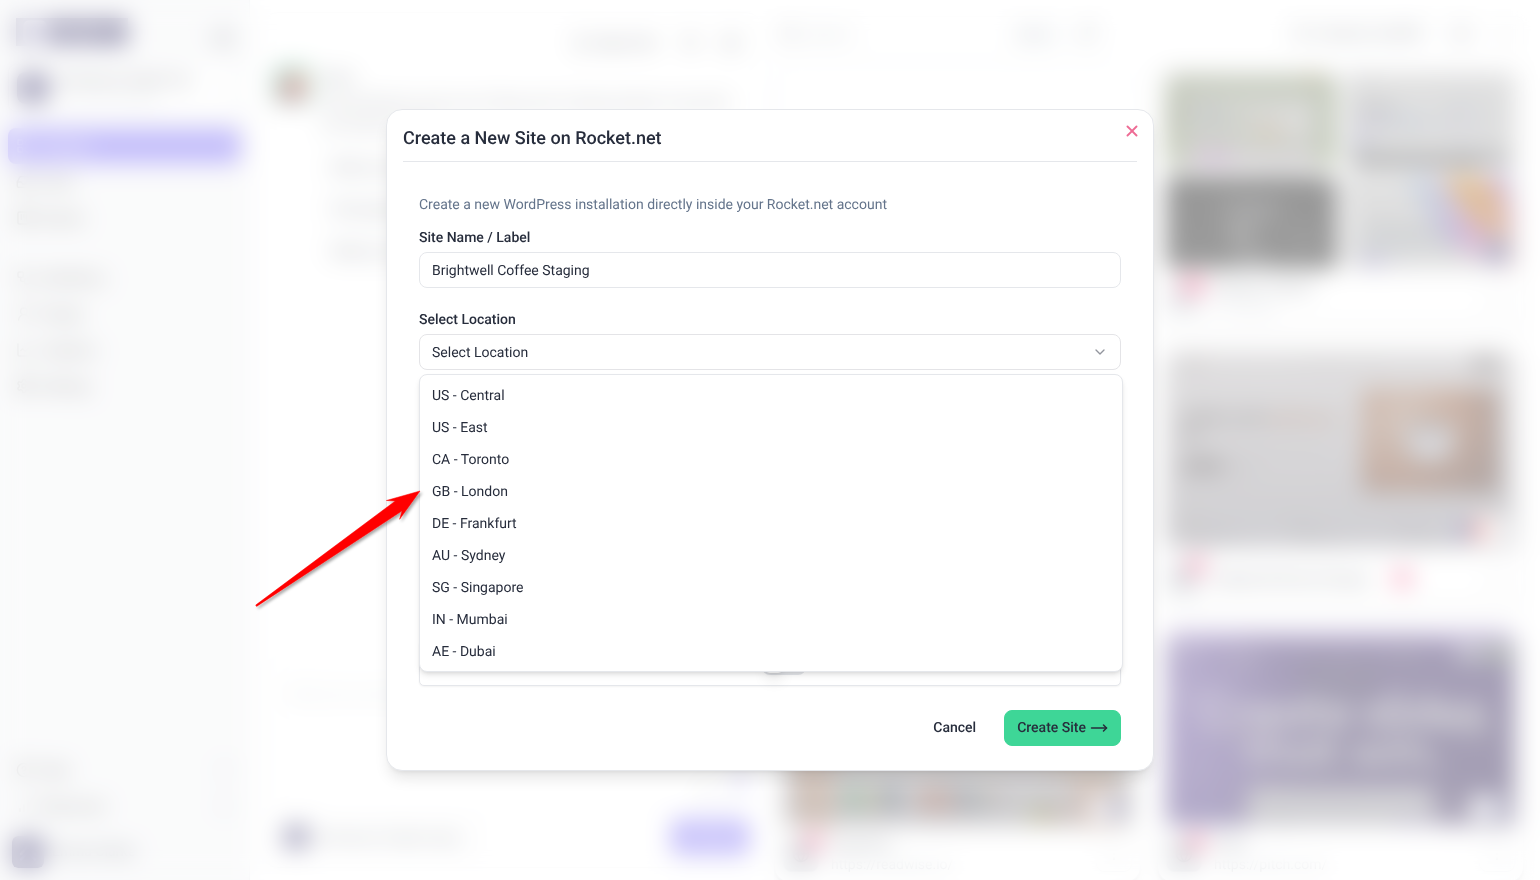
- Choose a Select Location for where the environment is hosted.
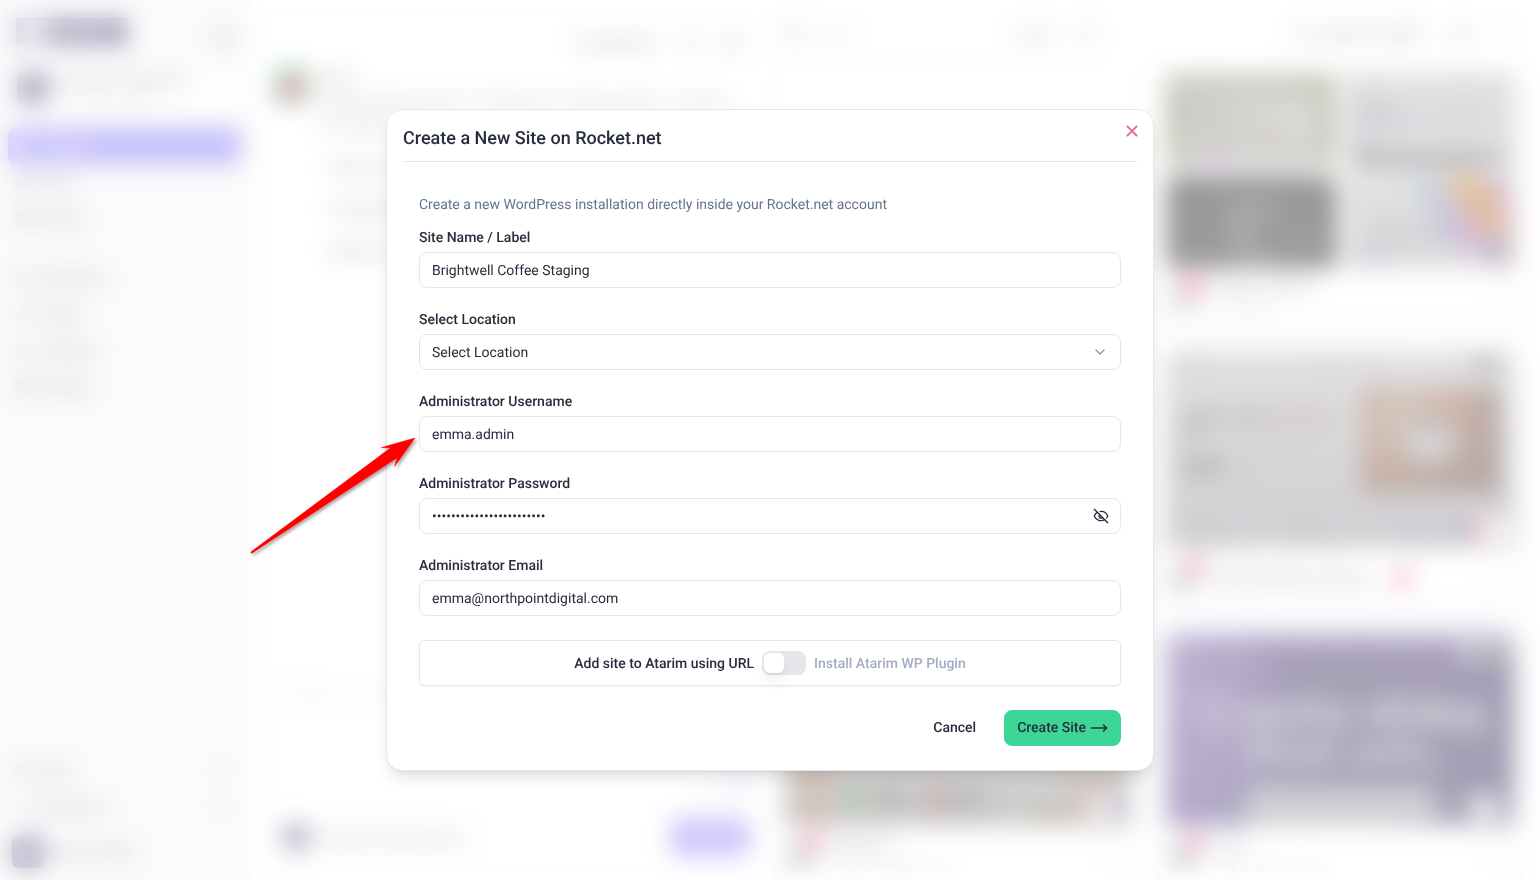
- Set the Administrator Username, Administrator Password and Administrator Email for the WordPress admin account. All three start empty — what looks like a value is placeholder text — and whatever you type here becomes the admin login for the new site, so write it down before you submit.
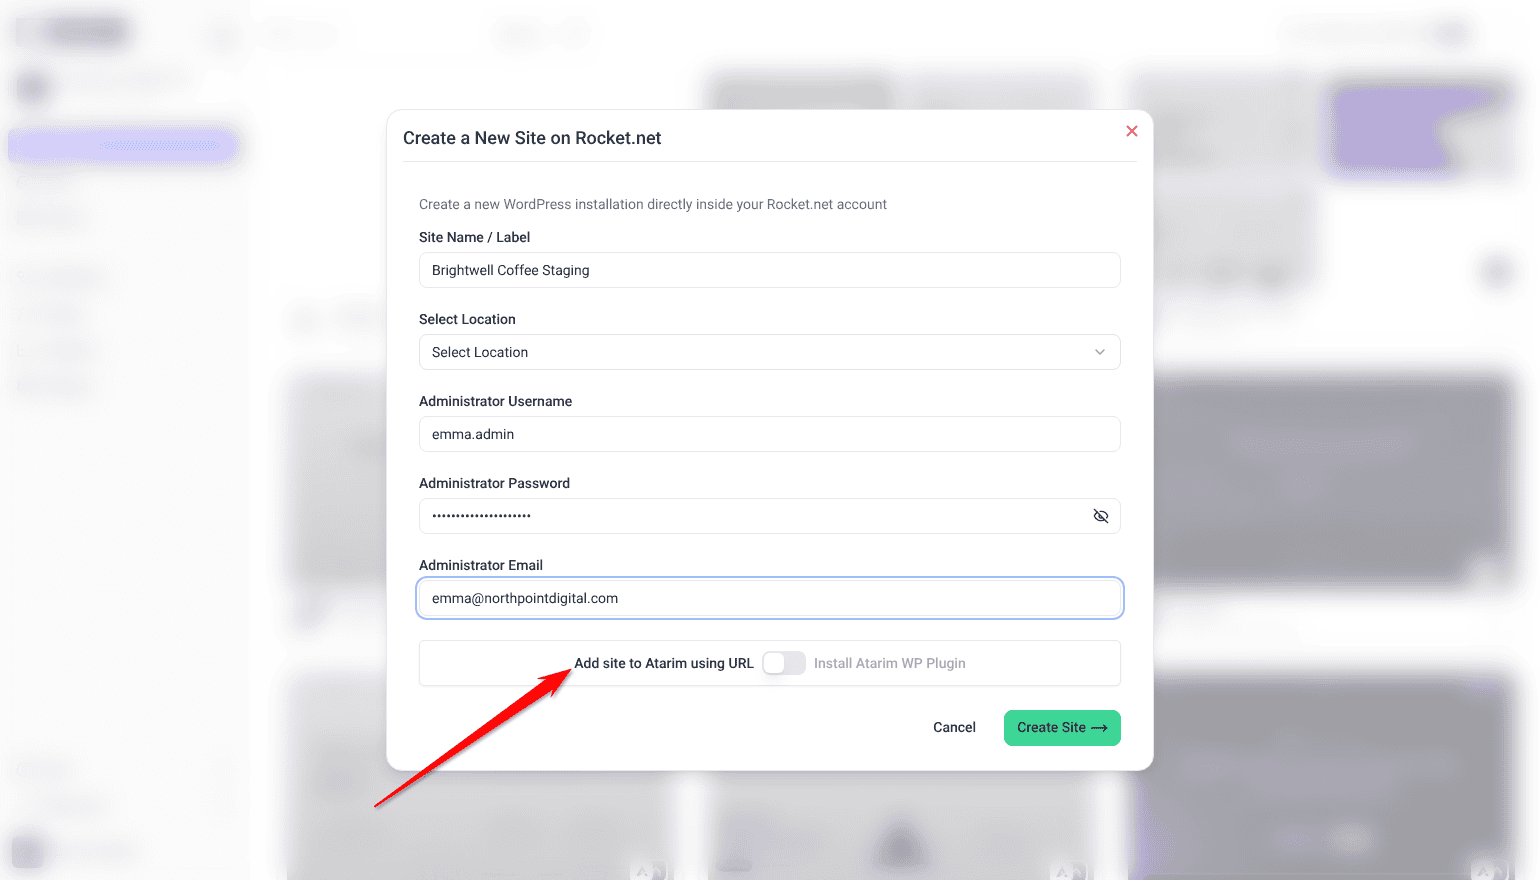
- Decide how the site joins Atarim. The toggle carries a label on each side — Add site to Atarim using URL and Install Atarim WP Plugin — and starts on the URL side, with the switch off. Leave it there to add the site by address, or turn it on to have the Atarim plugin installed instead. Then select Create Site. Creating the site takes about a minute.
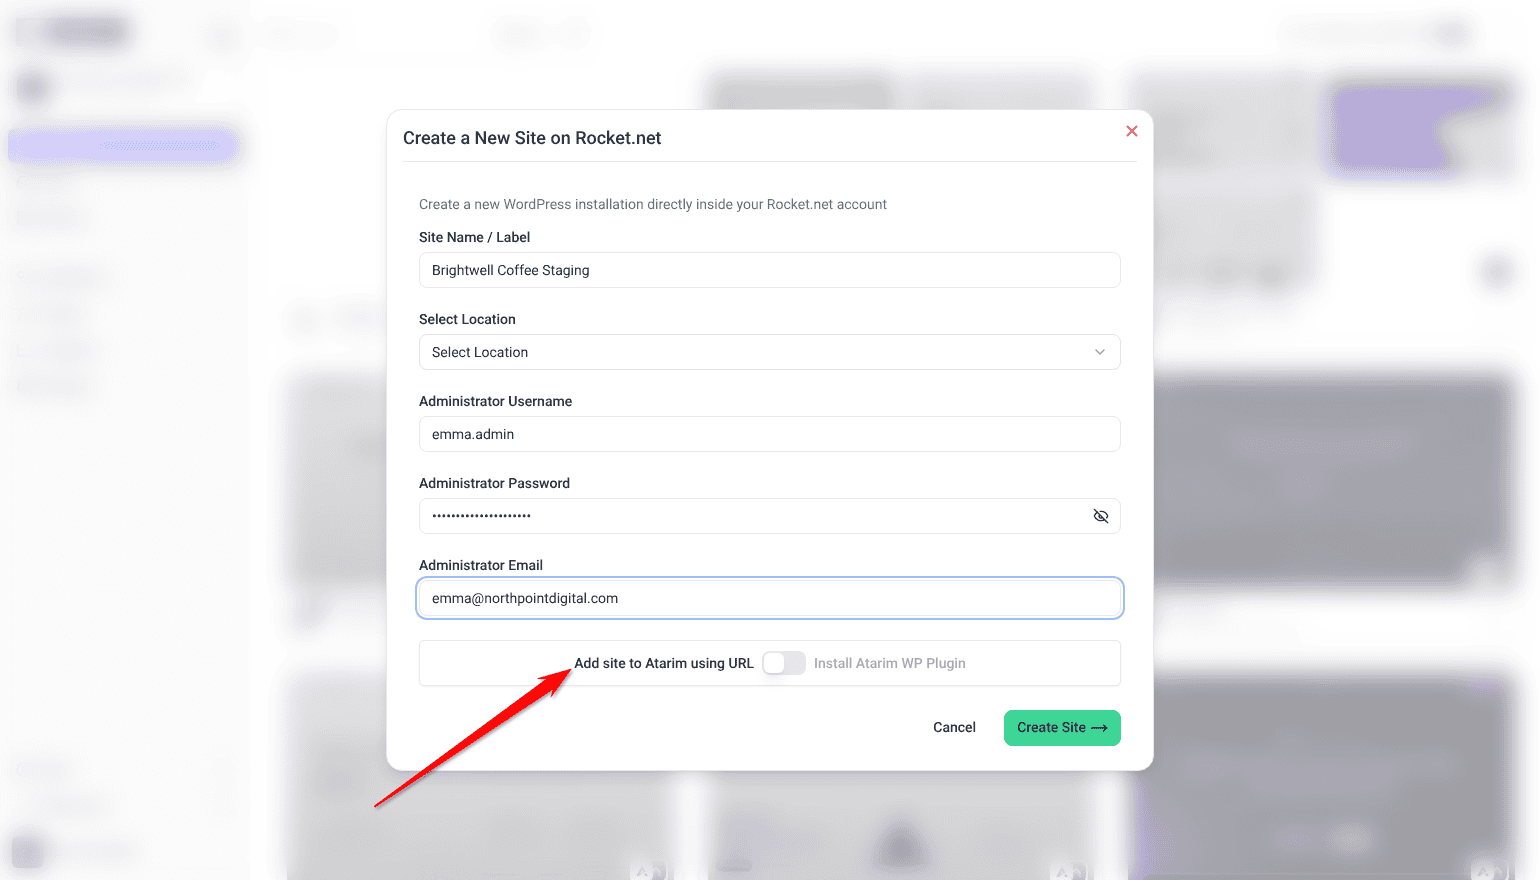
Choosing How the Site Is Added
| Switch position | What happens | Best for |
|---|---|---|
| Off — Add site to Atarim using URL (the starting position) | The site is added to Atarim by its address. Nothing to install. | Getting a client reviewing quickly. |
| On — Install Atarim WP Plugin | The Atarim plugin is installed on the new site. The site joins Atarim once you connect the plugin from its WordPress admin. | Sites you will manage properly, where you want the full plugin features. |
Adding via URL
The URL route has you collaborating straight away, without touching the site's WordPress install.
Instructions:
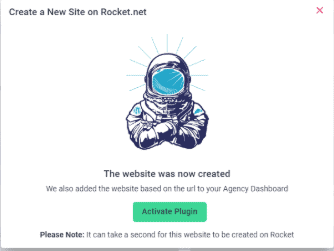
- Leave the switch on the Add site to Atarim using URL side and select Create Site. When the progress message clears, close the window.
- The new site appears as a project on the Projects screen, with its rocket.net panel on the card. Refresh the page if you don’t see it yet.
- Select Open on the project card to start visual collaboration on the new site.
Adding via Plugin
The plugin route takes longer to set up, and is what unlocks anything that needs to write to the site. Explore The WordPress Plugin
Instructions:
- Turn the switch to the Install Atarim WP Plugin side and select Create Site. Creating the site takes about a minute.
- Log in to the new site’s WordPress admin with the administrator details you entered.
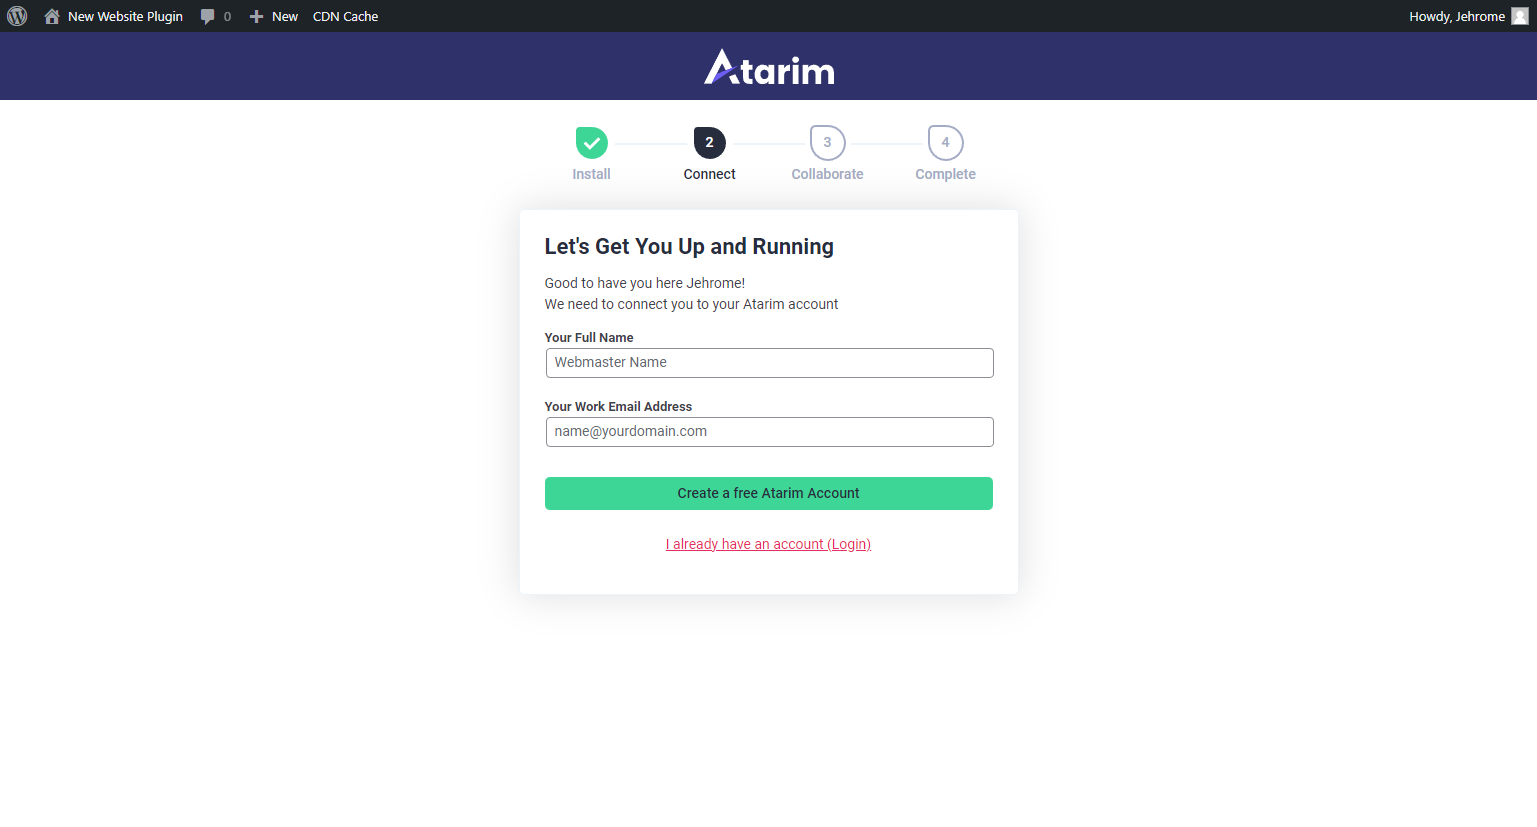
- Go to Settings → Collaborate. If it isn’t there, activate the Atarim plugin under Plugins first.
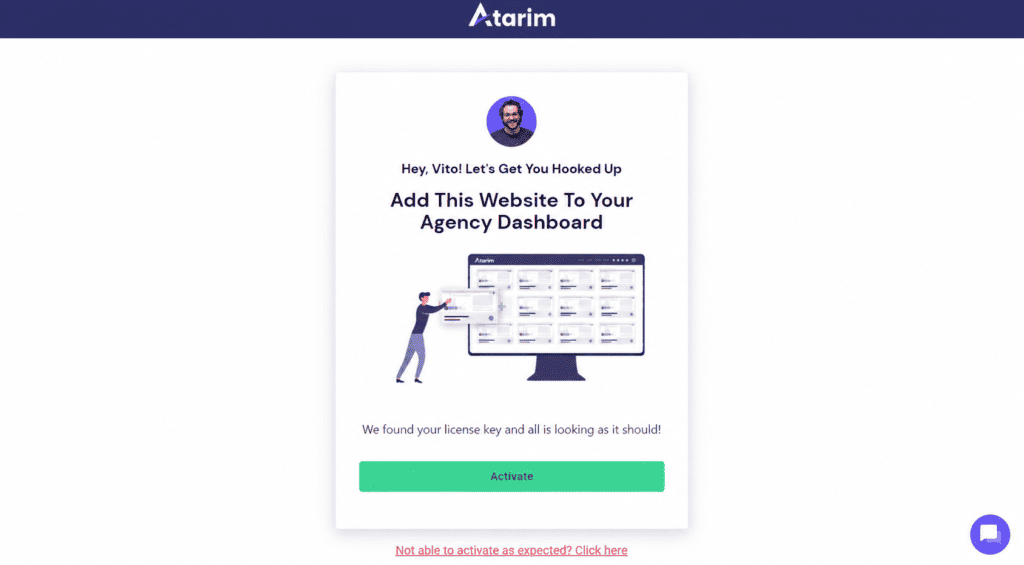
- Select Connect site (or Connect with Atarim). Atarim opens in a new tab.
- Check the site address and workspace, then select Connect site. The new site then appears on your Projects screen.
Hosting Signals on the Project Card
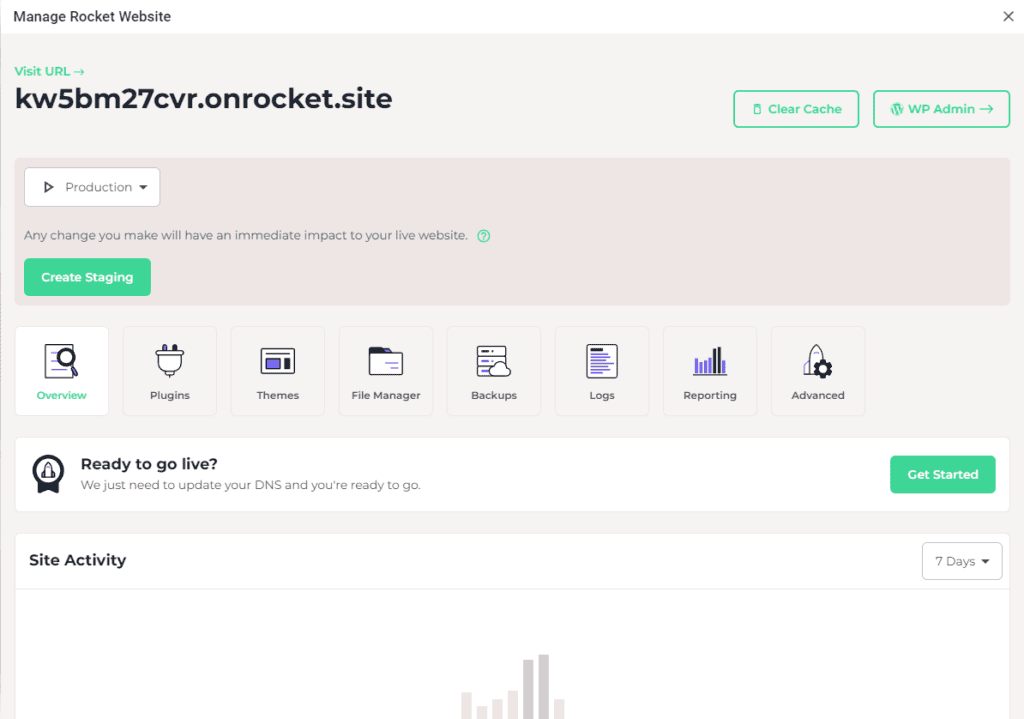
Where a website exists on both rocket.net and your Atarim dashboard, the project picks up a rocket.net panel. It reports the last 24 hours — requests served from the edge, edge cache hit rate, threats blocked and the last backup — and carries two controls: Purge the cache, which runs from Atarim, and Open in rocket.net, which hands you over to rocket.net for anything else. For other changes, use rocket.net itself or ask Atarim’s AI, as described below.
About the Rocket.net Link
The integration panel includes a link to Rocket.net, described in Atarim as the best WordPress hosting the team has used. Hovering over the link shows a note that it is an affiliate link: you will not pay any extra for using it, but Atarim is rewarded if you sign up through it.
Connect InstaWP
InstaWP is the second hosting integration. Connecting it lets Atarim reach the hosting your sites run on — creating sites, changing PHP versions, taking backups and running InstaWP’s own maintenance tools such as flushing permalinks or fixing permissions — from the same place as the rest of the work.
Instructions:
- In Atarim, go to Settings.
- Under Connected Apps, select Integrations.
- Find InstaWP, switch its toggle on, and select Connect with InstaWP.
- Sign in to InstaWP and allow access. Back in Atarim, the card shows that InstaWP is connected to this workspace.
- On the Projects screen, open the project’s ⋮ menu and select Change Project Settings.
- Select Link an InstaWP site, choose the matching site, and select Link site.
What Atarim Can Do on Your Hosting
Once a project is linked to its hosting, Atarim can reach that host’s own tools — listing sites, reading a site’s details and settings, checking which backups exist, and running the actions the host exposes. The distinction that matters is between reading and writing, and it is the same on both hosts.
| Kind of action | What happens |
|---|---|
| Reading | Runs straight away. Listing sites, reading a site’s settings or PHP version, checking which backups exist — none of it changes anything. |
| Writing | Held when it comes from AI chat or another run a person starts. Anything that writes goes to the Approval Queue with the reason, and does not run until a person approves it. A request nobody decides on within 14 days is declined automatically, and nothing runs. This applies on both hosts. |
| A workflow you have switched on | Runs other hosting changes directly, without approval, because switching the workflow on is the sign-off for what it does. It can’t use the riskiest hosting actions, such as running commands, restoring backups, publishing staging, or creating and deleting InstaWP sites. Run those from chat, where you approve them. |
| Never offered | Cancelling a rocket.net account, and changing the hosting plan on either host, are not available at all. |
Benefits
| Benefit | In practice |
|---|---|
| One place instead of two | Hosting actions happen where your projects and client feedback already live. |
| Faster staging | A staging environment is a click rather than a separate workflow. |
| Feedback from day one | Add a new site to Atarim by URL as you create it, and share it for review straight away. |
| Less context switching | No jumping to a hosting panel mid-task. |
Example Use Cases
| Situation | How it helps |
|---|---|
| A client wants to review changes safely | Create a staging environment in a click and share it for feedback. |
| Testing a risky change | Stage it first rather than working on production. |
| Onboarding a new client site | Create the site and add it to Atarim by URL in one step, so feedback can start straight away. |
| Managing several hosted sites | Handle hosting from the same dashboard as the projects they belong to. |
FAQs
What does this integration actually do?
It connects your Rocket.net account so you can manage hosting from Atarim, including creating new sites with the Atarim plugin installed if you choose.
Does it sync tasks like the other integrations?
No. This one is about hosting. Task syncing is handled by the project tool integrations such as Jira, Asana or Trello.
Why does it ask for my password?
Rocket.net connects with your account credentials rather than an authorization screen. Only enter them on Atarim’s own settings page.
Is the Rocket.net link an affiliate link?
Yes. A note saying so appears when you hover over the link. You pay no extra; Atarim is rewarded if you sign up through it.
Do I need Rocket.net hosting to use Atarim?
No. This integration is only relevant if you host with Rocket.net. Everything else in Atarim works regardless of your host.
Can I connect more than one Rocket.net account?
Not to the same workspace — Atarim supports one Rocket.net connection per workspace. If you manage several accounts, use separate Atarim workspaces.
Can I connect more than one InstaWP account?
Not to the same workspace. Atarim holds one InstaWP connection per workspace, and authorising again replaces the one already there. That connection also covers a single InstaWP team rather than your whole account, so sites belonging to another team will not appear when you go to link a project. If you manage several InstaWP accounts, or several teams within one account, use a separate Atarim workspace for each.
Will I have to re-authenticate often?
No. Once authenticated, the connection stays until you disconnect it manually.
What if I disconnect by accident?
Reconnect through Settings → Connected Apps → Integrations. Sites you have already created stay intact.
Does deleting a site in Atarim delete the hosting?
No. It removes the site from your Atarim dashboard, but the hosting instance stays on Rocket.net until you delete it there.
What happens if I change my Rocket.net password?
The connection stops working until you reconnect with the new credentials.
Common issues
- The connection is rejected — check the email and password are the ones you use to sign in at rocket.net, and that the account is active.
- The connection stopped working — the rocket.net password may have changed. Reconnect with the current credentials.
- The Rocket option is locked — your plan does not include native integrations. The lock names the minimum plan required.
- Integrations is not in your settings sidebar — your role does not have access. Ask an Administrator.
- You expected tasks to sync — they will not. These integrations manage hosting. Use a project tool integration for task syncing.
- The site was not created — creating a site takes about a minute, so wait for the progress message to clear. If it still fails, check your rocket.net account has a free site slot, then try again.
- The rocket.net panel does not appear on a project — the URLs must match on both platforms. Check the addresses agree, or pair the project to its site by hand from Project Settings.
- A new site is missing from your Projects screen — if you chose Install Atarim WP Plugin, the site joins Atarim only after you connect the plugin under Settings → Collaborate on that site. Otherwise, refresh the page.
- The InstaWP site list is empty, or the site you want is missing — only sites in the connected InstaWP team are listed. Check which team the connected account belongs to.
- Atarim will not do hosting work on a project — connecting the account is only half of it. The project itself has to be linked to its rocket.net or InstaWP site in Project Settings.
- A hosting action is waiting rather than running — expected. Reads run immediately; a write asked for in chat is held until someone approves it.
Conclusion
These two integrations manage hosting rather than moving tasks. Connect rocket.net with your credentials and you can create new sites from the Projects screen and add them to Atarim in the same step. Connect InstaWP and link a project to its site, and the same dashboard reaches that site’s hosting too.
On either host the rule is the same: reading runs, and a write asked for in chat waits for someone to approve it.
If you host elsewhere, these are not for you — but the project tool integrations are.
Tips & best practices
- Connect with a shared account where possible, so the integration survives staff changes.
- Reconnect after any Rocket.net password change.
- Use staging environments for client review rather than working on production.
- Choose a server location close to the client’s audience.