Adding DNS Records to Verify Your Domain
Two MX records, an SPF record, and a DKIM record — what to add, where to add them, and why verification sometimes takes days.
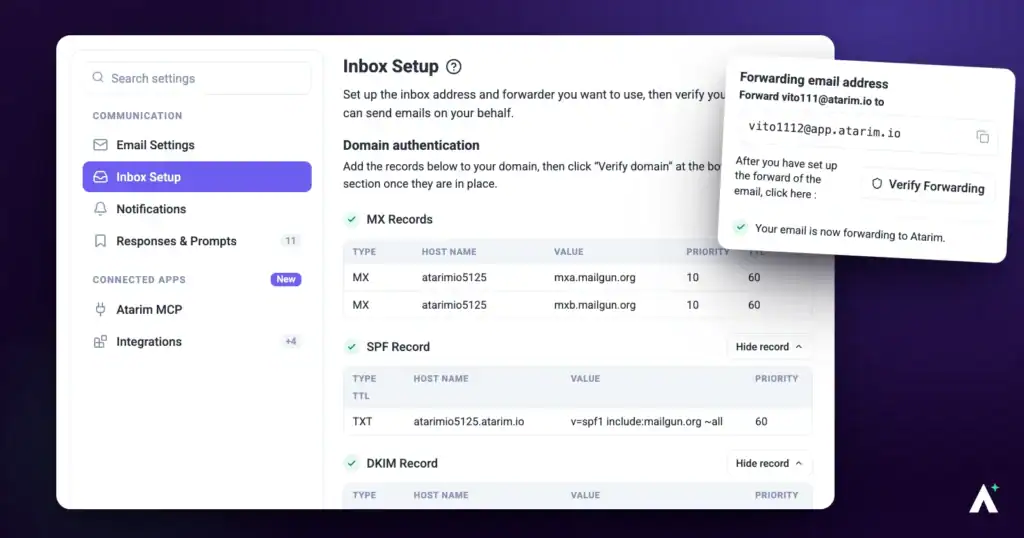
Leaving comments on pages means nothing if your messages don't reach the people you're trying to reach. Authenticating your domain is what lets Atarim send email as you instead of from a generic address, and it's one of the biggest factors in whether those emails land in an inbox or a spam folder. Four DNS records are what make this work: two MX records so Atarim can receive, and an SPF and a DKIM record so it can send as you. They all sit on a dedicated subdomain, so your existing email keeps working exactly as it does now, whether that's Google Workspace, Microsoft 365, or anything else.
Step-by-Step Guide
What Domain Authentication Actually Does
Setting up the Atarim Inbox has two halves, and they’re easy to confuse:
- Forwarding verification lets Atarim receive the mail you forward to it. This is what activates the Inbox.
- DNS record verification lets Atarim send as you. Until it passes, your replies go out from Atarim’s default sender address rather than your own.
You can use the Inbox with only the first half complete. The second half is what protects your deliverability and makes replies look like they came from your agency.
Each domain you authenticate must first be used as the Inbox Email Address on your account. Once added, your domain is assigned its own set of DNS record values — which is why the email address has to be saved before there’s anything to copy.
Why this won’t disturb your existing email
Every record Atarim gives you belongs to a dedicated subdomain, atarimio5125.yourdomain.com, which is a separate namespace from your domain itself:
- Your root MX records still route
@yourdomain.commail to Google Workspace, Microsoft 365, or wherever it goes today. The new MX records only apply to the subdomain. - Your existing SPF record at the root is untouched. The new one is a separate record on the subdomain, not an edit to yours.
- Your existing DKIM keys live at
selector._domainkey.yourdomain.com. The new one sits under the subdomain and never collides with them.
The safety of this depends entirely on the records landing on the subdomain. Every record you save should have atarimio5125 somewhere in its name. If one doesn’t, delete it and add it again — see the hostname section below.
What Each Record Does
Four records in total:
| Record | Count | What it’s for |
|---|---|---|
| MX (Mail Exchange) | 2 | Identify which mail servers accept incoming email for the subdomain. Both are required. |
| SPF (Sender Policy Framework) | 1 TXT | Identifies which servers are allowed to send email using your domain, which reduces the risk of spoofing. |
| DKIM (DomainKeys Identified Mail) | 1 TXT | Signs your outgoing mail so the message arriving at the recipient’s inbox is provably identical to the one you sent. |
Step 1: Set Your Inbox Email Address
This is the address clients will see replies coming from, so use one you are happy to publish. Use an address on a domain you own, like hello@yourstudio.com. Nobody can add DNS records to a free email domain such as gmail.com or outlook.com, so with one of those your replies can’t come from your own address.
Instructions:
- From the main dashboard, select Settings.
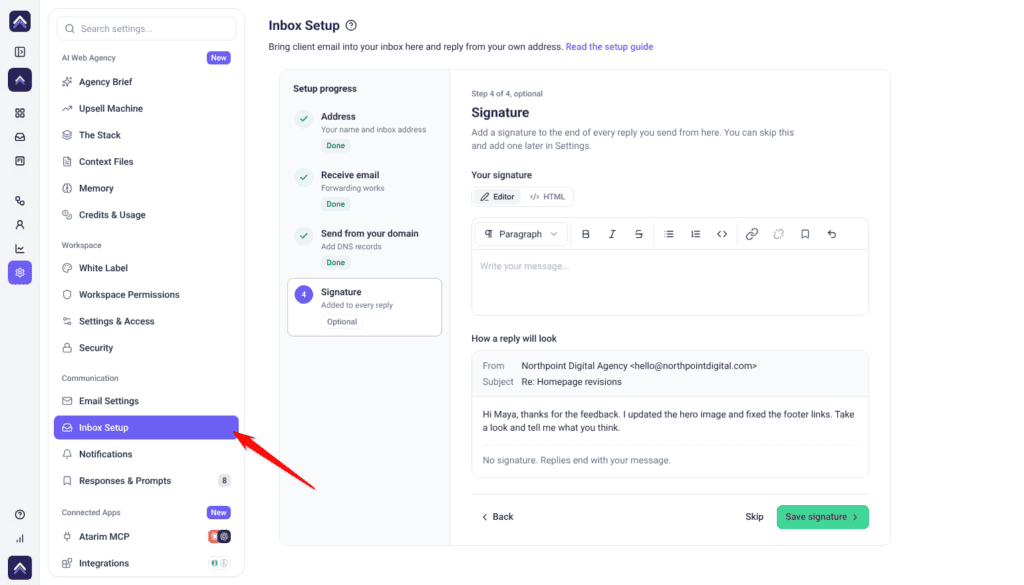
- Under Communication, select Inbox Setup.
- The wizard opens on Step 1 of 4, Your inbox address.
- Enter a From name. Clients see this name on your replies. It must be at least two characters.
- Enter your Inbox address, the address your clients already email.
- Select Continue.
What happens: Atarim creates a dedicated mail subdomain from your address’s domain and generates the DNS records you’ll add in the following steps. If your address is hello@youragency.com, the subdomain is atarimio5125.youragency.com.
You can also reach the same wizard from the sidebar. Before setup, your inbox shows in the Inbox project list as Activate inbox with a warning icon. Select Set up inbox to open the wizard.
Step 2: Set Up Forwarding
The wizard moves to Step 2 of 4, Receive email.
Instructions:
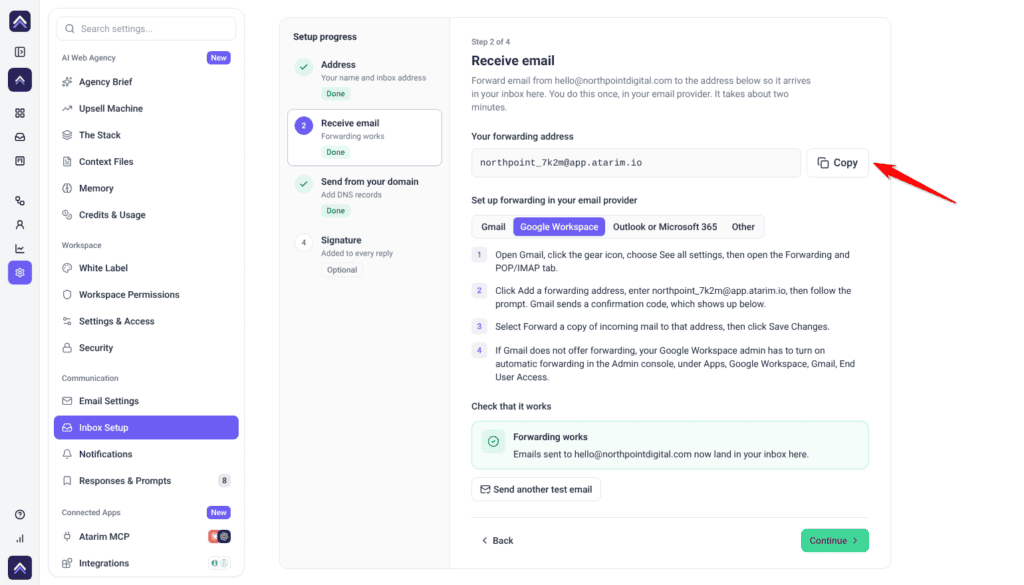
- Copy Your forwarding address.
- Under Set up forwarding in your email provider, pick your provider: Gmail, Google Workspace, Outlook or Microsoft 365 or Other. Follow the steps shown. Gmail and Google Workspace send a confirmation code to your forwarding address first. The code shows in the wizard, so you can finish the forwarding setup in Gmail.
- Select Send test email. Atarim keeps checking for 5 minutes. You can select Stop checking at any time.
- When the email arrives, you see Forwarding works. Select Continue.
If it doesn’t arrive: you see The test email has not arrived yet, with what to check. Fix the forwarding rule and select Send the test email again.
Step 3: Locate Your DNS Records
Atarim generates four records specific to your domain. Copy them from here rather than from any other guide.
Instructions:
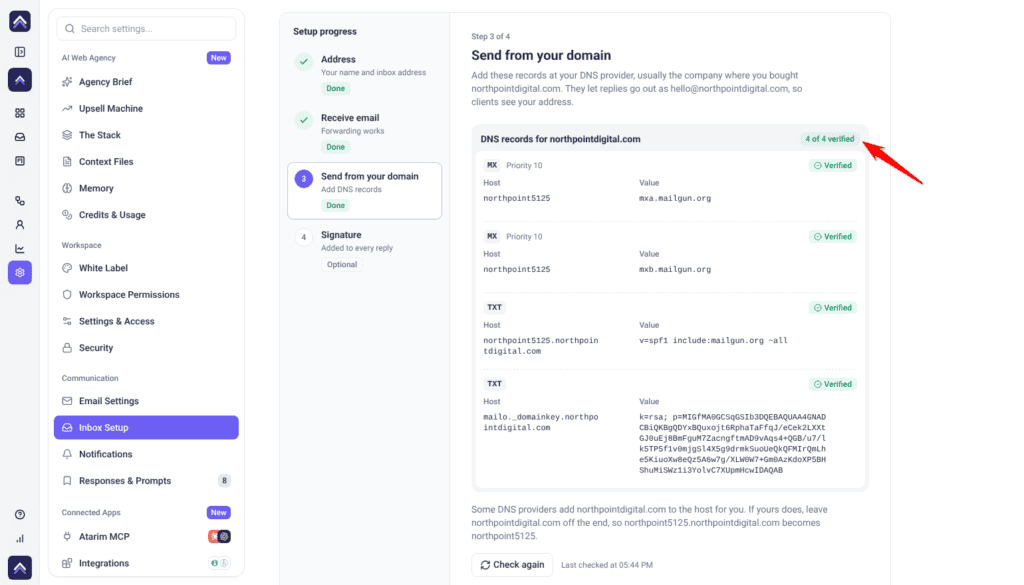
- Go to Step 3 of 4, Send from your domain. The records are listed under DNS records for yourdomain.com.
- Each of the four records shows its type, its Host and its Value, with a copy button beside each. The two MX records also show their priority.
- Use the copy button beside each Host and Value rather than retyping.
The two TXT records are listed third and fourth. The one whose value starts v=spf1 is SPF. The one with _domainkey in its host is DKIM.
Every value is shown in full. Use the copy button anyway, so nothing is mistyped.
Your DKIM host begins with a selector that is generated for your domain, so it will not match anyone else’s. Copy it exactly as shown rather than typing what you expect it to be.
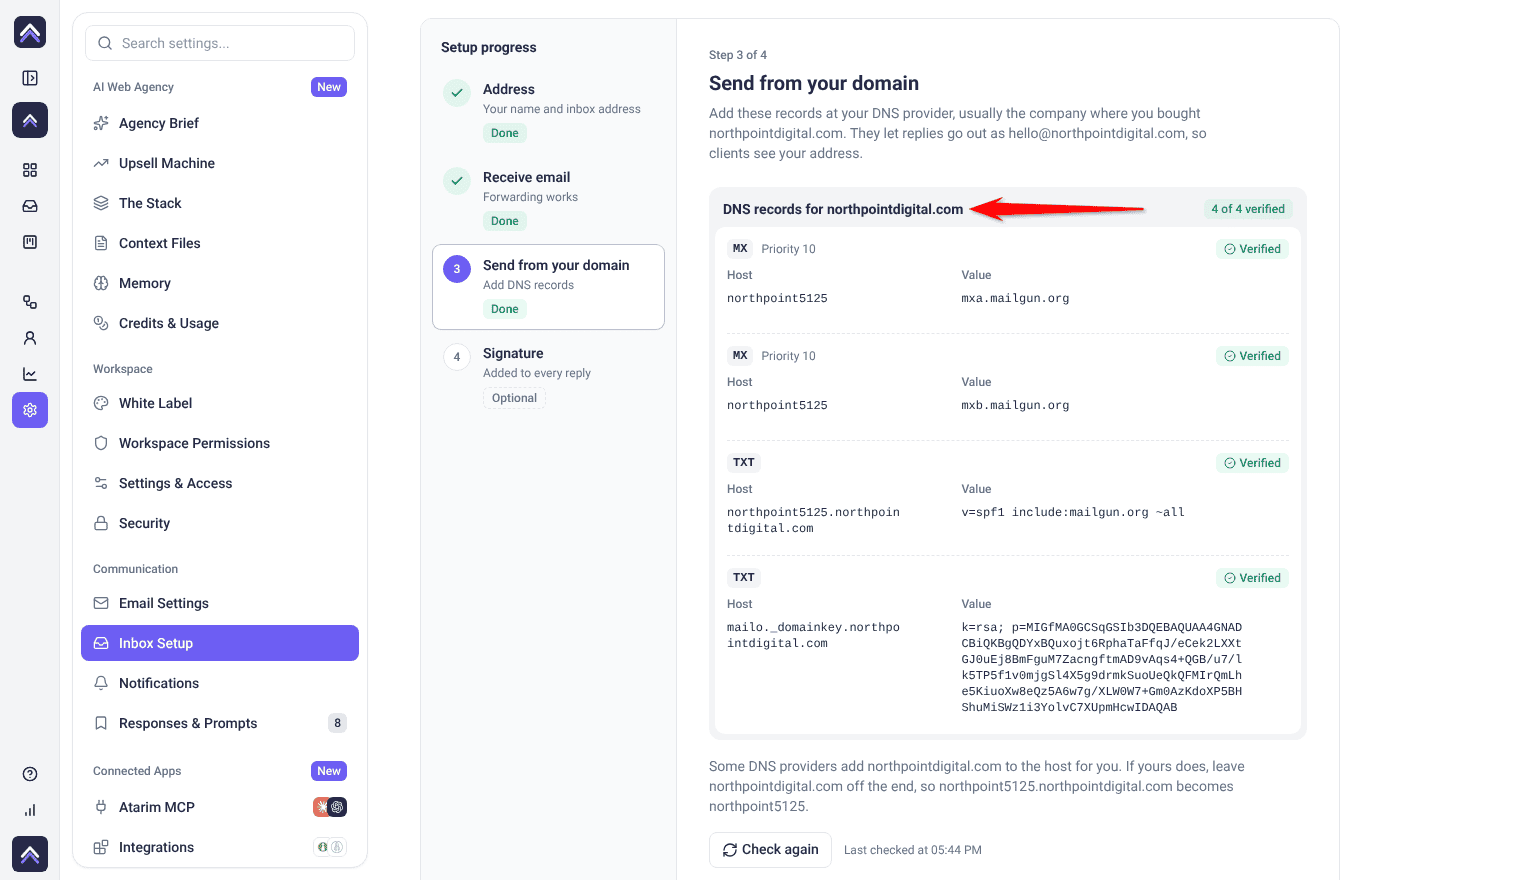
The MX rows and the TXT rows are built differently behind the scenes. The two MX hosts are a short prefix with no domain on the end. The two TXT hosts are complete hostnames with your domain already included. Paste each one, check what your provider saved, and adjust — see the next section.
Step 4: Add the Records at Your DNS Provider
The wording differs by provider, but the shape is the same: find the DNS management screen, add each record, save. The steps below use GoDaddy.
Adding the MX records
Both MX records are required. They differ only in their value.
Instructions:
- Log in to your GoDaddy Domain Control Center.
- Select your domain and go to Manage DNS.
- Select Add under the records table.
- Select MX as the record type.
- Enter Host:
atarimio5125, Points to: the Value from row 1 in Atarim, Priority: 10, and the lowest TTL your provider allows. - Select Save.
- Repeat for the second record, using the Value from row 2 as the Points to value. Everything else is identical.
Adding the SPF record
SPF tells receiving servers that Atarim may send on your behalf, which is what keeps replies out of spam.
Instructions:
- In Manage DNS, select Add.
- Select TXT as the record type.
- Copy the host from row 3 in Atarim. It is displayed as a complete hostname ending in your domain. GoDaddy appends your domain automatically, so enter Host:
atarimio5125— the displayed value with.yourdomain.comremoved. - Paste the value from row 3 into TXT Value. It starts
v=spf1. - Select Save.
Adding the DKIM record
DKIM signs your outgoing mail. The string is long — paste it rather than typing it.
Instructions:
- In Manage DNS, select Add.
- Select TXT as the record type.
- Copy the host from row 4 in Atarim — the one containing
_domainkey. It is displayed as a complete hostname ending in your domain. GoDaddy appends your domain automatically, so remove.yourdomain.comfrom the end before entering it. - Paste the full DKIM string copied from Atarim into TXT Value.
- Select Save.


A note on priority
Only the two MX records have a priority. Enter the priority shown on each MX row. SPF and DKIM records don’t take one.
Other providers
Cloudflare — Select your domain, open DNS > Records, then Add record. Enter the Host in Name and paste the Value into Mail server for MX or Content for TXT. Set Priority to 10 on the MX records. TTL can stay on Auto. MX and TXT records can’t be proxied, so there’s no orange cloud to disable.
Namecheap — Go to Domain List > Manage > Advanced DNS, then Add New Record. Choose MX Record or TXT Record, enter the Host, paste the Value, set Priority to 10 on the MX rows, leave TTL on Automatic, and save each row with the green tick.
cPanel — Open Zone Editor, select Manage next to your domain, then Add Record. Fill in Name, TTL, Priority, and Record/Value for each.
Check the Hostname Before Saving
This is the single most common reason verification fails, and it catches people specifically because Atarim displays the four hosts in two different formats.
Many DNS providers automatically add your domain name to the end of any hostname you enter. Since the SPF and DKIM hosts are already displayed with your domain included, pasting them as-is at one of those providers duplicates the domain and the record will never verify.
Example. Your domain is yourdomain.com and Atarim displays the SPF host as atarimio5125.yourdomain.com. If your provider auto-appends and you paste that in whole, it saves as:
atarimio5125.yourdomain.com.yourdomain.com
What to do:
Providers disagree about whether to append your domain to a host, and getting it wrong is the most common reason verification fails.
Instructions:
- Before saving anything, add one record and check what your provider displays back as the saved name.
- If it appended your domain, go back and remove
.yourdomain.comfrom the end of the two TXT hosts before saving them. - If it expects the complete name, enter the SPF and DKIM hosts exactly as displayed, and add your domain to the two MX hosts —
atarimio5125.yourdomain.com.
Whichever way your provider works, every saved record should end in your domain exactly once. If you can see yourdomain.com.yourdomain.com anywhere, that record will not verify. If Atarim finds a record saved with your domain twice, it tells you on that record and shows the host to use instead.
Equally, don’t strip too far. Every saved record must still contain atarimio5125. A record saved with an empty host, or a host of @, lands on your root domain instead of the subdomain.
Step 5: Verify Your Domain in Atarim
DNS changes take time to propagate, so a failed check straight after saving does not necessarily mean a mistake.
Instructions:
- Return to Settings > Communication > Inbox Setup.
- Open Send from your domain.
- Select Check again.
Each record shows Verified, Waiting or Not found yet, and the count at the top reads, for example, 4 of 4 verified. You see All DNS records are verified when they all pass.
- Select Continue to go to Signature, an optional step. Select Save signature, or Skip. The summary then shows where each part stands. Select Go to your inbox.
DNS Propagation
DNS changes take time to apply. Atarim re-checks unverified records about once an hour, and you can select Check again at any time to check straight away. Propagation time depends on your provider and on the TTL of any record you’re replacing, and can take up to 48 hours.
If it still doesn’t verify after 48 hours:
Instructions:
- Check that all four records were added correctly.
- Confirm the hostname hasn’t duplicated your domain name.
- Confirm the DKIM host includes
_domainkeyand matches row 4 exactly. - Make sure the record type, host, value, and priority match the values shown in Atarim.
- Contact your domain provider if the saved records look correct but verification still fails.
What Changes Once Verification Passes
Once forwarding works, Activate inbox changes to your inbox, with a gear icon beside it for Email settings.
Once all four DNS records verify, outgoing email sends from your own address with proper authentication, rather than from Atarim’s default sender.
To change anything later, select the gear icon. Email settings opens on your setup summary. Select Edit or View records on the part you want to change, then Done. Emails about project updates are set in Notification settings.
Resources
For your convenience, here is a list of links to the instructions for adding DNS records at commonly used hosts:
- 123 Reg – MX | TXT | CNAME
- bluehost – MX | TXT and CNAME
- DNS Made Easy – MX | TXT | CNAME
- DNSimple – TXT | CNAME
- Dreamhost – MX | TXT | CNAME
- DYN – MX, TXT, and CNAME
- GoDaddy* – MX | TXT | CNAME
- Hostgator – MX | TXT and CNAME
- Hover – MX, TXT, and CNAME
- Media Temple – MX, TXT, and CNAME
- Namecheap – MX | TXT and CNAME
- Network Solutions – MX | TXT and CNAME
- Register.com – MX | TXT | CNAME
FAQs
Do I have to verify my domain before I can use the Inbox?
No. Forwarding verification is what activates the Inbox. Domain verification only controls which address your outgoing email sends from.
Will these records break my existing email?
No, as long as they land on the subdomain. Every record belongs to atarimio5125.yourdomain.com, which is separate from your domain itself, so your root MX, your existing SPF record, and your current DKIM keys are all untouched. The one way to cause a problem is saving an MX record on the root domain by mistake — check that every saved record still has atarimio5125 in its name.
Do I need a DMARC record?
Atarim doesn’t ask for one and doesn’t check for one. If your domain already publishes DMARC on default settings, Atarim’s mail passes. If your policy uses strict alignment, it can fail even with all four records verified, because your address stays in the From header while the mail is signed by the subdomain.
Can I verify my domain before entering my email address?
No. The records are generated from the domain of the address you enter in Step 1, so there’s nothing to verify until that’s saved.
Both TXT rows just say TXT — which is SPF and which is DKIM?
They are listed third and fourth. The one whose value starts v=spf1 is SPF. The one with _domainkey in its host is DKIM. You don’t need to tell them apart to add them, as long as each host stays paired with the value on its own row.
How long should verification take?
Most providers propagate within 15 to 30 minutes, but it can take up to 48 hours. If it hasn’t verified after that, check the saved records before contacting support.
Where do I change these settings after setup?
Select the gear icon next to your inbox in the Inbox project list, then View records. You can also go to Settings, then Inbox Setup under Communication.
Conclusion
Once your records verify, replies to clients go out from your own address and are much more likely to reach their inbox.
Tips & best practices
- Double-check record values before saving to prevent authentication failures.
- Use a DNS checker tool (e.g., MXToolbox) to confirm propagation.
- If issues persist after 48 hours, contact your domain provider for assistance.