Managing Your Workspaces
Create, rename, staff, and remove the workspaces that keep your brands, teams, and clients separated inside Atarim.
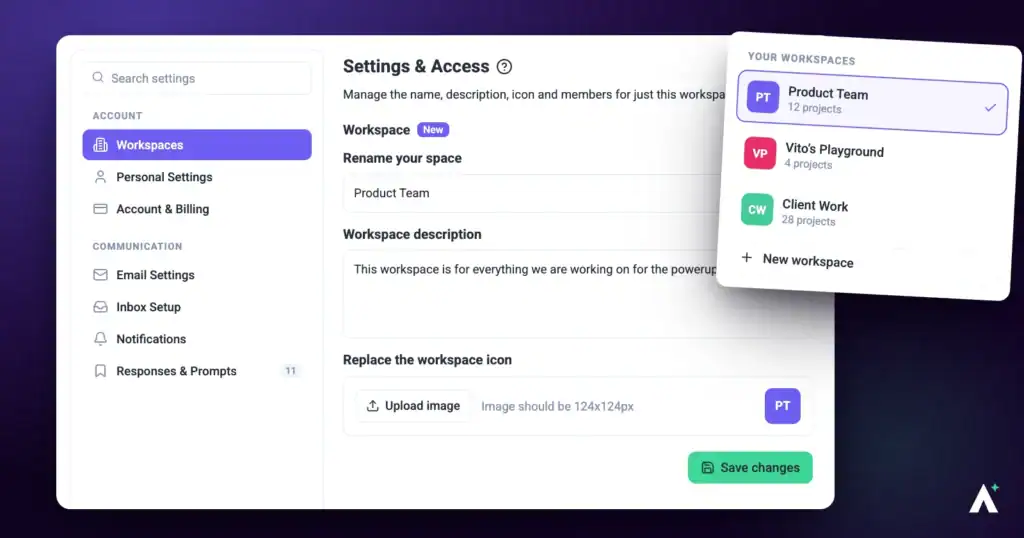
A workspace is the top-level container in Atarim. Projects, tasks, workflows, integrations and white-label settings belong to a workspace and stay separate from your other workspaces. That separation is the point: a workspace lets you run one brand, one department, or one client portfolio without its data, branding, or team bleeding into another. The one link is clients: if you manage clients in Atarim, the workspace they are linked to can see and automate their projects.
Every Atarim account starts with one default workspace. Additional workspaces are optional and are limited by your plan. This article covers the full lifecycle — switching between workspaces, creating a new one, editing its name and branding, adding and removing people, and deleting one you no longer need.
Who can manage workspaces
Workspace management sits behind two separate gates, and both must be satisfied before the controls appear.
First, the Settings item in the left sidebar is administrator-only. It appears only when your role in the currently selected workspace is Owner or Administrator, and when your role carries the settings permissions. If you are signed in as a Team Member or Collaborator, Settings will not be in the sidebar at all.
Second, the Workspaces item inside Settings is gated by its own workspace-settings permission. An administrator whose role does not carry that permission will see the Settings screen but not the Workspaces entry.
Beyond that, each individual workspace carries its own per-user permissions, which control what you can do once you are inside it:
| Action | What must be true |
|---|---|
| Edit name, description, or icon | You hold edit rights on that workspace. Without them, the fields render but are greyed out and cannot be typed into. |
| Add or invite members | You hold edit rights on that workspace. |
| Delete the workspace | You hold delete rights and the workspace is not your default workspace. |
| Create a new workspace | Your plan has an unused workspace slot, and you belong to the account of the owner you are creating it for. |
How to open workspace settings
There are two routes into the same screen. Use whichever is closer to where you already are.
Route 1 — From the Settings sidebar
Both routes reach the same panel. This one is easiest when you are already in settings.
Instructions:
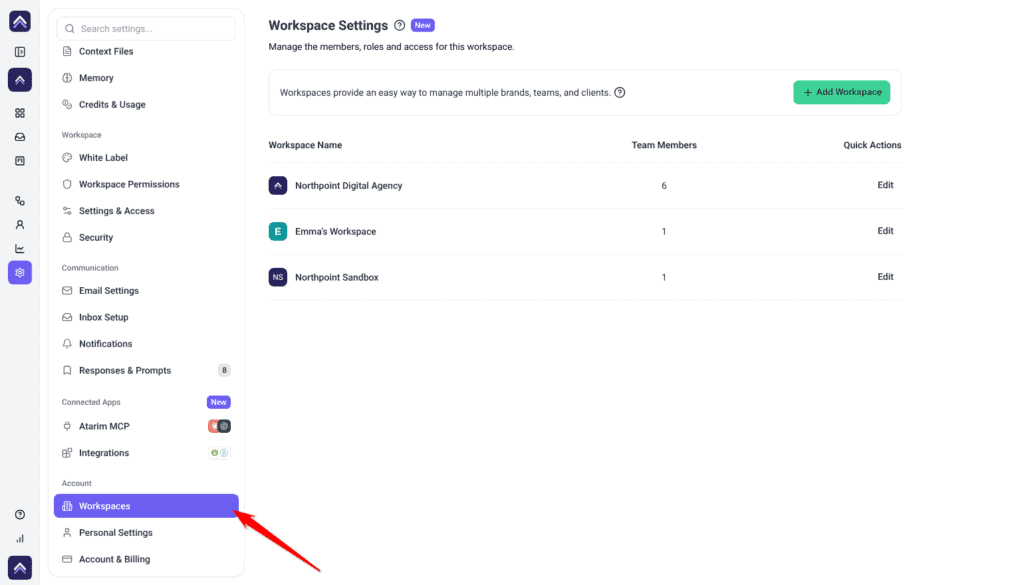
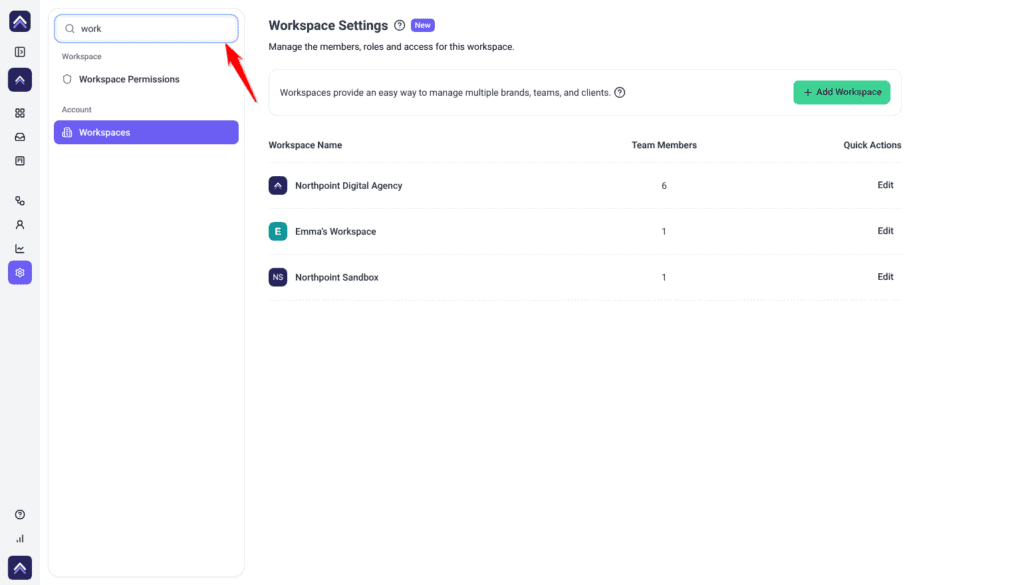
- From the main dashboard, select Settings in the left navigation. It sits in the lower group of the sidebar, alongside Workflows, People, and Analytics. The Settings screen opens, with a Search settings… box and grouped sections down the left side, such as Workspace, Communication and Account.
- Scroll to the Account group at the bottom of the settings navigation.
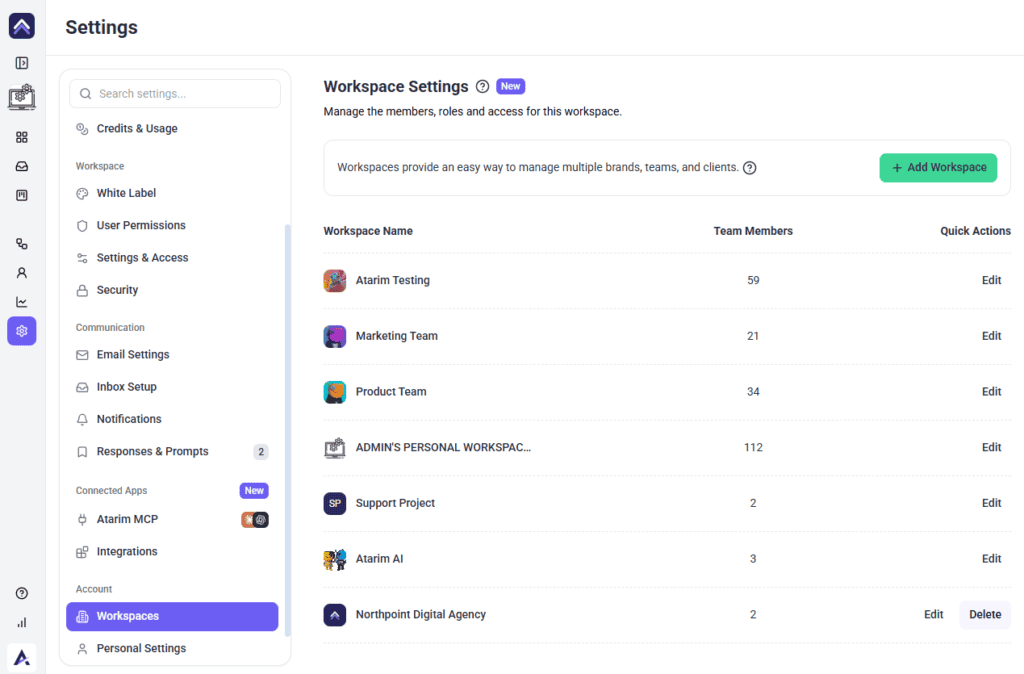
- Select Workspaces.The Workspace Settings panel opens, showing the Add Workspace card and a table of every workspace on the account.
Route 2 — From the workspace switcher
This route is quicker when you are already working and want the workspace you are currently in.
Instructions:
- Select the workspace name and avatar at the top of the left sidebar.The workspace switcher opens, listing your workspaces. The active one is highlighted and labelled Current Workspace.
- Select the gear icon on the right of the current workspace’s row. Atarim opens Settings with the Workspaces panel already selected and that workspace loaded.
The Workspace Settings panel
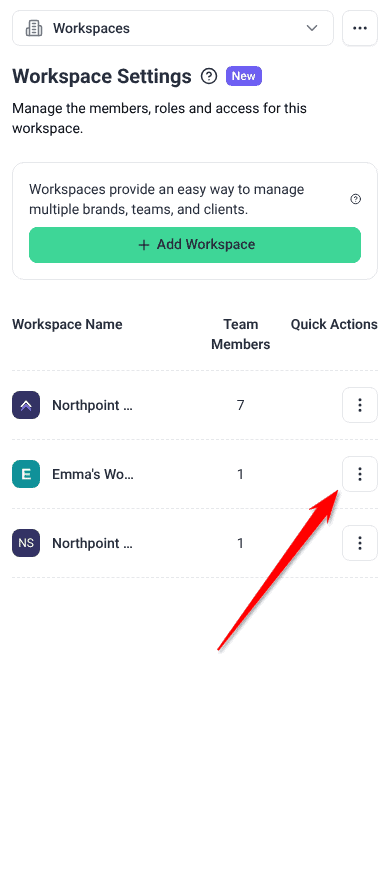
The panel is headed Workspace Settings with the description “Manage the members, roles and access for this workspace.” Below it sits an information card reading “Workspaces provide an easy way to manage multiple brands, teams, and clients” with the Add Workspace button on its right.
Underneath is the workspace list table:
| Column | What it shows |
|---|---|
| Workspace Name | The workspace icon and name. Locked workspaces appear at reduced opacity with a padlock icon. |
| Team Members | The number of people currently attached to that workspace. |
| Quick Actions | Edit and Delete buttons, shown only when your permissions allow them. Locked workspaces show Upgrade To Unlock instead. |
Switching on desktop
Switching reloads the dashboard into the new workspace — nothing carries across from the one you left.
Instructions:
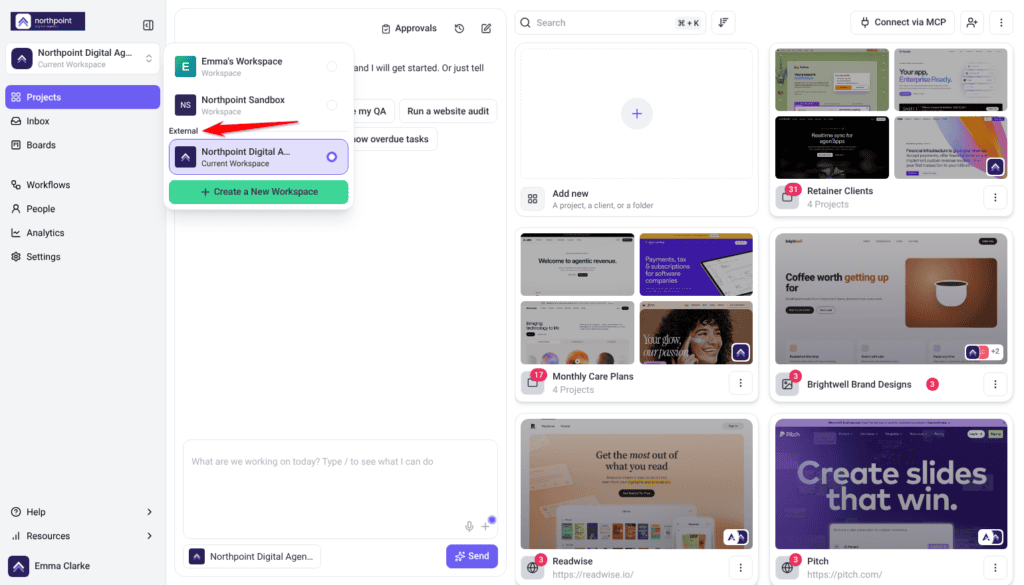
- Select the workspace avatar and name at the top of the left sidebar.The workspace switcher opens as a dropdown panel. When the sidebar is collapsed, hovering the avatar shows the current workspace name as a tooltip instead.
- Find the workspace you want in the list. Workspaces you own are listed first; workspaces you have been invited into appear below a divider labelled External.The active workspace is highlighted with a coloured border and reads Current Workspace under its name. Every other row reads Workspace.
- Select the workspace row, or its radio button on the right-hand side.Atarim switches immediately. The sidebar name and avatar update, and the projects list reloads showing only that workspace’s projects.
Switching on mobile
The mobile switcher lives in the navigation bar rather than the sidebar, but behaves the same way.
Instructions:
- Select the workspace avatar in the mobile navigation bar.A drawer slides up from the bottom of the screen, headed Workspaces.
- Select the workspace you want from the list.The drawer closes and the dashboard reloads in the selected workspace.
What happens when you switch
Switching does more than change what you are looking at. It is worth knowing the side effects before you switch mid-task:
| Where you were | Where you land after switching |
|---|---|
| Projects, or most dashboard screens | The same screen, reloaded for the new workspace. |
| A Collaborate view on a website | You are returned to Projects, because the site you were viewing belongs to the workspace you just left. |
| Settings (as an administrator) | You are returned to Projects rather than staying in Settings. |
| Inbox or Boards | The same screen, but your selected project, selected task, and scroll position are cleared so the view rebuilds cleanly for the new workspace. |
Any filters held in the address bar are also cleared during the switch, so a filtered view will come back unfiltered.
Creating a new workspace
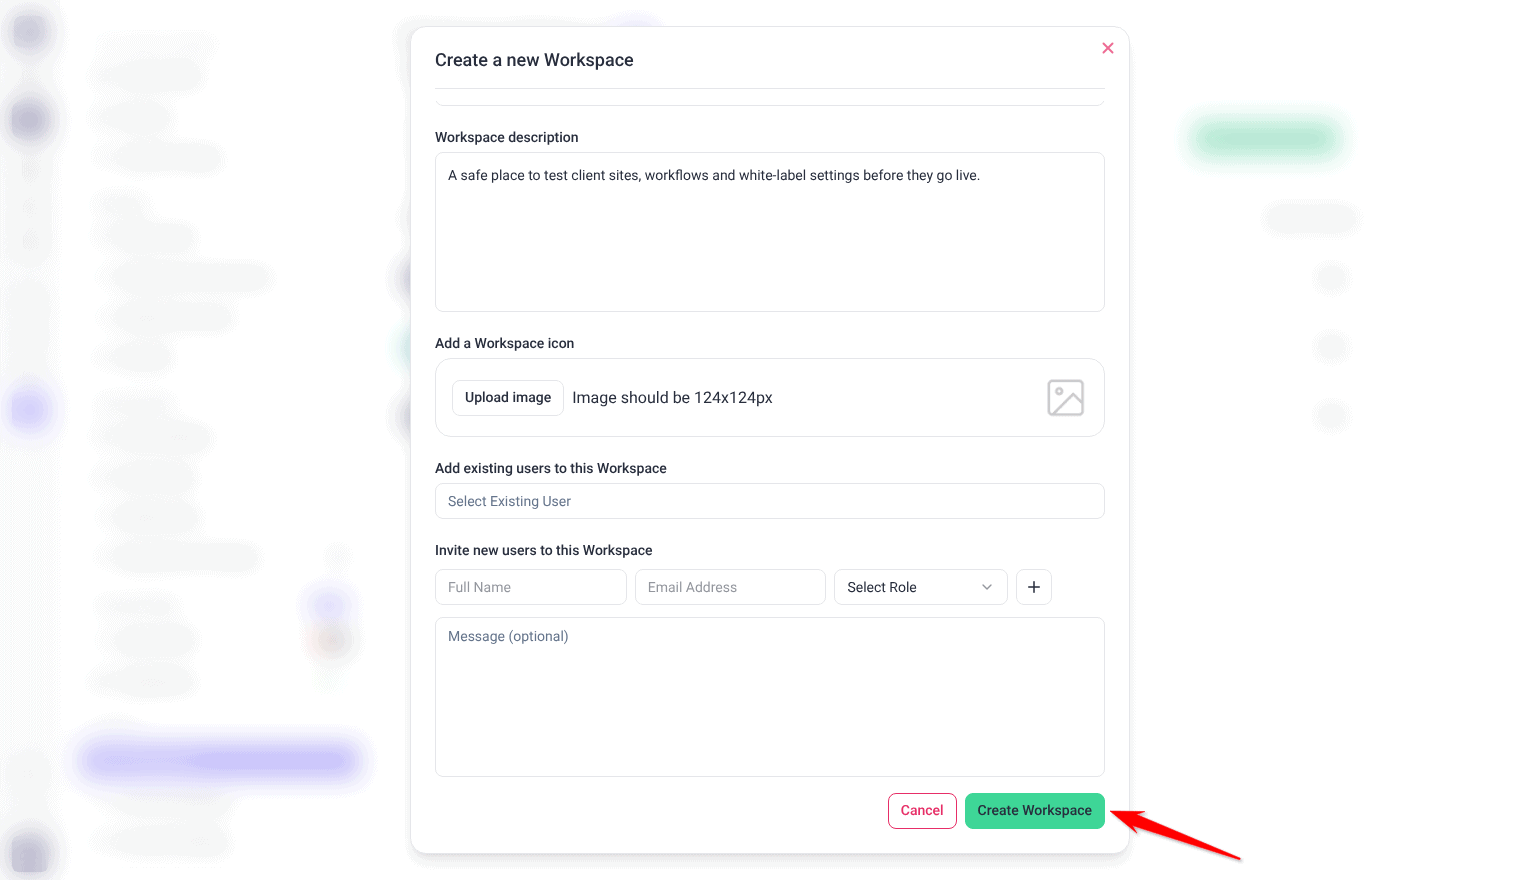
Use the Add Workspace button in the Workspace Settings panel, or Create a New Workspace at the bottom of the workspace switcher. Both open the same modal, titled Create a new Workspace.
Instructions:
- Select Add Workspace. The Create a new Workspace modal opens.
- Open the Workspace Owner dropdown and choose an owner. Each option shows the person’s name, email, and how many team member slots they have available.The owner determines whose plan the new workspace draws its slot from. Leaving this empty blocks the creation with the message “Please select a workspace owner.”
- In Name your Workspace, enter a name. This field is required and accepts up to 255 characters.The Create Workspace button stays disabled until a name is entered.
- Optionally enter a Workspace description to explain what the workspace is for.
- Optionally select Upload image under Add a Workspace icon to set the workspace avatar. The panel recommends an image of 124 × 124 pixels.A preview of the uploaded image replaces the default placeholder inside the modal.
- Optionally use Add existing users to this Workspace to pull in people who already belong to your account. You can select up to ten at a time.
- Optionally use Invite new users to this Workspace to invite people who do not yet have an account. For each person, enter their Full Name and Email Address, then open the role dropdown labelled Select Role and choose one.
- Select the + button to add another invite row, or the − button to remove one.
- Optionally add a note in the Message (optional) field. This message is included in every invitation email sent from this modal.
- Select Create Workspace. The workspace is created with a default set of settings and integration settings, invitations are emailed to anyone you added, the new workspace appears in both the list table and the workspace switcher, and Atarim switches you into it. If your plan has no free workspace slot, an upgrade dialog opens at this step instead and the workspace is not created.
The three roles you can assign
| Role | Who it suits | Typical use |
|---|---|---|
| Administrator | A project manager or team member | Someone who needs to manage settings, people, and billing-adjacent screens. |
| Team Member | A team member or contractor | Day-to-day staff who work on tasks and projects but do not administer the workspace. |
| Collaborator | A stakeholder or client | External stakeholders who need to view and comment but not administer anything. |
Renaming and rebranding a workspace
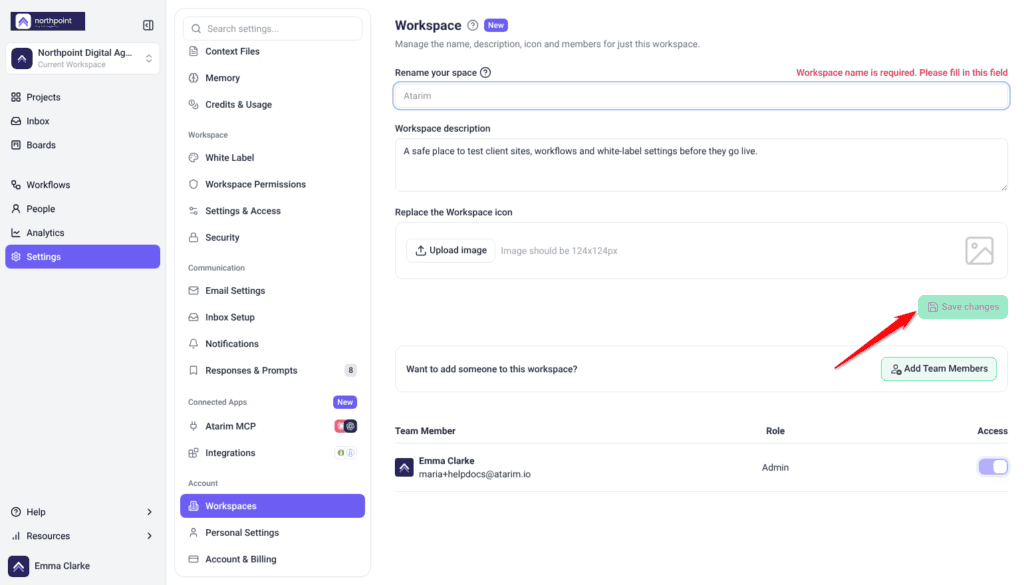
Selecting Edit on a workspace row (shown when you hold edit rights) opens that workspace’s own settings screen, headed Workspace with the description “Manage the name, description, icon and members for just this workspace.”
Instructions:
- In the Workspace Settings panel, find the workspace in the list table and select Edit.The individual workspace screen opens with the name, description, and icon fields pre-filled with the current values.
- Edit the Rename your space field to change the workspace name.Clearing the field shows the inline validation message “Workspace name is required. Please fill in this field” and disables the save button.
- Edit the Workspace description field if you want to change what the workspace is described as.
- Select Upload image under Replace the Workspace icon to change the avatar. The recommended size is 124 × 124 pixels.
- Select Save changes.A green confirmation toast appears, and the new name and icon are reflected in the workspace switcher and the list table.
Adding and managing members
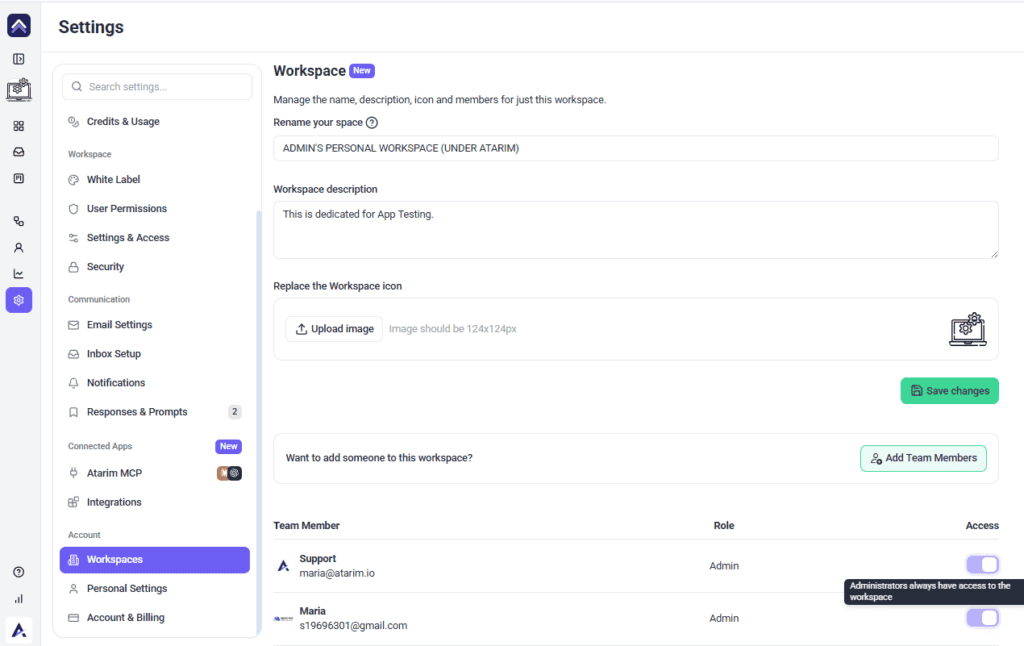
Below the save button on the individual workspace screen is a card reading “Want to add someone to this workspace?” with an Add Team Members button, followed by the member table.
Adding people
People can be pulled from your existing account or invited fresh by email, and both paths sit in the same modal.
Instructions:
- Select Add Team Members.A modal opens titled Add people to followed by the workspace name. Current members are already selected and cannot be deselected here — this modal only adds.
- Use Add existing users to this Workspace to pick people who already belong to your account.If nobody is available to add, the dropdown shows “No users found.”
- Use Invite new users to this Workspace to invite people by email. Enter Full Name and Email Address, then pick a role from the role dropdown. It starts on Administrator.
- Optionally add a Message (optional) to include in the invitation email.
- Select Invite users.Existing users are attached to the workspace immediately. Invited people receive an email and appear in the member table once the invitation is processed.
The member table
The table has three columns — Team Member, Role, and Access. The Access column holds a toggle that controls whether that person can currently reach the workspace.
Deleting a workspace
You can delete a workspace from its row in the list table, or from the bottom of the individual workspace screen under the heading Delete this Workspace. Both appear only when the workspace is not your default and you hold delete rights on it.
Instructions:
- Select Delete on the workspace’s row in Workspace Settings, or open the workspace with Edit and scroll to Delete this Workspace. That section warns that deleting removes all data and projects for the workspace, and that the action is not reversible.
- If you are on the workspace screen, select Delete Workspace. Either way, a confirmation modal opens asking “Are you sure you want to delete [workspace]?”
- Type the workspace’s exact name into the confirmation field.The Delete Workspace button in the modal stays disabled until what you type matches the workspace name character for character.
- Select Delete Workspace to confirm, or Cancel to back out. The workspace and its projects are removed. If you were working in that workspace, Atarim moves you to your default workspace.

Plan limits and locked workspaces
The number of workspaces you can run is set by your plan, plus any additional workspaces added to your account. When you are at the limit, Atarim shows an upgrade dialog when you select Create Workspace, instead of creating the workspace.
If your available workspace count drops — for example after a plan change — Atarim does not delete anything. Instead it locks the excess workspaces:
- Your default workspace is never locked.
- Remaining workspaces are unlocked oldest-first, up to your new limit. Newer workspaces are the ones that stay locked.
- Locked workspaces stay visible in the switcher and the list table, greyed out with a padlock.
- Members of a locked workspace are deactivated within it until it is unlocked again.
In Workspace Settings, each locked workspace shows an Upgrade To Unlock button in its row.
Workspaces and connected WordPress sites
When you connect a WordPress site using the Atarim plugin, the plugin’s connection screen is headed Connect this Site to your Atarim Workspace. The site is attached to a specific workspace as part of that handshake, and once the connection completes the plugin confirms with “This website is connected to your dashboard.”
FAQs
How many workspaces can I create?
That depends on your plan’s workspace allowance plus any additional workspaces attached to your account. When you reach the limit, selecting Create Workspace opens an upgrade dialog instead of creating the workspace.
Can I move a project from one workspace to another?
Not between your own workspaces. If you need work moved, contact Support before recreating anything manually.
What happens to my data if a workspace gets locked?
Nothing is deleted. The workspace and everything in it are preserved and become reachable again as soon as a slot frees up or you upgrade.
Can I delete my default workspace?
No. The delete section does not appear for the default workspace, and the request is refused server-side. Contact Support if you need one retired.
Does each workspace have its own white label and integration settings?
Yes. A new workspace is created with its own default settings and integration records. White label, integrations, canned responses, and notification preferences all need configuring separately in each workspace.
Why can’t I switch off an administrator’s access?
Administrators always retain workspace access by design — their toggle is shown as on and disabled with a tooltip explaining this. To remove an administrator, change their role first.
I invited someone but they are not in the member table. Why?
Invited people appear once their invitation is processed and accepted. If it has been longer than expected, check that the seat limit was not reached and ask them to look in their spam folder.
Can a client see my other workspaces?
No. People only see workspaces they have been added to, and workspaces do not share data. A client added to one workspace has no visibility of any other.
Conclusion
Workspaces are the cleanest separation Atarim offers. Used well, they let one account run several brands or client portfolios side by side without settings, branding, or people leaking across. Create one per genuine boundary, keep the membership tight, and remember that everything below the workspace — projects, integrations, white label — is configured per workspace rather than once for the account.
Tips & best practices
- Name workspaces after the boundary they represent — a client, a brand, a region — rather than a project. Project-named workspaces age badly.
- Set the workspace icon early. Once you run more than three, the switcher is far faster to scan by icon than by name.
- Before a plan downgrade, check which workspaces will lock. Unlocking runs oldest-first, so your newest work is the most exposed.
- Pick the workspace carefully when you connect a WordPress site. Moving it later means disconnecting and connecting again.
- Invite clients and stakeholders as Collaborator from the workspace invite form. The People screen does not offer that role.
- Keep one administrator besides yourself in every workspace. If you switch off your own access by accident, you will need someone else to let you back in.