How to Use the Annotation Tools for Feedback
Simplify your website collaboration with Atarim’s annotation tools — visual feedback made easy.
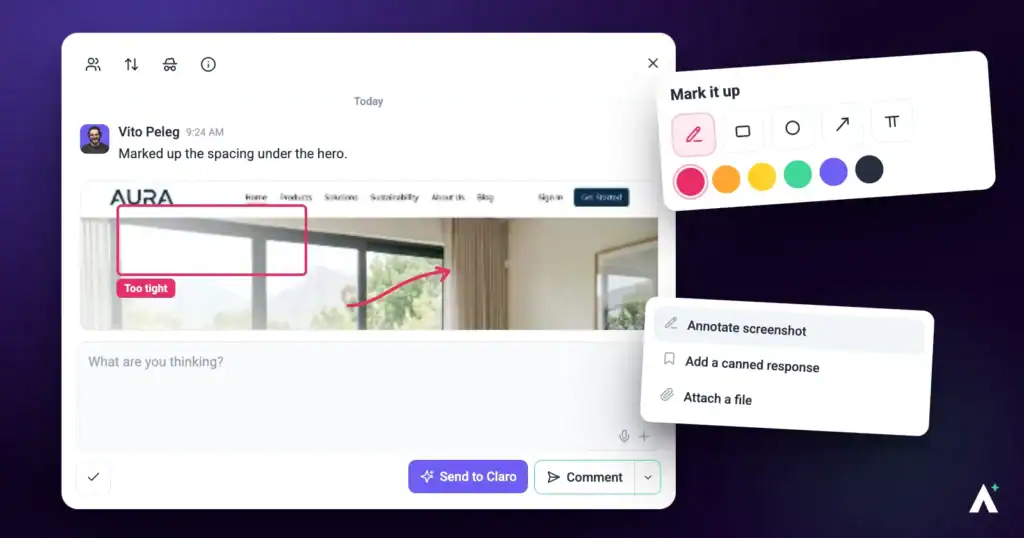
Atarim’s annotation tools let you highlight and comment on specific areas of a webpage by capturing a screenshot of what you can currently see. Marking directly on that screenshot removes the ambiguity that written feedback alone leaves behind.
Atarim frames the purpose plainly: draw, highlight, and point directly on your view to make feedback crystal clear. No guesswork — just straightforward, visual communication.
Step-by-Step Guide
1. Access the Annotation Tool
Annotation starts from a task, not from the toolbar. Open the task you want to leave feedback on, and the control sits in its comment box.
Instructions:
- Open the website project from your Atarim dashboard.
- Select an existing task, or create a new one. The task popover opens with a comment input area.
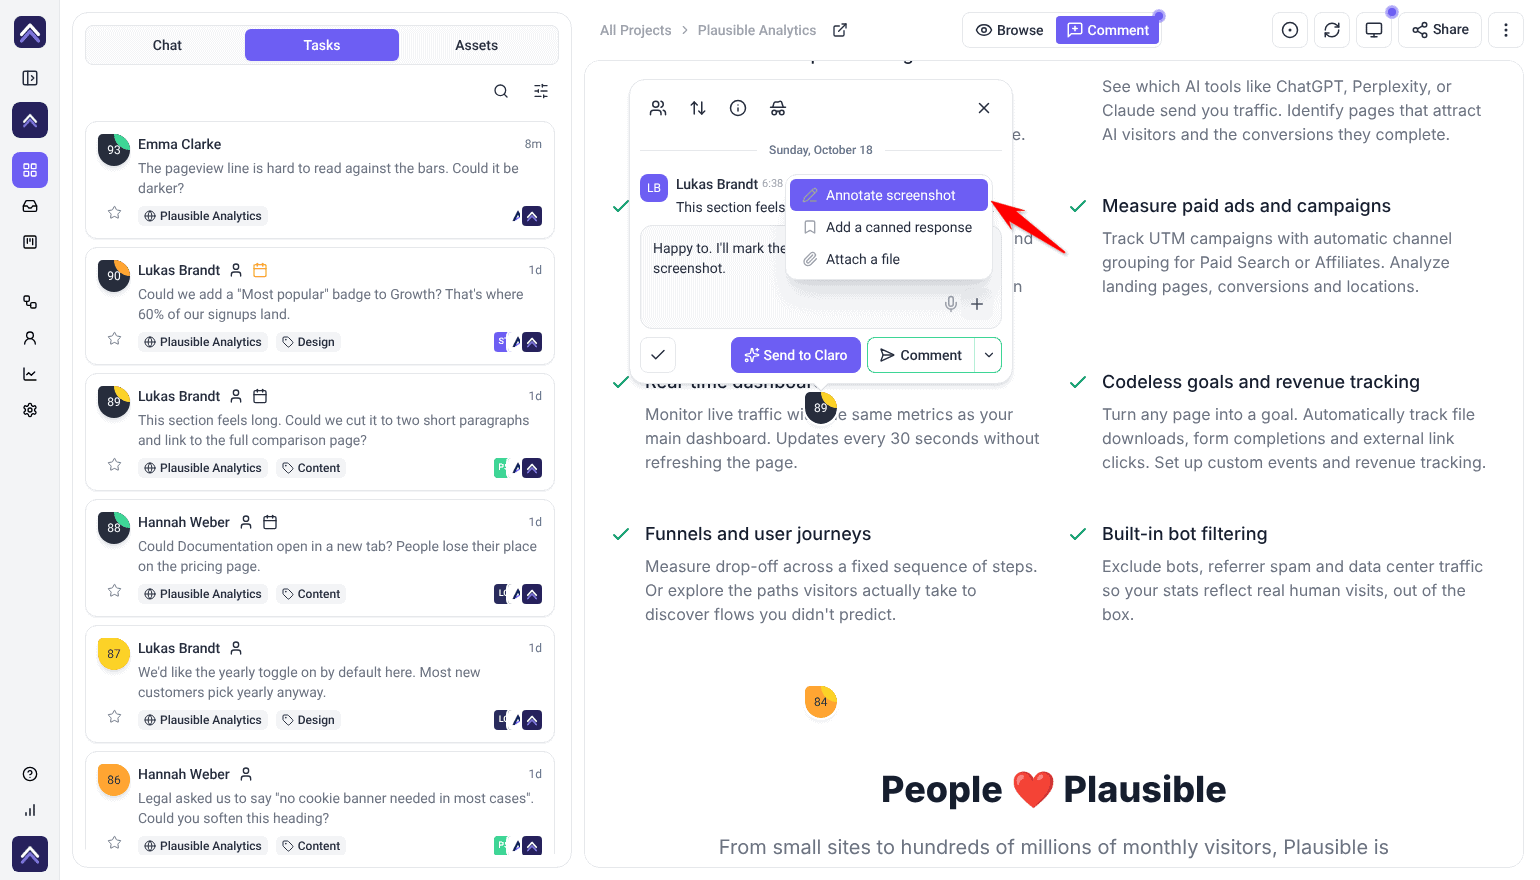
- Select the + button in the comment box — its label is More composer actions — and choose Annotate screenshot from the menu.
- If your browser asks for permission to share this tab, select Allow. In Chrome and Edge you are asked once per visit if you already chose Most accurate when Share exactly what you see appeared.
- The Annotate screenshot editor opens with the captured view loaded, ready to mark up.
2. Capture the Screenshot
Atarim captures your current viewport — what is on screen at that moment, not the whole page — and loads it into the annotation editor.
Instructions:
- Confirm the capture permission if you have not already. The system captures the current screen view and loads it in the annotation editor.
- Check the captured view shows what you intended. If the area you wanted is off screen, close the editor, scroll to it, and start again.
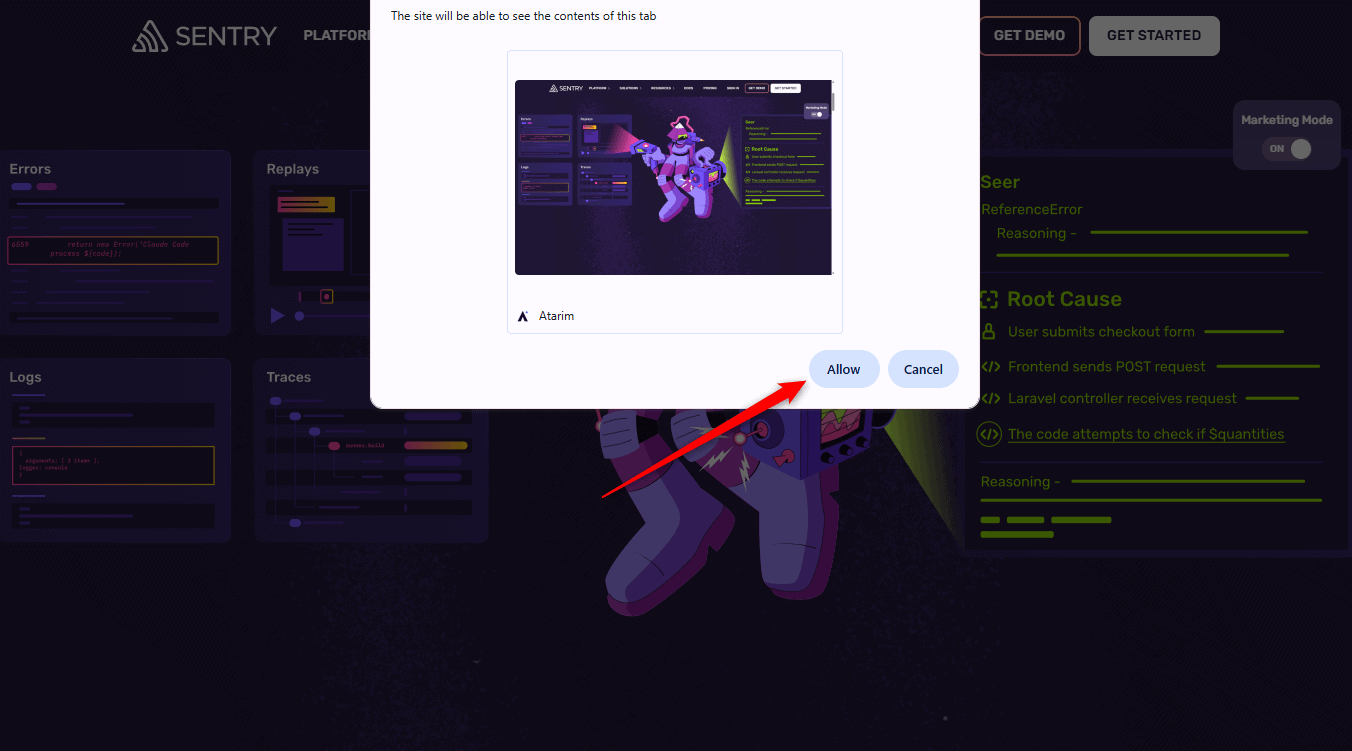
The Chrome extension removes the permission step: with it enabled, the current view is captured and loaded into the editor automatically. Learn More About The Chrome Extension
| Without the extension | With the Chrome extension | |
|---|---|---|
| Permission | Allow tab access each time, or once per visit in Chrome and Edge if you share your tab. | Not required. |
| Capture | Loads after you grant permission. | Loads automatically. |
| Tools | Identical. | Identical. |
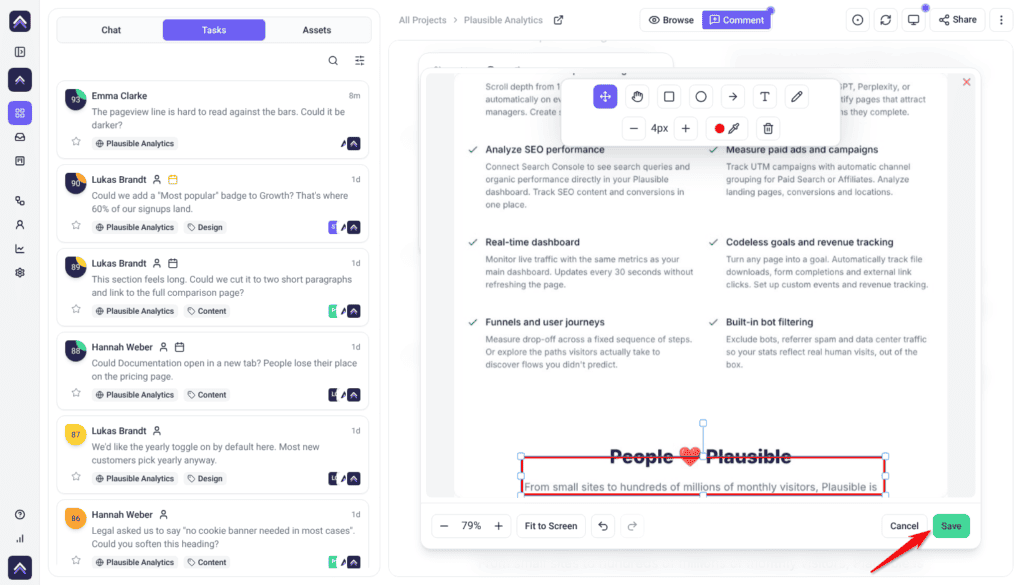
3. Annotate the Screenshot
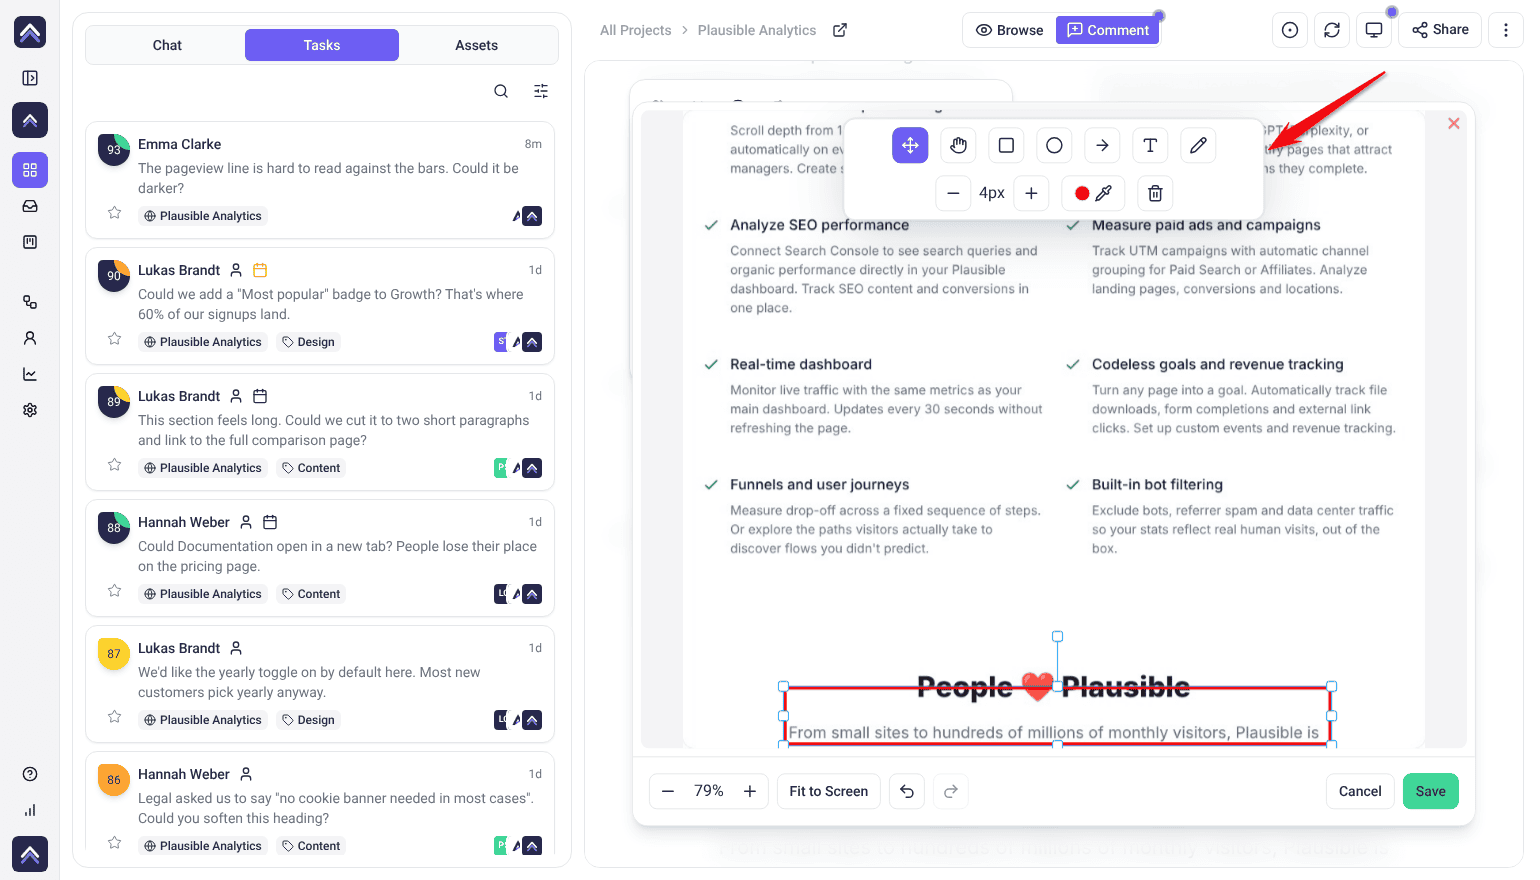
The editor gives you a small set of drawing tools. They are deliberately few, because the point is clarity rather than artwork.
| Tool | Use it for |
|---|---|
| Arrow | Directing attention to one specific element or issue. The clearest tool for “this bit here”. |
| Circle | Highlighting a small element such as a button, without obscuring it. |
| Rectangle | Calling out a larger area — a section, a column, a content block. |
| Pen | Freehand marks, for roughly circling an area or sketching a direction. |
| Text | Writing notes directly on the screenshot. A new text box opens empty and ready to type, showing the placeholder Type your note — there is nothing to delete first. |
| Move/Select | Picking up something you have already drawn to move, resize, or recolor it. |
| Pan (Space) | Dragging the canvas to move around a zoomed-in screenshot. |
Instructions:
- Choose a tool from the toolbar.
- Pick a color. Annotations start red, which stands out against most designs. Change it if red already appears on the page.
- Adjust the stroke size if you need a heavier or finer line.
- Draw on the screenshot. Each shape is a separate object, so you can select and adjust it afterwards rather than starting again.
- Add a text note to explain what needs to change.
Moving Around the Canvas
On a busy screenshot you will want to zoom in on detail and then get back out again. Three controls handle that.
- Zoom: use the − and + buttons at the bottom left. The zoom level shows between them.
- Pan (Space): select the hand tool and drag the canvas to move around it. Holding Space does the same while another tool is selected.
- Fit to Screen — zooms out so the whole screenshot is visible again. The quickest way to recover if you have lost your place.
Keyboard Shortcuts
Four shortcuts make the editor considerably faster, particularly when correcting a mark you are not happy with.
| Shortcut | Does |
|---|---|
| Ctrl / Cmd + Z | Undo the last mark. |
| Ctrl / Cmd + Shift + Z | Redo. |
| Delete or Backspace | Removes the selected shape. |
| Space | Hold to pan the canvas without switching tools. |
4. Publish Your Annotation
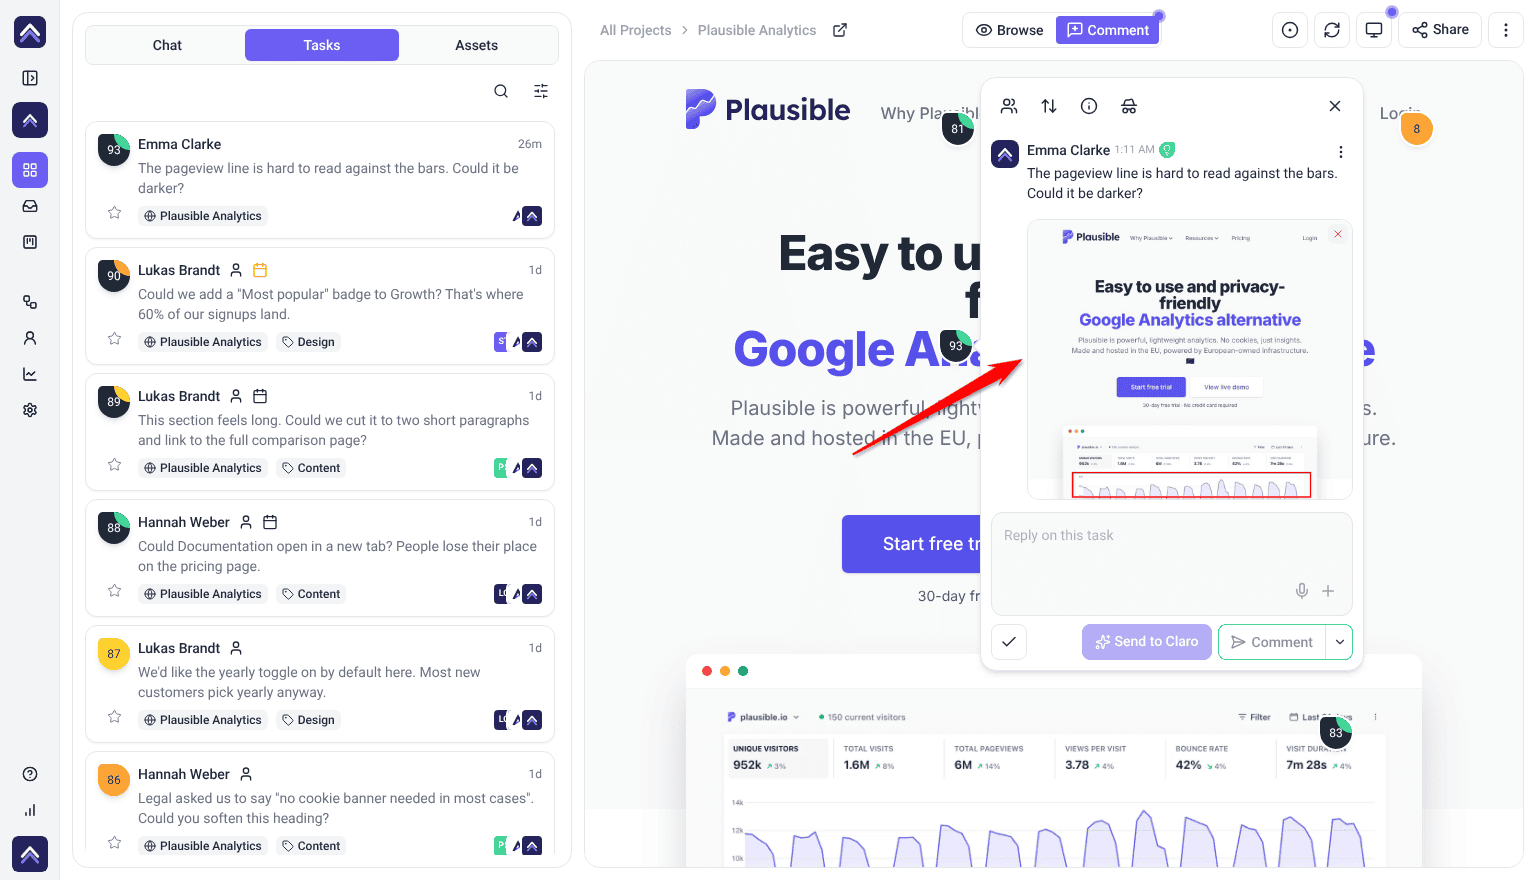
Saving attaches the marked-up screenshot to the task as a comment, where the rest of the team can see and reply to it.
Instructions:
- Review your annotations before saving. Check the marks land where you intended and the text reads clearly at normal size.
- Select Save. The editor closes and the marked-up screenshot is attached to your comment — it is not posted yet.
- Send the comment. The image then appears in the task thread, visible to everyone with access to the project.
Benefits of Annotating
| Benefit | In practice |
|---|---|
| No ambiguity | An arrow pointing at the element removes any doubt about which one was meant. |
| Fewer rounds | Spatial problems are shown rather than described, so the fix lands right the first time. |
| Anyone can do it | No design software and no training — clients use the same tools your team does. |
| The context is preserved | The screenshot captures how the page looked at that moment, even if it changes later. |
| The discussion stays attached | Replies happen on the task, beneath the image everyone is looking at. |
Example Use Cases
| Situation | How to annotate it |
|---|---|
| Elements are misaligned | Rectangle around the group, arrow to the one that is out, and a note giving the direction to move it. |
| Spacing is too tight | Arrows on both sides of the gap with a short note — far quicker than describing which margin you mean. |
| A layout change | Rectangles around both blocks and an arrow showing where one should go. |
| A specific button or link | Circle it and add a note. Circling keeps the element visible in a way a filled shape would not. |
| A mobile-only problem | Switch to mobile width first, then annotate — the task records the screen size too. Discover Responsive Testing |
Known Limitations
- Annotation is a paid feature. On lower plans the control opens an upgrade panel instead.
- It captures the visible viewport only, not the full page.
- Annotations attach to a comment, so they cannot exist on their own.
- A published annotation cannot be edited. Draw a new one and add it as another comment.
- The screenshot is a moment in time. If the page changes afterwards, the annotation still shows how it looked when you drew on it.
FAQs
Can annotations work on mockups or designs?
The screenshot annotation tool covered here is for website and URL projects. Image and design projects have their own image annotations, available as a plan-dependent feature. Learn More About Image Based Collaboration
Is the Chrome extension necessary?
No. Annotation works both with the extension and with URL-based projects. The extension simply removes the permission prompt each time.
How is the screenshot saved?
Once published, the annotated screenshot is added to the task as an image comment, visible to everyone with access to the project.
Do I need design software?
No. Everything happens in the browser, and the tools are deliberately simple — pen, arrow, rectangle, circle, and text.
Can I edit an annotation after publishing it?
Not the saved image. Draw a new annotation and add it as another comment on the same task.
Can I change a shape’s color after drawing it?
Yes. Select it with Move/Select, then choose a new color.
Can my client annotate too?
Yes, once they are signed in, using the same tools you do.
Common issues
- Annotate screenshot opens an upgrade panel — annotation is not included on your plan. The panel names the minimum plan required.
- Nothing happens after selecting Annotate screenshot — your browser is waiting for permission. Select Allow on the prompt, or install the Chrome extension to skip it.
- The screenshot shows the wrong part of the page — only the visible viewport is captured. Close the editor, scroll to the right area, and start again.
- You cannot select a shape you drew — switch to the Move/Select tool. Drawing tools create new shapes rather than selecting existing ones.
- You have zoomed or panned and lost the page — select Fit to Screen to bring the whole screenshot back into view.
- You drew something by mistake — undo with Ctrl or Cmd + Z, or select it and press Delete.
- Red marks are hard to see — change the color before drawing. Red is only the default, and it disappears on a red design.
Conclusion
Atarim’s annotation tools make website feedback intuitive and efficient. By capturing what you can see and marking it up directly, teams remove the miscommunication that written feedback alone creates — and projects finish faster for it.
Annotations travel with the comment, so whoever picks up the task sees both.
Tips & best practices
- Be specific. Use arrows or shapes to highlight only the key elements, not everything on the page.
- Provide context. Add a clear, concise note so the mark is actionable rather than decorative.
- Position before you capture. Only the visible viewport is captured, so scroll first.
- Install the Chrome extension if you annotate often . It removes the permission prompt entirely.
- Change the color when the design is already red. The default disappears on the wrong page.
- Collaborate actively. Encourage your team to reply within the task thread so the answer stays with the drawing.