Pabbly
Push and pull data between Atarim and thousands of other apps, using Pabbly Connect workflows.
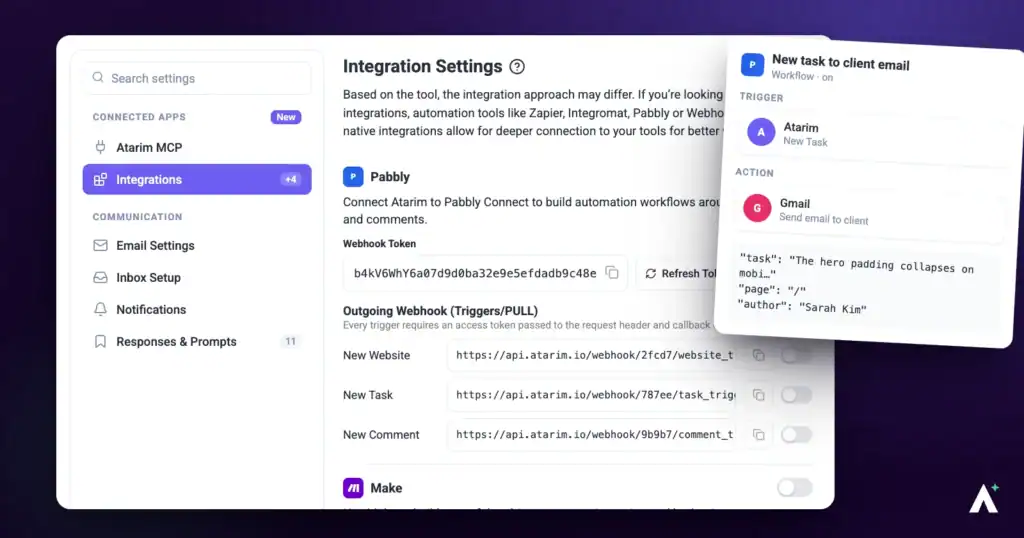
Pabbly Connect is an automation platform that links Atarim to over 6,000 other apps. Setup has two halves that are easy to confuse — an API key so Pabbly can read your Atarim account, and a webhook URL so Atarim knows where to send new tasks. Both are required.
Enable Pabbly and Copy Your API Key
The API key is what authorizes Pabbly to act on your account, so treat it like a password.
Instructions:
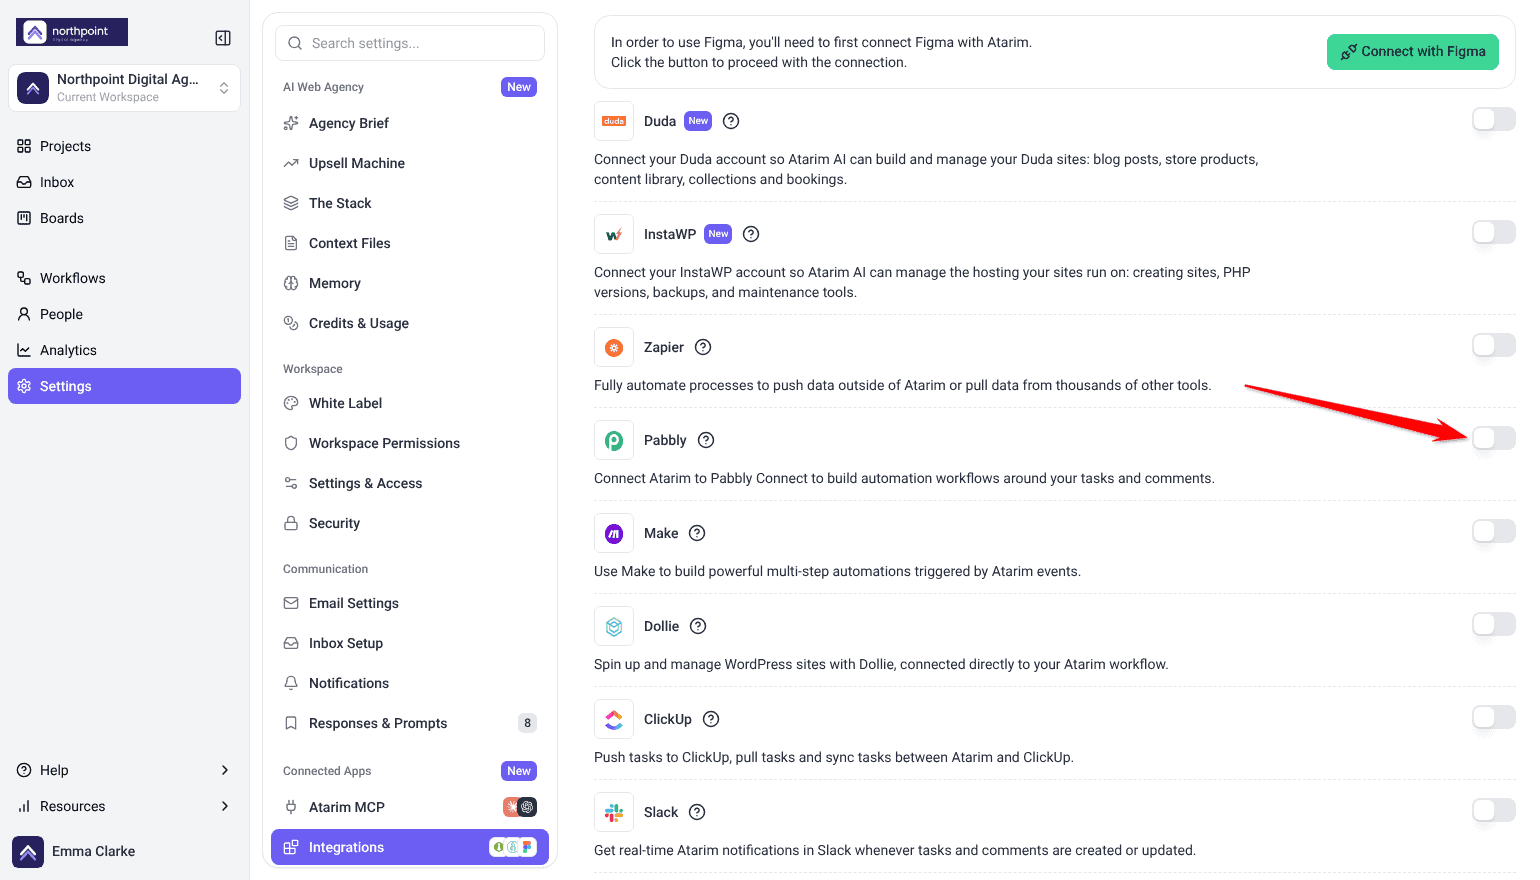
- Log in to Atarim and go to Settings.
- Under Connected Apps, select Integrations.
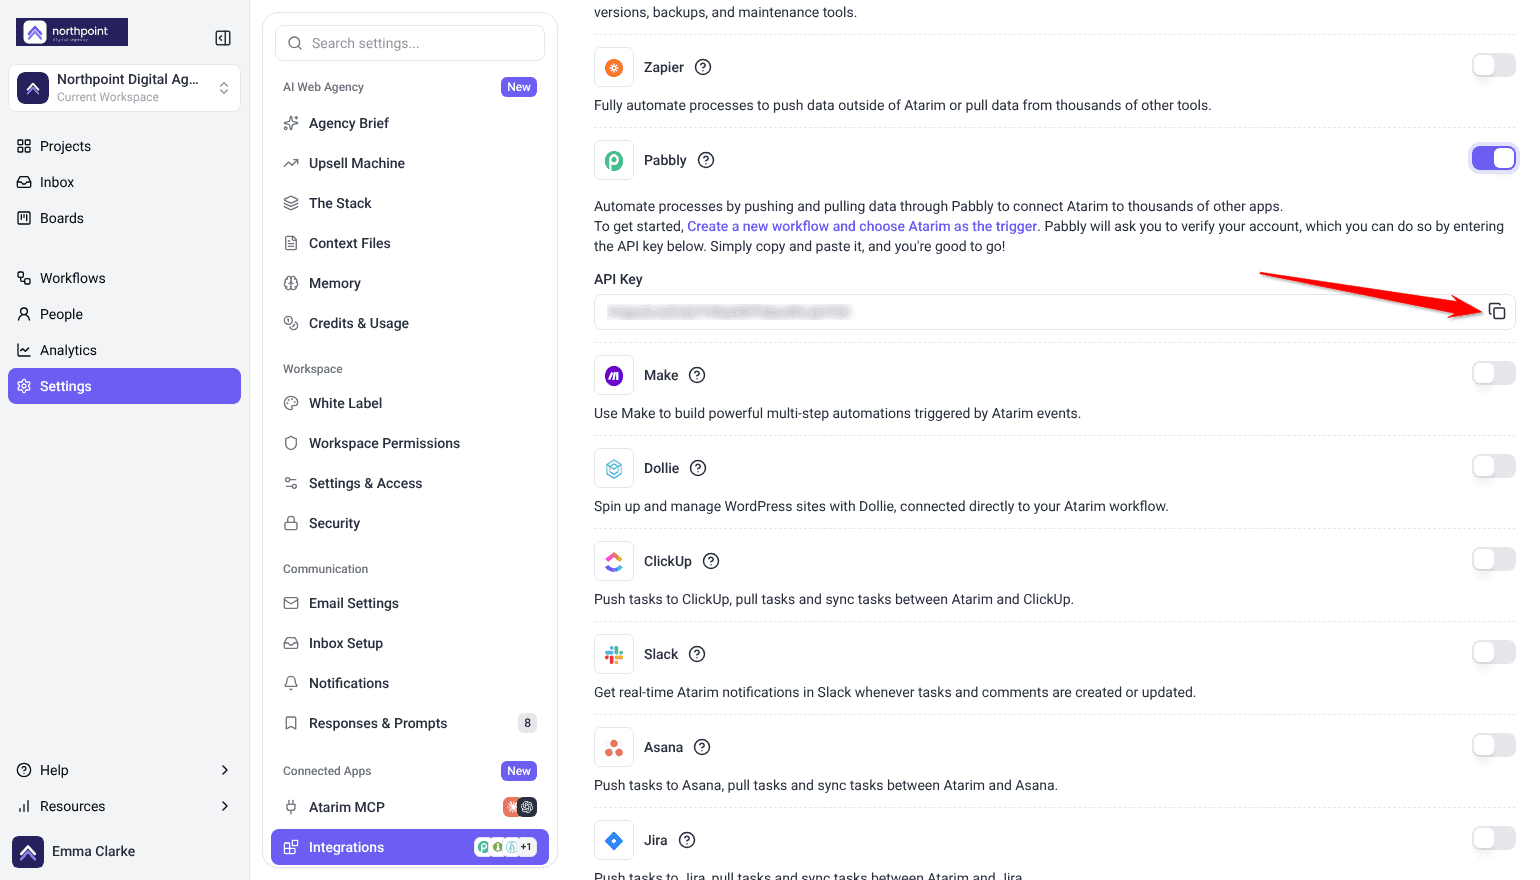
- Find Pabbly and switch its toggle on. The integration’s details expand, and a confirmation appears that the settings changed.
- Find the API Key field beneath the description and select the copy icon. The key is on your clipboard, ready for the verification step in Pabbly.
Add Atarim as a Connection in Pabbly
The API key establishes Pabbly’s connection to your Atarim account.
Instructions:
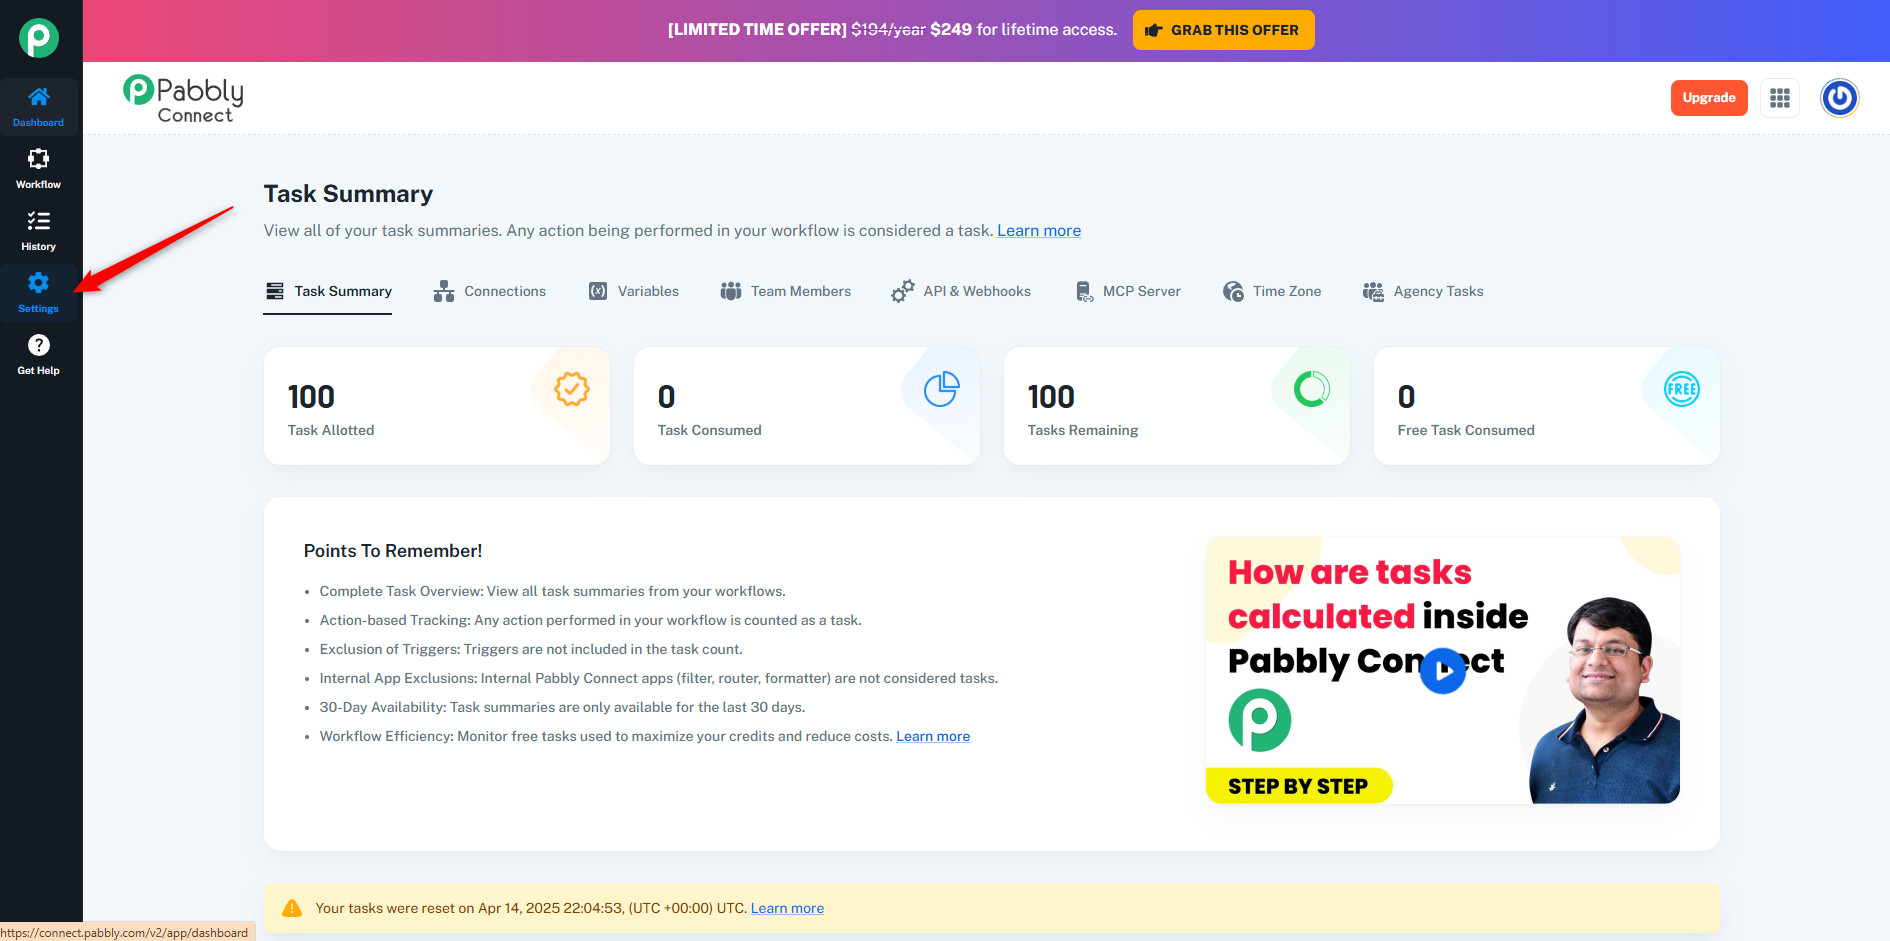
- Log in to Pabbly Connect.
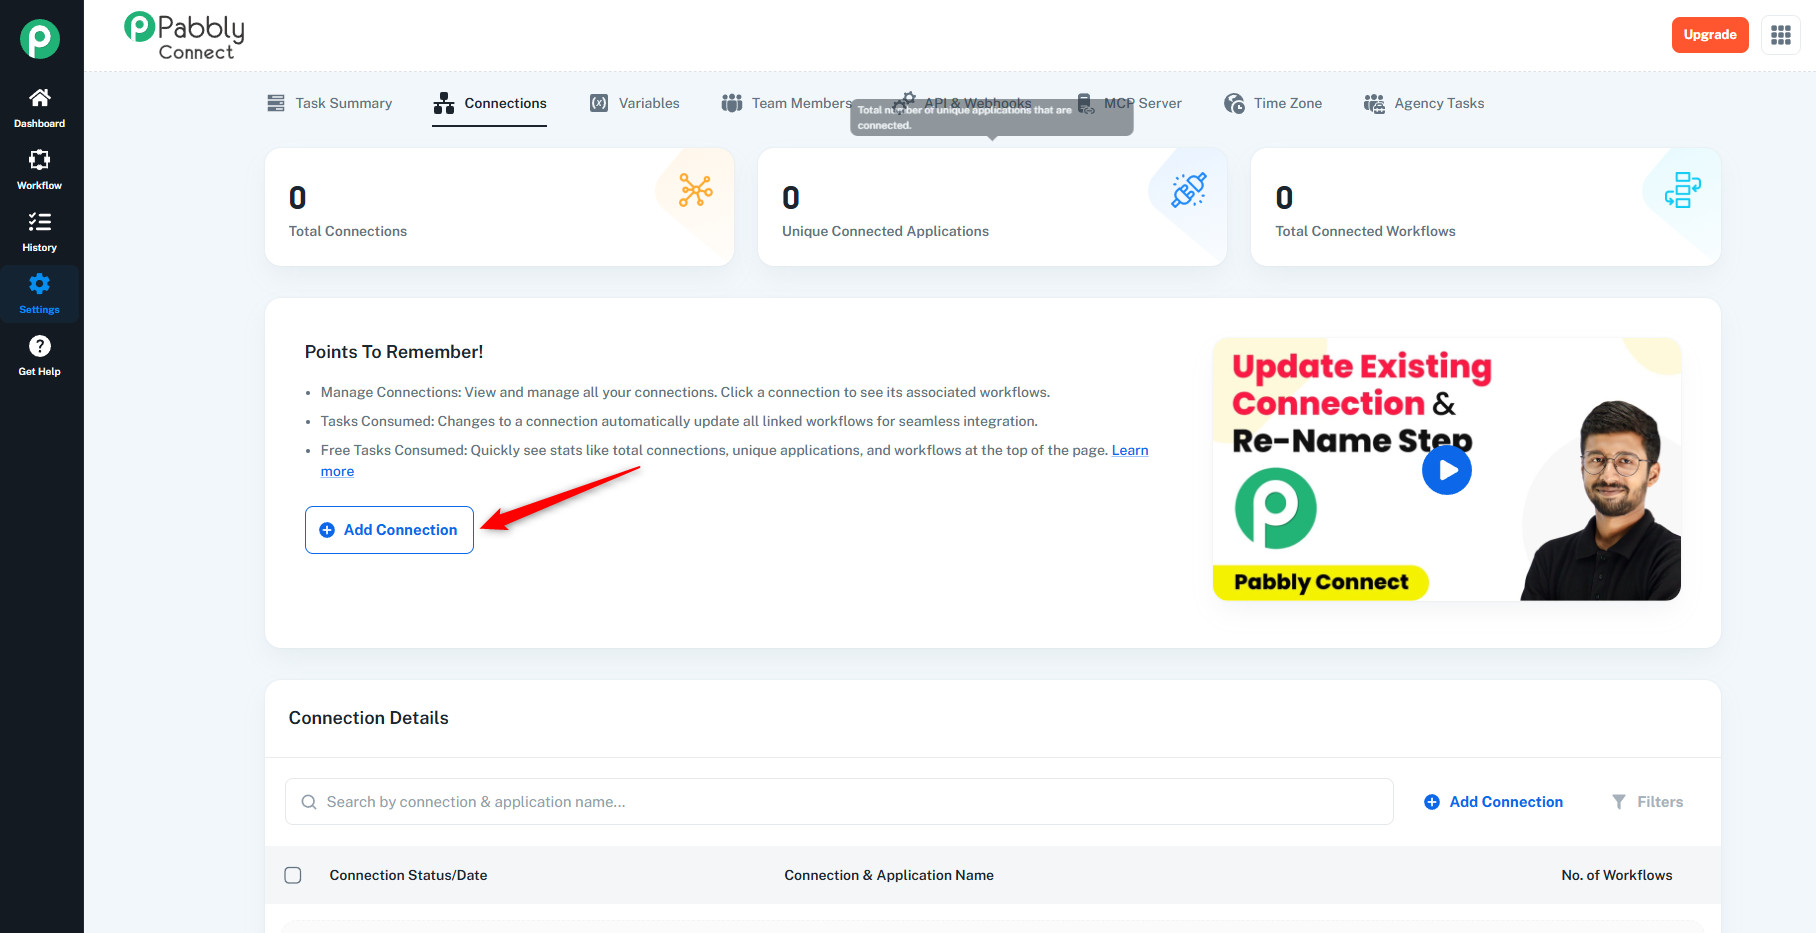
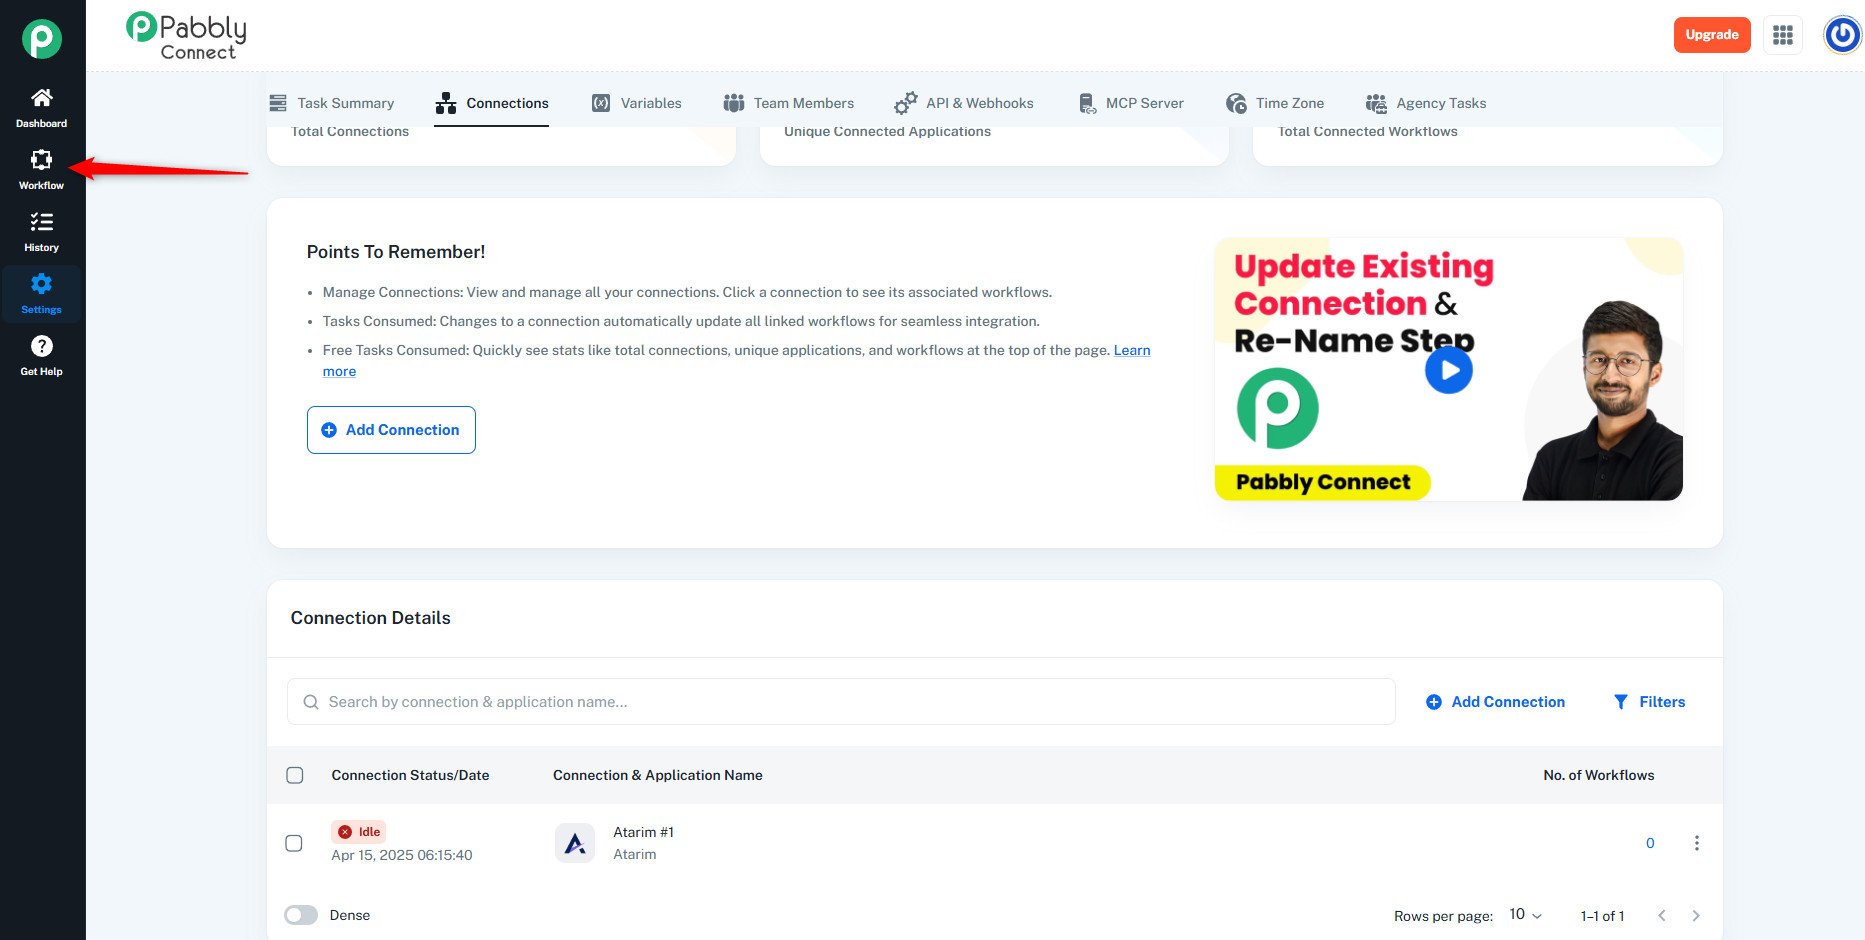
- Go to Settings, then Connections.
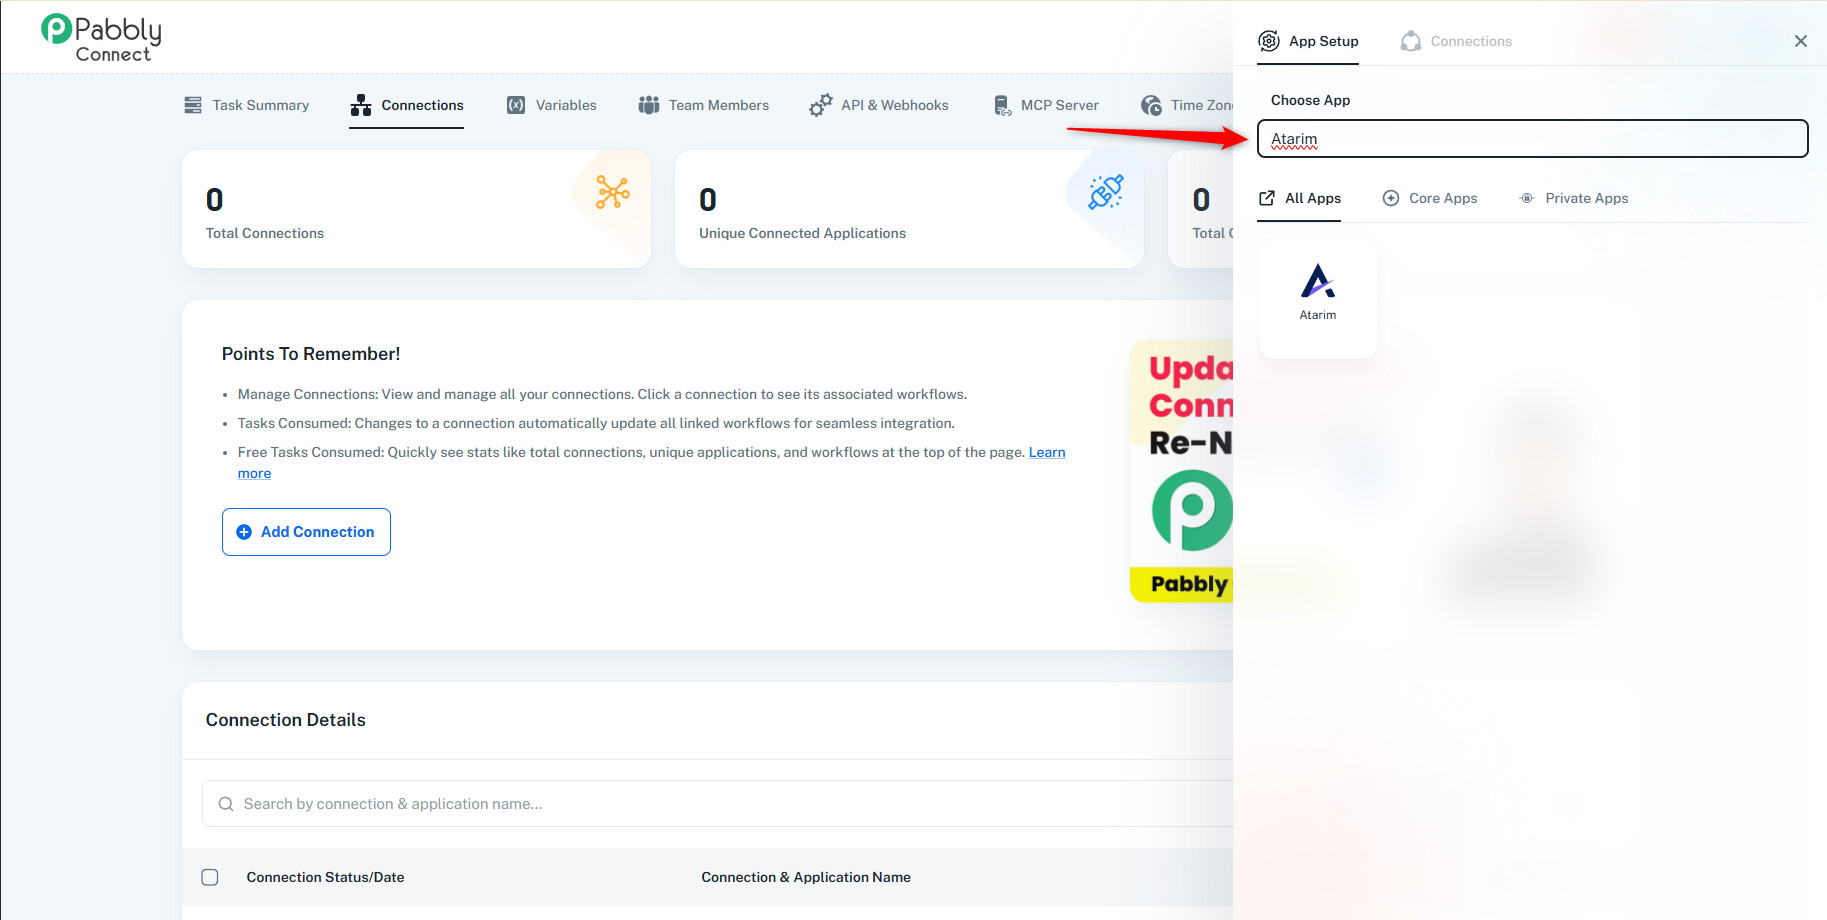
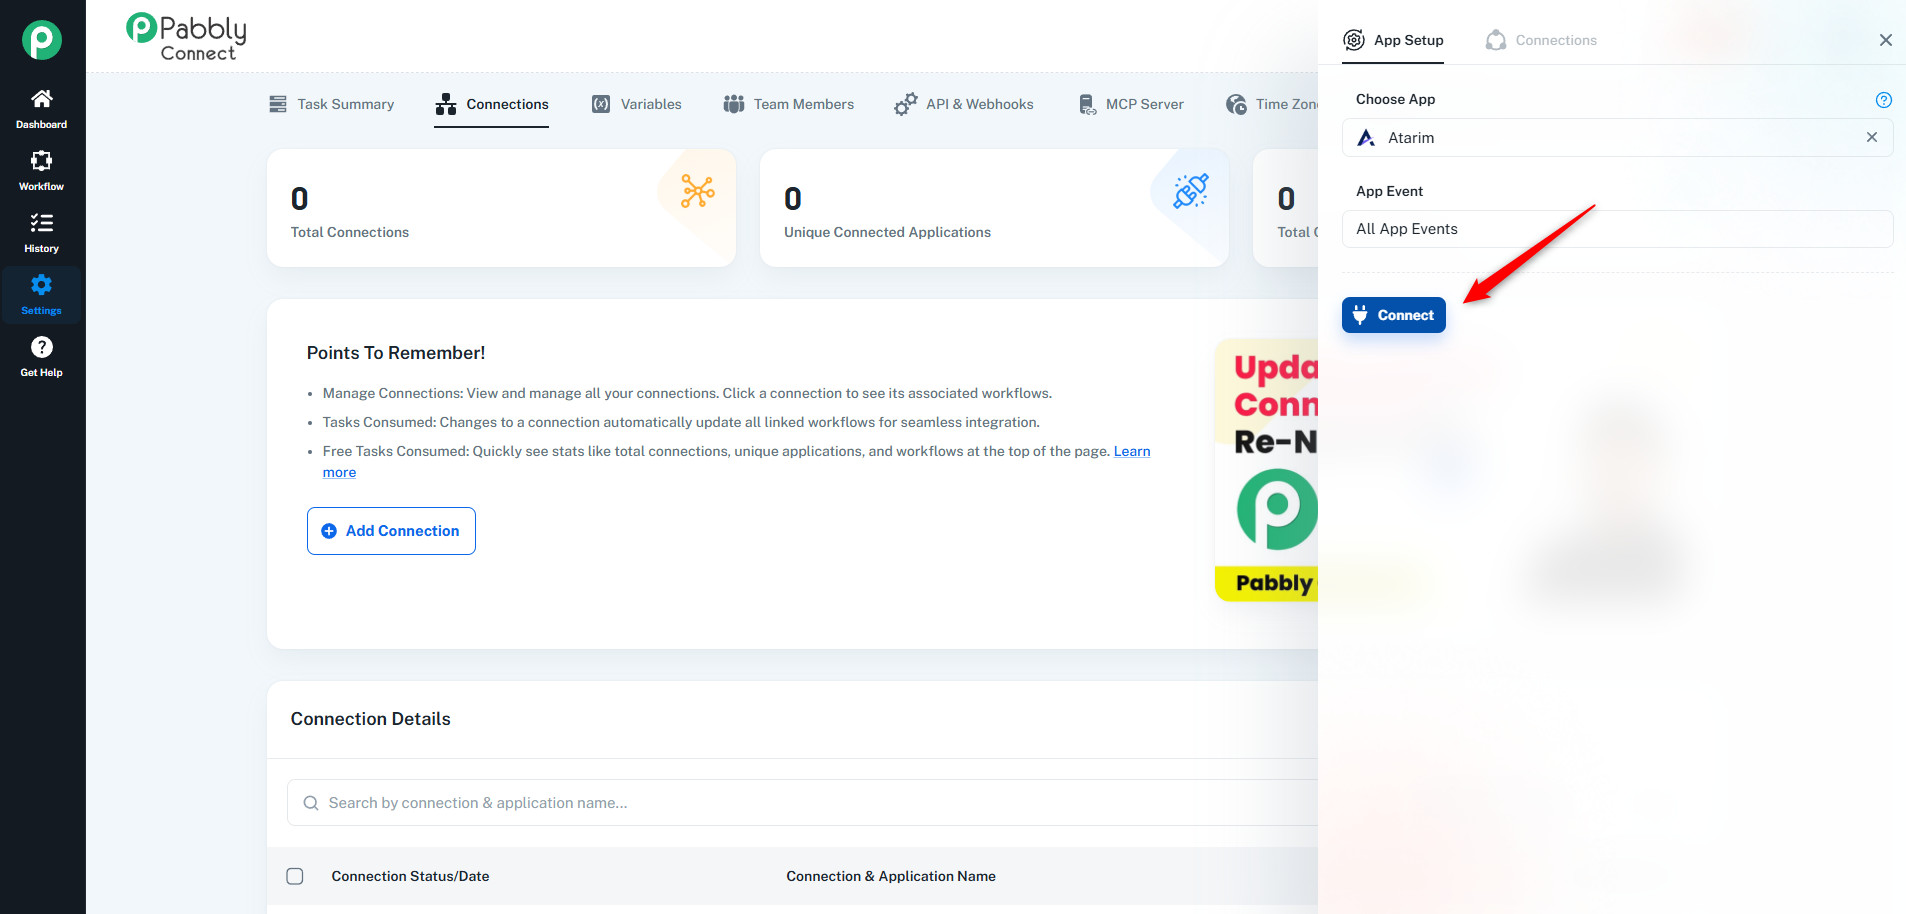
- Select Add Connection and search for Atarim.
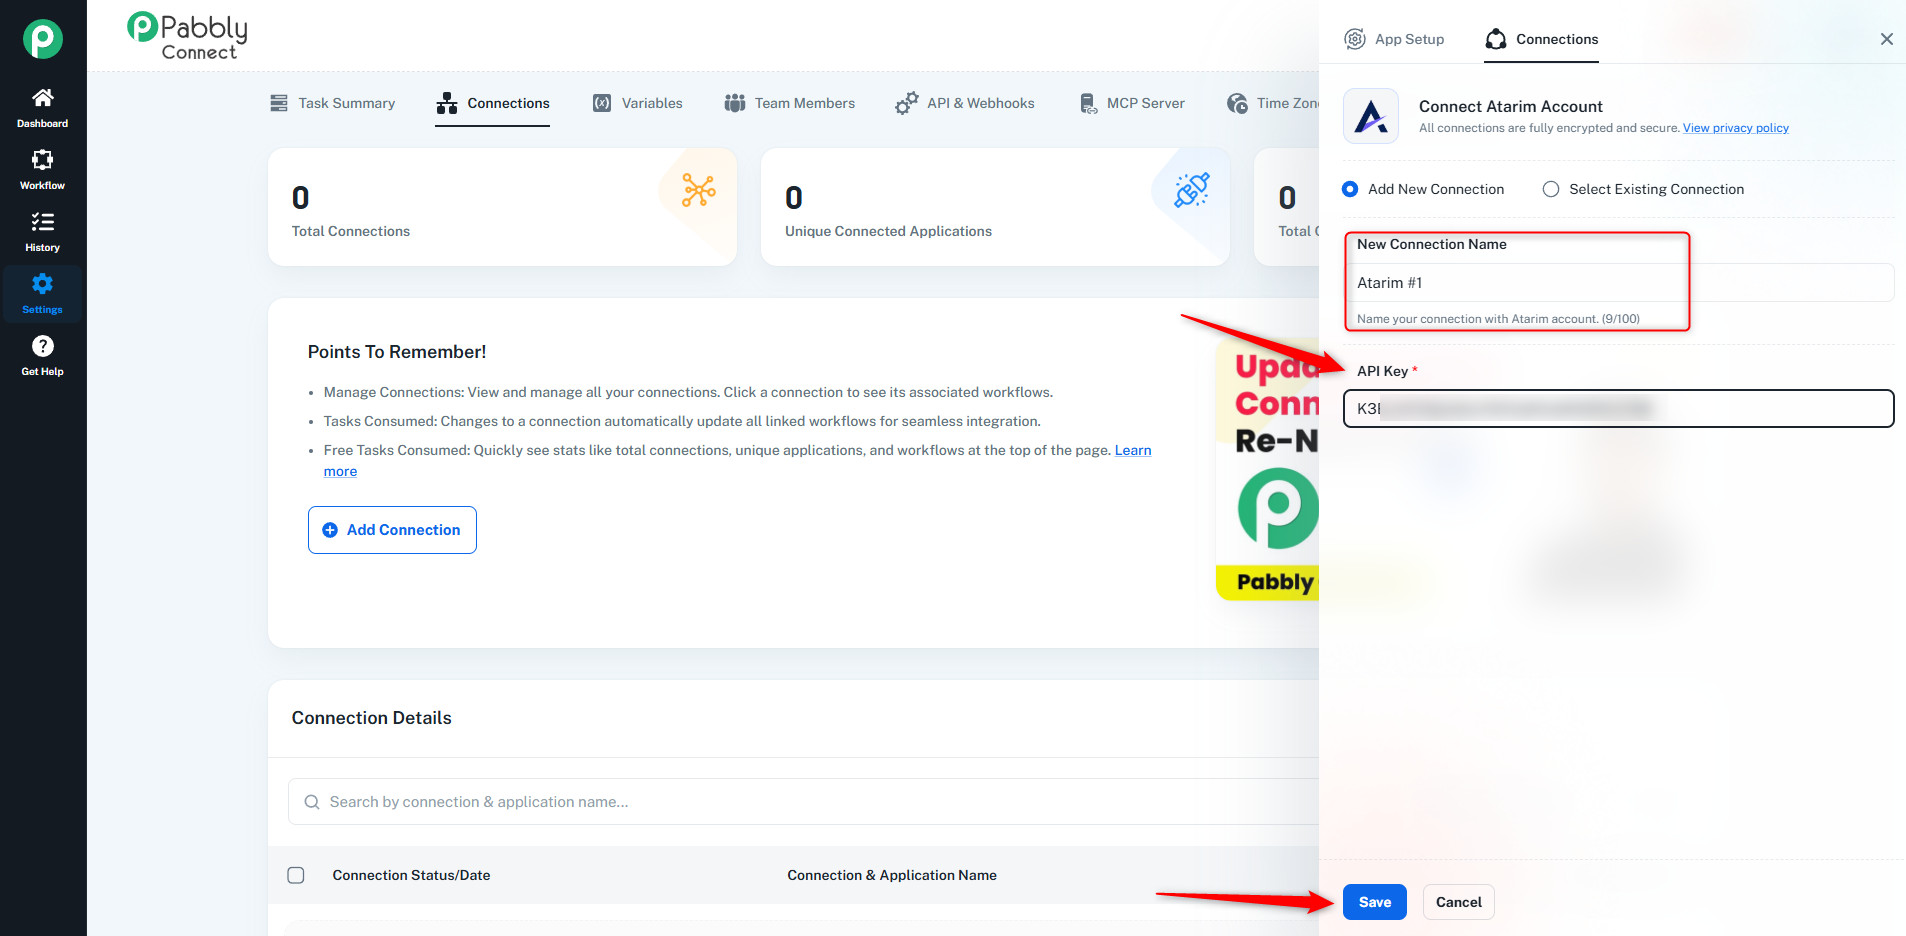
- Paste your Atarim API key into the field and select Save. Pabbly stores the connection so you can reuse it across workflows.
Set Atarim as the Trigger and Get the Webhook URL
Pabbly generates the URL here, but nothing will reach it until Atarim is told to post there in the next step.
Instructions:
- In Pabbly, create a new workflow and give it a name.
- Choose Atarim as the trigger app.
- Select New Task as the trigger event. This fires every time a new task is created in Atarim.
- Pabbly generates a Webhook URL. Copy it — this is what Atarim will send task data to.


Add the Webhook to Atarim
Instructions:
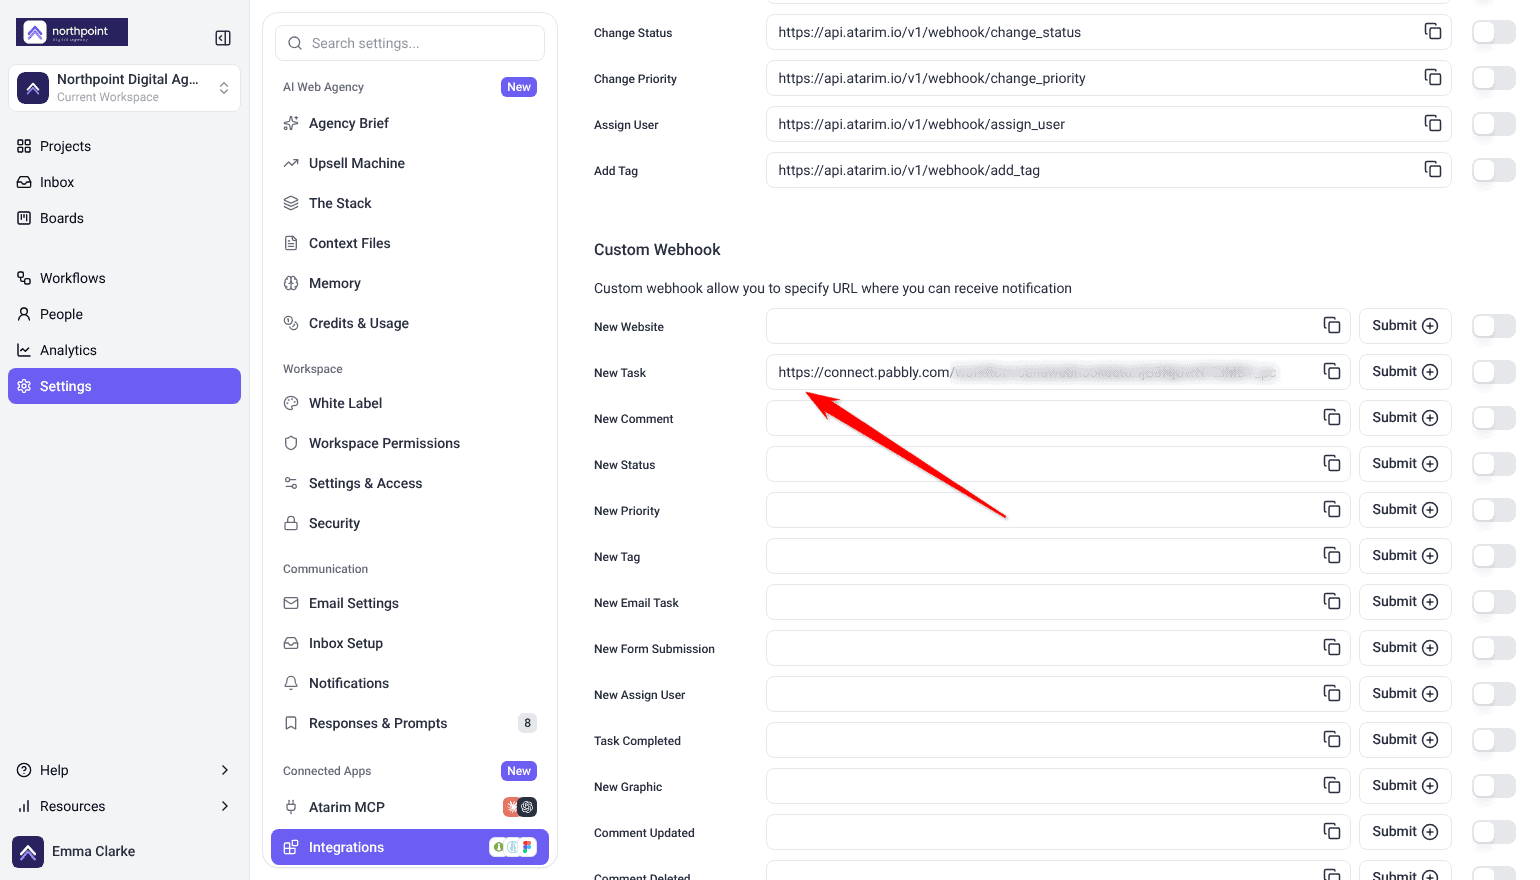
- In Atarim, go to Settings › Integrations, scroll to the Webhooks card at the bottom of the list and switch it on.
- Find Custom Webhook, described in-product as letting you specify a URL where you can receive notifications.
- Paste the Pabbly webhook URL into the New Task event field.
- Select Submit, then switch that row on. Atarim will now post new task data to that URL.
Webhooks are covered in more depth separately. Explore Webhooks
Test the Workflow
Pabbly has to be listening before the task exists, so start the test request first and create the task second.
Instructions:
- In Pabbly, select Save and Send Test Request. Pabbly waits for incoming data.
- Create a test task in Atarim.
- Check Pabbly for the response. You should see the task data come through, which you can then map into an action.

Add an Action
- Choose an action app in your workflow — Email by Pabbly, Slack, Google Sheets or anything else Pabbly supports.
- Map the Atarim task data into the action’s fields.
- Select Save & Send Test Request and confirm the result arrives.
- Turn the workflow on.

Benefits
| Benefit | In practice |
|---|---|
| Data moves both ways | Push task data out of Atarim, or pull data in from other tools. |
| No code required | Workflows are built visually, so this is not a developer task. |
| Thousands of destinations | If Pabbly supports the app, Atarim can feed it. |
| Verify once | The key is used to verify the connection, which Pabbly then reuses. |
| Nothing to install | The whole setup is a toggle, a copied key and a pasted webhook URL. |
Example Use Cases
| Situation | Workflow to build |
|---|---|
| A team that works in chat | Trigger on a new Atarim task, then post it to your channel. |
| Clients expecting acknowledgement | Trigger on a new task, then send a confirmation email. |
| Work tracked in another tool | Trigger on a new task, then create a matching item there. |
| Reporting outside Atarim | Append each new task to a spreadsheet as it arrives. |
| Feeding a CRM | Route client-raised requests into your CRM automatically. |
Known Limitations
- It is a plan feature. Where integration connectors are not included, the toggle is locked.
- Permission is needed to manage integrations and reach the API key.
- One API key per workspace. It authorizes that workspace rather than an individual project, so copy the key from the workspace whose data the workflow should see.
- The key cannot be regenerated from the Integrations panel. If you believe it has been exposed, contact support rather than looking for a reset.
- Workflow behavior is Pabbly’s, not Atarim’s. Task limits and scheduling follow your Pabbly plan.
- Two connections are required. The API key alone will not deliver data — the webhook URL must be saved in Atarim, with that row’s toggle switched on.
FAQs
What does the Atarim–Pabbly integration do?
It lets you push data out of Atarim and pull data in, connecting Atarim to thousands of other apps through Pabbly Connect workflows.
Which plans support it?
It requires a plan that includes integration connectors. If the toggle is locked in your Integrations panel, it names the minimum plan needed.
Which API key does it use?
Your Atarim key, copied from the Pabbly row in Integrations and pasted into Pabbly when it asks you to verify.
Where do I find the API key again later?
In Settings → Connected Apps → Integrations, in the Pabbly row beneath its description.
Why do I need both an API key and a webhook?
They do different jobs. The key lets Pabbly connect to your Atarim account; the webhook tells Atarim where to send new tasks. Without the webhook, nothing is delivered.
How do I check it is working?
Use Save and Send Test Request in Pabbly, then create a task in Atarim. If no data arrives, check the webhook URL is saved against New Task in Atarim’s Custom Webhook section, and that the toggle on that row is switched on. A saved URL with its toggle off is skipped silently, with no error anywhere.
Why is my API key not working?
Re-copy it using the copy icon rather than selecting the text, in case a space was included. The key does not change on its own, so a key that has stopped working is almost always a copy-and-paste problem.
Can I use one connection for several workflows?
Yes. Once verified, Pabbly stores the connection for reuse.
What happens if I turn the integration off?
The API key is hidden until you switch it back on. To stop a workflow, switch it off in Pabbly. To stop Atarim sending new tasks to it, switch off the New Task row under Custom Webhook.
Common issues
- Integrations is not in your settings sidebar — your role does not have access. Ask an Administrator.
- The Pabbly toggle is locked — your plan does not include integration connectors. The lock names the minimum plan required.
- Pabbly rejects the API key — re-copy it with the copy icon rather than selecting the text, in case a space crept in.
- The trigger never fires — check the Pabbly webhook URL is saved in Atarim under Webhooks → Custom Webhook, against the New Task field. This is the usual cause.
- The connection verified but nothing arrives — the API key was accepted but no webhook is configured. Add the Pabbly webhook URL in Atarim.
- The workflow is on but silent — confirm the webhook URL went into the New Task field rather than another event.
- Fields arrive empty — a mapping problem. Re-run the test and check which field came through blank.
- The connection stopped working — re-copy the key from the Pabbly row and verify again in Pabbly. If you think the key was exposed, contact support.
- You cannot find Atarim in Pabbly — use the link from the Pabbly row in Atarim, which goes to the Atarim integration page on Pabbly.
Conclusion
Pabbly is one of the lighter integrations to set up: toggle it on, copy the key, create a workflow with Atarim as the trigger, and verify. Everything after that happens in Pabbly.
The step worth not skipping is the webhook — without it the connection verifies and then sits silent. Build one step at a time and test with a real task before switching the workflow on.
Tips & best practices
- Use the link in the Pabbly row to reach the Atarim integration page directly.
- Map one or two fields first, then add more once data arrives correctly.
- Test with a real Atarim task rather than sample data.
- Confirm the workflow is switched on, not just saved.
- Keep the API key out of email and chat.
- Apply filters in Pabbly so workflows only run for the tasks you care about.
- Watch your API and webhook usage if you run several workflows.
- Configure error handling in Pabbly so you are alerted when an automation fails.