How you get set up in Atarim depends on which side of the relationship you're on — and for agencies, a 6-step wizard reads your site before it ever asks you to register.
None. This guide is written for anyone setting up Atarim for the first time.
Tools & resources needed
An Invitation to Atarim or Access to Sign-up links
A website URL to add as your first project
An email address
Onboarding splits into two distinct paths in V5 — a 6-step guided wizard for agencies setting up a workspace, and a lightweight, pre-filled registration for invited Website Owner clients. The agency wizard has an unusual order: it reads your site and shows you what it learned before it ever asks you to create an account.
Step-by-Step Guide:
Creating Your Atarim Account
Before you can start managing projects or collaborating, you need to set up your Atarim account.
The wizard opens with a single field: your agency’s own website URL (not a client’s). Atarim reads your site and uses it to build your AI team around how you already work.
Instructions:
Enter your agency’s live website URL in the field on screen.
Double-check it’s your own domain, not a client’s — everything in Steps 1 and 2 is built from this URL.
Submit the field to start the read.
Agency website setup screen
Website analysis begins after submission
Below the URL field, three cards preview what the AI agency does once it’s running:
Self-serving clients — “Clients request and approve work on their own sites, inside your guardrails. They stay yours, not Claude’s.”
A proactive agency — “Scheduled care, reports, and recommendations land before your clients think to ask.”
The upsell machine — “Anything beyond the AI’s mandate comes back quoted, scope creep becomes billable.”
Note
This 6-step wizard is now the default route for new signups, so creating an account from the Atarim site starts here rather than on the older registration form. People who arrive through an invitation from an agency are the exception: they get the same account-creation screen, prefilled with their details and carrying that agency’s branding, and go straight to their client dashboard rather than through the six agency steps.
Wizard Step 2 of 6 — Welcome to Your AI Web Agency
Reading the site takes about 32 seconds, during which the screen gradually re-themes from Atarim’s default violet into your agency’s own scraped brand color.
Instructions:
Wait out the read — roughly 32 seconds — and watch the interface shift into your brand color.
Land on the “Welcome to your AI web agency” screen.
Review the “what we now know about you” panel and confirm it describes your agency correctly.
Click Next to continue.
Brand intelligence processing
Website data analysis
AI agency configuration
AI team orchestration
Review your agency profile, then click Next.
The panel shows three things pulled from your site:
A plain-language description of your business
Your brand color and fonts
A one-line summary of your brand voice
Note
The same three pillar cards from Step 1 repeat below the panel, followed by the Next button. If the scrape can’t read anything useful from the URL — a network failure, for example — the screen stays on Atarim violet with no morph, and shows neutral fallback copy instead of your brand
Tip
If the wizard scrapes the wrong company from your URL, use “Not your agency?” to reset and try again, rather than correcting each field by hand.
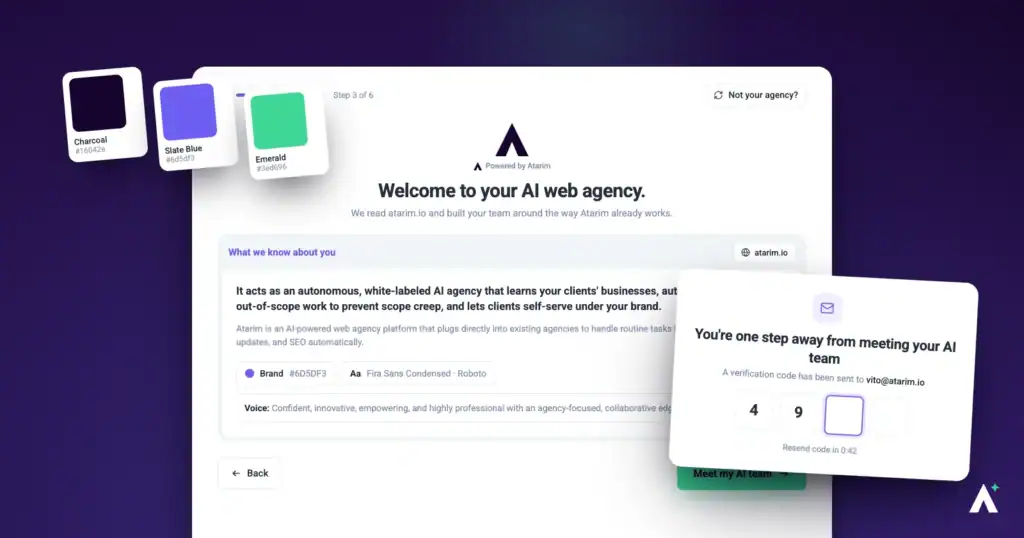
Wizard Step 3 of 6 — Create Your Account and Verify Your Email
Only now does the wizard ask you to register. Everything up to this point happened without an account.
Instructions:
Enter your full name.
Enter your work email address.
Choose a password.
Tick the terms & conditions checkbox.
Click “Meet my AI team” — or use “Sign up with Google” instead of filling the form.
Open the email Atarim sends and enter the 5-digit verification code.
Account creation
Click Meet my AI team to continue
Verification code entry
Note
The email address shown is for demonstration only. The verification code will be sent to the same email address used during registration.
Verification email with your five digit code
Two things worth knowing about the code screen:
The code stays valid for 15 minutes. After that, use “Resend my code”.
If you mistyped your address, “Use a different email” lets you correct it without restarting the wizard.
Tip
Register and email verification share a single step indicator in the wizard — if you get logged out partway through, you’ll come straight back to this step, not all the way to Step 1.
Wizard Step 4 of 6 — Tell Me a Bit About You
A short profile step: pick every role that describes you, then pick a single experience level.
Instructions:
Select every role that applies to you — this one is multi-select.
Pick the one experience level that matches how you want the AI to talk to you.
Select your team size: Just me, 2–10, 11–50, 51–100, 101–500, or 500+.
Tell Atarim how you found it.
Once complete, click Next.
Choose your role and experience level.
Your preferences are set. Click Next to continue building your AI team.
Roles available to select:
Web Designer
Web Developer
UI/UX Designer
Marketing Professional
Content Creator / Copywriter
Product Manager
QA / Tester
Agency Owner / Freelancer
Internal Team Member (at a larger company)
Project Manager
Other — with a free-text field to name your own
Experience level — pick one:
I’m a beginner — explanations stay clear and bite-sized as the AI works.
I’m an intermediate — the AI talks to you like a peer and adds context alongside its work.
I’m an expert — advanced, technical, hands-on execution with recommendations.
I’m the final boss — high-signal, execute-first, strategic calls only.
Team size and how you found Atarim are used for account setup rather than shown back to you.
Tip
Your experience-level choice changes how much explanation the AI includes in every future response — pick the one that actually matches how you want to work, not the most impressive-sounding option.
Wizard Step 5 of 6 — Add Your First Client
The same three pillar cards appear again, reworded for a client relationship:
“Clients request and approve work on their own site, inside your guardrails”
“Your AI team works their site in the background”
“Every request beyond the AI’s mandate comes back quoted”
Instructions:
Enter the client’s website URL in the Add your first client panel.
Enter the client’s name.
Enter the client’s email address.
Leave “Invite the client to self-serve” ticked — it’s pre-checked — or untick it if you’d rather not invite them yet.
Click “Read their site” to continue.
Bring in your first client
Start the client site analysis
Tip
To skip instead, click the “I’ll add a client later” link sitting next to the primary button. This step is entirely optional.
Wizard Step 6 of 6 — Client Brief and the Live Brand Mock
A loading screen reads the client’s site the same way Step 1 read yours, then reveals what it found.
Instructions:
Wait for the client’s site to be read.
Review the brand kit it produced.
Review the live brand mock — an actual rendered landing-page preview in the client’s own scraped brand, with nav, hero, cards, and footer.
Continue to the deploy stage.
Analyzing the client site and generating its project brief
Client brand identity extracted
Brand profile ready for deployment
The brand kit covers:
The client’s brand colors
Their fonts
A plain-language description of their business
Planning proactive workflows
Prioritizing the highest impact work
Reviewing the project brief
Deploying the client’s AI team
This step only generates the brief — there’s no manual field-editing here. Fine-tuning happens later from the dashboard’s Project Brief panel, once you’re inside the project.
Note
What you see here is a starting point, not a locked brief — expect to refine colors, copy, and details later from the Project Brief panel before anything client-facing goes out.
If It’s WordPress: An Inline Upgrade Step
When the client’s site is detected as WordPress, the wizard adds one more screen before deploying: an inline pitch for installing the Atarim plugin.
Instructions:
Install the Atarim plugin on the client’s site if you have access to their wp-admin.
Skip the screen if you don’t — you may not control their WordPress at this point.
Continue to the deploy loader either way.
Installing the plugin unlocks:
The on-site action where your AI team edits the live site directly
Pixel-perfect visual collaboration on real pages, not just previews
Automations tailored for WordPress — content, SEO, performance, and uptime
Non-WordPress sites never see this screen; they go straight to the deploy loader next.
Note
A connected WordPress site gets a different set of proactive workflows than a site without it, because the plugin unlocks direct-edit capability the AI can plan around.
Deploying Your AI Team and Approving the Plan
Once the WordPress step above resolves — connected or skipped — a “Deploying your AI team” loader covers the wait while the AI builds a plan for the client’s site, cycling through status lines like “Reviewing the brief…”, “Planning proactive workflows…”, and “Choosing the highest-impact work…”.
Instructions:
Wait for the loader to finish and the “Your proactive plan is ready” modal to appear — the only modal in the entire onboarding flow.
Work through the proposed workflows and toggle each one on or off. Approving means enabling; deselecting means disabling.
Check the budget meter on the left, which compares the approved plan’s estimated usage against a recommended monthly amount.
Open Adjust budget if the estimate looks wrong for this client, and set the monthly credit allocation on the slider.
Click “Approve & deploy [N]” — or “Approve & schedule [N]” if a budget has already been set.
Review credit usage and disable any workflows you don’t need.
Adjust the client’s monthly credit budget
Approve and deploy the selected workflows
Workflows are grouped by cadence, in this order:
Weekly
Monthly
Quarterly
Yearly
On-demand and daily workflows trail after those groups. Each workflow shows:
A name
A one-line description specific to this client’s site
An estimated credit cost
Its own on/off toggle
The budget slider has a floor of 1,000 credits and a cap of 10,000. As you move it, a badge updates:
Below recommended — manual-led care with minimal proactive work
Recommended — up to 4,000 credits, a fully-served client, roughly the range of a $100–$300 care plan you’d bill
Generous — above 4,000, a heavy proactive cadence for demanding clients
If your workspace doesn’t have enough pooled credits to cover your selection, you’ll be prompted to top up.
AI agency ready with 11 workflows awaiting budget
Recommendation
The recommended amount is based on the plan’s estimated usage, not a fixed number — it changes per client depending on what workflows got selected. Don’t assume last client’s number applies to the next one.
If You’re a Website Owner (Invited)
Your invite link looks like app.atarim.io/register?client_token=…&workspace_uuid=… — the token identifies you, and the workspace UUID identifies the agency inviting you.
Instructions:
Click the invite link in the email from your agency.
Check your name and email — both are pre-filled from the invite.
Set a password.
Agree to the terms.
Click “Meet my AI team”.
Select every role that applies to you.
Choose the experience level that best matches how you want the AI team to communicate with you.
Click Meet the Team.
Review the introduction to your AI team.
Click See My Project to open your project dashboard.
Once onboarding is complete, you can view the website, communicate with the AI team, submit requests, review work that needs your approval, and see the workflows scheduled for your project.
Activate your Website Owner account from the agency invitation email
Complete your account setup
Note
Any email address shown in the screenshots is for demonstration only. Your invitation and verification details will be sent to the email address your agency used when inviting you.
Account ready to activate
Personalize your experience before meeting the AI team
Click Meet the Team to continue.
Meet your AI team, then open your project
Your project dashboard is ready with active scheduled workflows
This is the same account-creation form agencies see in Step 3 of the agency wizard, just pre-filled. Once registered, you land directly in a scoped workspace:
The sidebar shows Projects and Workflows only, plus Help.
Inbox, Boards, People, Analytics, and Settings are not shown.
Note
If you already have an Atarim account and are being invited to a new agency’s workspace, you’ll get a different link (using an `invite_client_token` parameter) that just asks you to accept the connection — not to register again.
Configuring Your Notifications
Keep everyone in the loop by setting up notifications for key project events.
Instructions:
Navigate to Settings → Communication → Notifications.
Customize how often you and your team receive updates (e.g., email notifications for new comments, task completion updates).
Enable grouped notifications to avoid email overload.
Configuring email notifications
Visit the People section to view user profiles and customize their email notification settings.
This allows you to configure notifications for each user profile individually.
Recommendation
Ensure that team members are automatically added to relevant projects by default, streamlining collaboration and reducing the need for manual invites.
FAQs
Do I need to register before the wizard reads my site?
No — Steps 1 and 2 read your agency’s own site and show you what was found before you ever create an account. Registration happens at Step 3.
Does the agency onboarding wizard read my own site or my client’s?
Steps 1–2 read your agency’s own website. Your client’s site isn’t touched until Step 5–6, when you add your first client.
Can I skip adding a client during onboarding?
Yes — “I’ll add a client later” on Step 5 skips straight to your dashboard without a client project.
What if the wizard reads the wrong company from my URL?
Use “Not your agency?” on Step 2 to reset and try again, rather than manually correcting every generated field.
Do Website Owners go through the same wizard as agencies?
No — invited clients get a simplified registration with no workspace-creation step at all.
Can I manage multiple projects within the same workspace?
Yes. A workspace can hold multiple projects, with tasks, comments, and feedback organized under each one. The number of projects available to you is set by your plan and shared across your account — you can add more by upgrading or purchasing additional projects.
What if I don’t receive the email verification code?
Check your spam folder first, then use the option to resend the code from the same screen — don’t create a second account as a workaround.
How do I configure notifications to avoid being overwhelmed by updates?
Go to “Settings,” then “Notifications,” and make sure that grouped notifications is enabled to receive fewer emails with consolidated updates.
How do I link Atarim with my team’s tools (e.g., Slack, Jira)?
Go to Settings → Connected Apps → Integrations, and follow the prompts to connect your desired tools.
Conclusion
Whichever side you're on, onboarding is built to get you to a working AI agency fast — for agencies, a read-first, register-later wizard that ends with an approvable workflow plan; for invited clients, a focused dashboard with Claro already waiting. The 6-step wizard is now the default path for new signups, so it is the flow most new accounts will see.
Tips & best practices
Have your agency's real live URL ready before you start Step 1 — the whole first half of the wizard depends on reading it accurately.
Answer the experience-level question in Step 4 honestly — it changes how much explanation the AI includes in every future response.
Use “I'll add a client later” on Step 5 if you're not ready to invite anyone yet — nothing forces you to notify a client before you're ready.
To provide the best experiences, we use technologies like cookies to store and/or access device information. Consenting to these technologies will allow us to process data such as browsing behavior or unique IDs on this site. Not consenting or withdrawing consent, may adversely affect certain features and functions.
Functional
Always active
The technical storage or access is strictly necessary for the legitimate purpose of enabling the use of a specific service explicitly requested by the subscriber or user, or for the sole purpose of carrying out the transmission of a communication over an electronic communications network.
Preferences
The technical storage or access is necessary for the legitimate purpose of storing preferences that are not requested by the subscriber or user.
Statistics
The technical storage or access that is used exclusively for statistical purposes.The technical storage or access that is used exclusively for anonymous statistical purposes. Without a subpoena, voluntary compliance on the part of your Internet Service Provider, or additional records from a third party, information stored or retrieved for this purpose alone cannot usually be used to identify you.
Marketing
The technical storage or access is required to create user profiles to send advertising, or to track the user on a website or across several websites for similar marketing purposes.