Access to the workspace with permission to invite people (owner or admin and team member privileges)
Email addresses for the people you're inviting
Atarim draws a clear line between internal team members, clients, and one-off guests — each uses a different invitation flow because they end up with different accounts and different views of the platform.
Step-by-Step Guide
Inviting Internal Team Members
First, the important distinction so you pick the right path — in V5 there are three different “invite” surfaces, and they’re not interchangeable:
Workspace team and collaborators — people added to your workspace with a role, either internal team or a stakeholder or client. This is the main one.
Project sharing — inviting people to one specific project or website only.
Invite a Client — the agency-level, credit-based client invite that generates a shareable link.
Three roles can be assigned: Administrator (“a project manager or team member”), Team Member (“a team member or contractor”), and Collaborator (“a stakeholder or client”).
Note
The People screen is restricted to admins — it will not appear in the sidebar for a regular Team Member. Only Team Members and Administrators can be invited from People; Collaborators are added through the Share modal on a project or in Collaborate view.
Method 1 — Invite Team Members From the People Screen
Instructions:
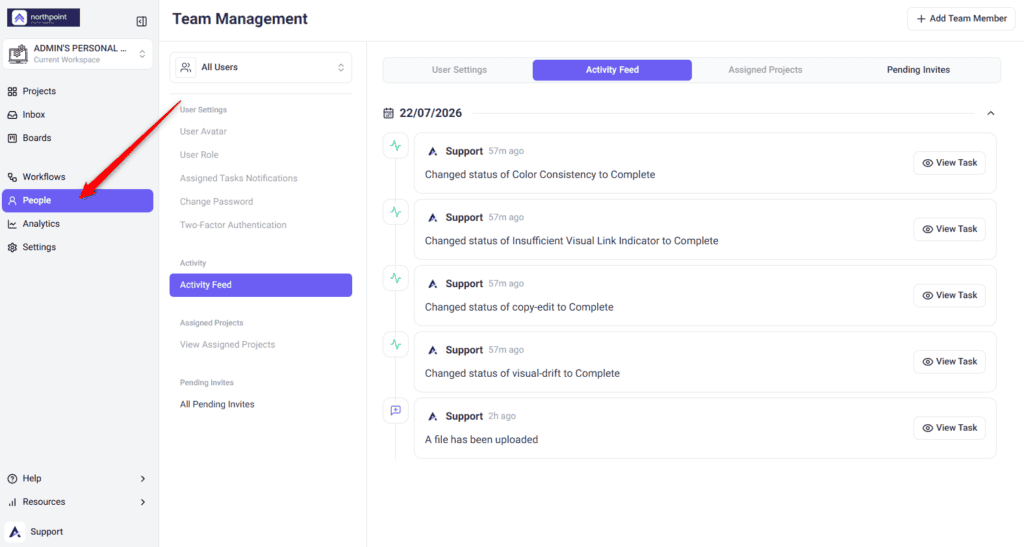
From the main dashboard, open People in the left navigation. People is admin-only; if you do not see it, your role does not have People access.
Review the current team list and any pending invites shown here.
Select the Invite action to open the invite form.
Enter the person’s Full Name.
Enter their Email Address.
Open the Role dropdown and choose either Administrator or Team Member.
Optionally, add a Message to include in the invitation.
To invite several people at once, add another row and repeat steps 4 to 7 for each.
Select Send.
Each person receives an email invitation and appears as pending in the People list until they accept.
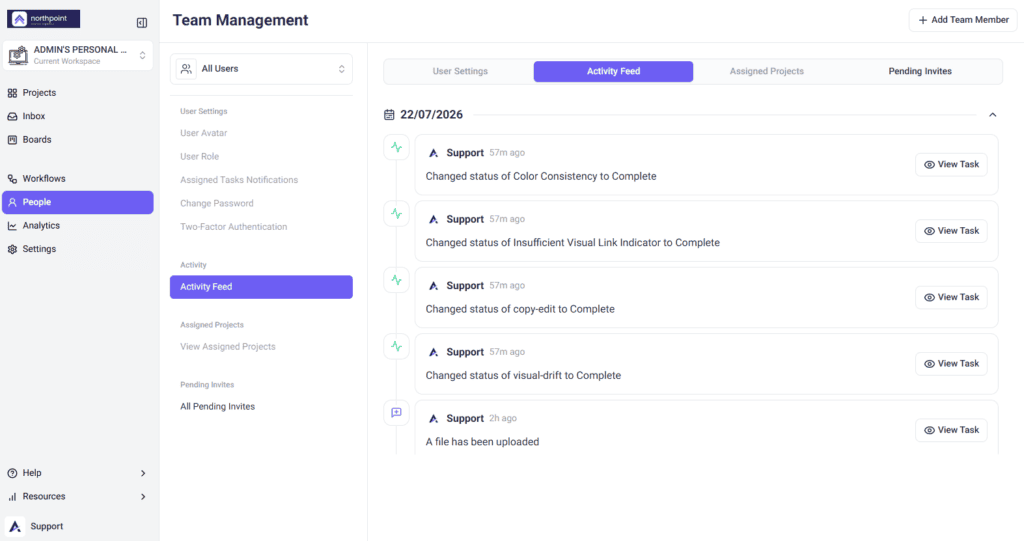
Open People to manage workspace members
Add a team member
Enter user details and choose a role before sending the invitation
Note
Invites consume seats — inviting beyond your plan’s seat count triggers a “You Need More Seats” upgrade prompt. You can also share an invite link from this screen instead of emailing each person.
Method 2 — Invite people to a specific project (Project sharing)
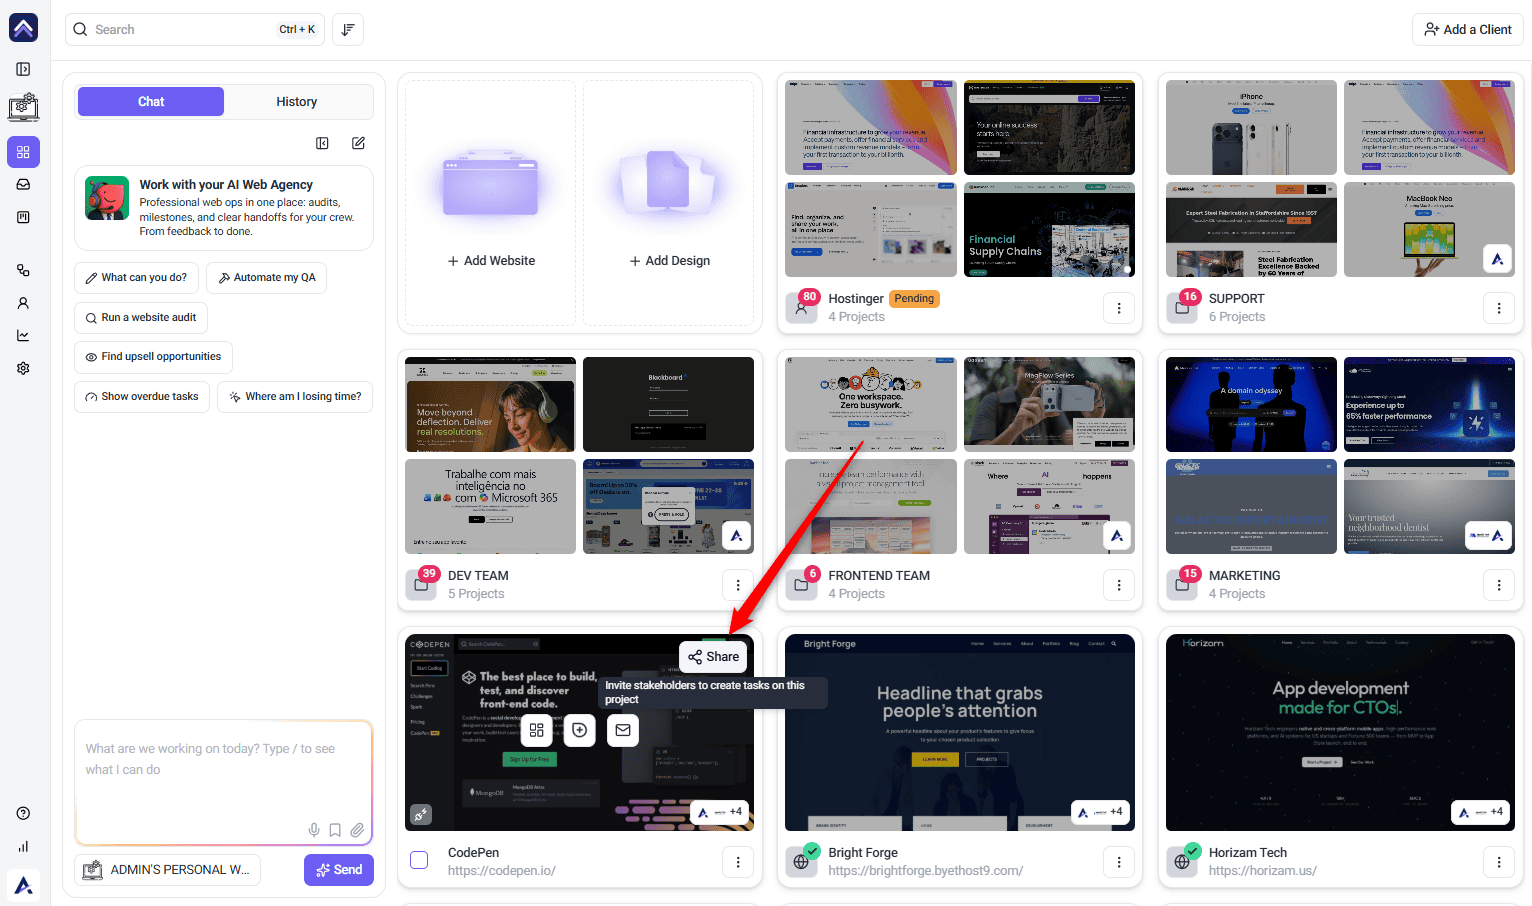
On the project you want to share, select the Share action (the share icon; tooltip “Invite stakeholders to create tasks on this project”).
The Project Permissions panel opens.
Enter the email address(es) of the people you want to add.
Choose their role / access level for this project.
(Optional) Add a note to the invite.
Send the invite. Invited people appear in the project’s people list, and you can re-invite or remove them from the same panel.
The Share action on a project card
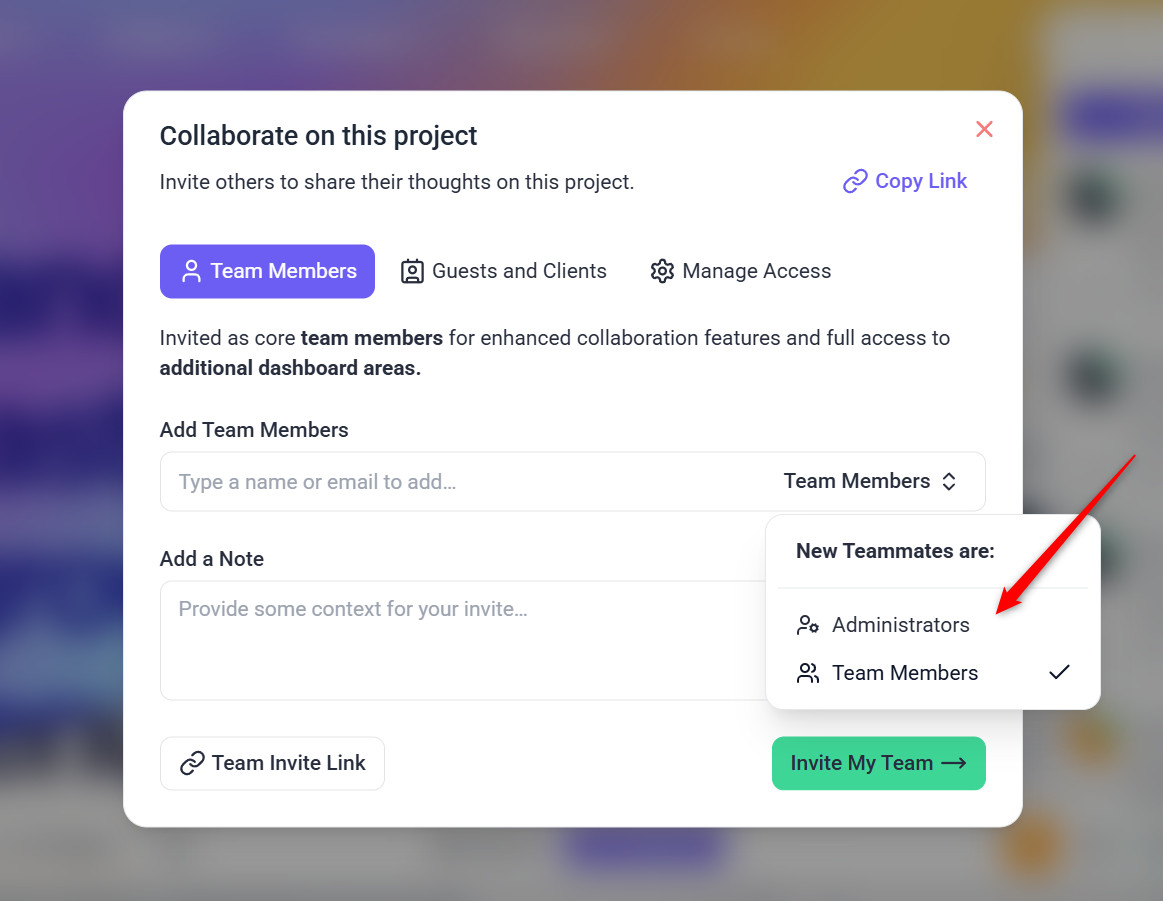
Choose whether to invite them as a Team Member or Administrator
Invite a guest or client to collaborate on the project
Note
Project sharing lets you set both a role (Administrator or Team Member) and an access level — Anyone with the link, or Only people with access. Use the access level to control whether a guest or client can open the project without a full account. Project-level permissions are a paid feature: below the minimum plan the option is locked and the prompt names the plan required, and only the workspace owner can change the subscription.
Method 3 — Invite Users From Collaborate View
While working directly on your project in the frontend (Collaborate view), you can invite collaborators without leaving the design interface.
Instructions:
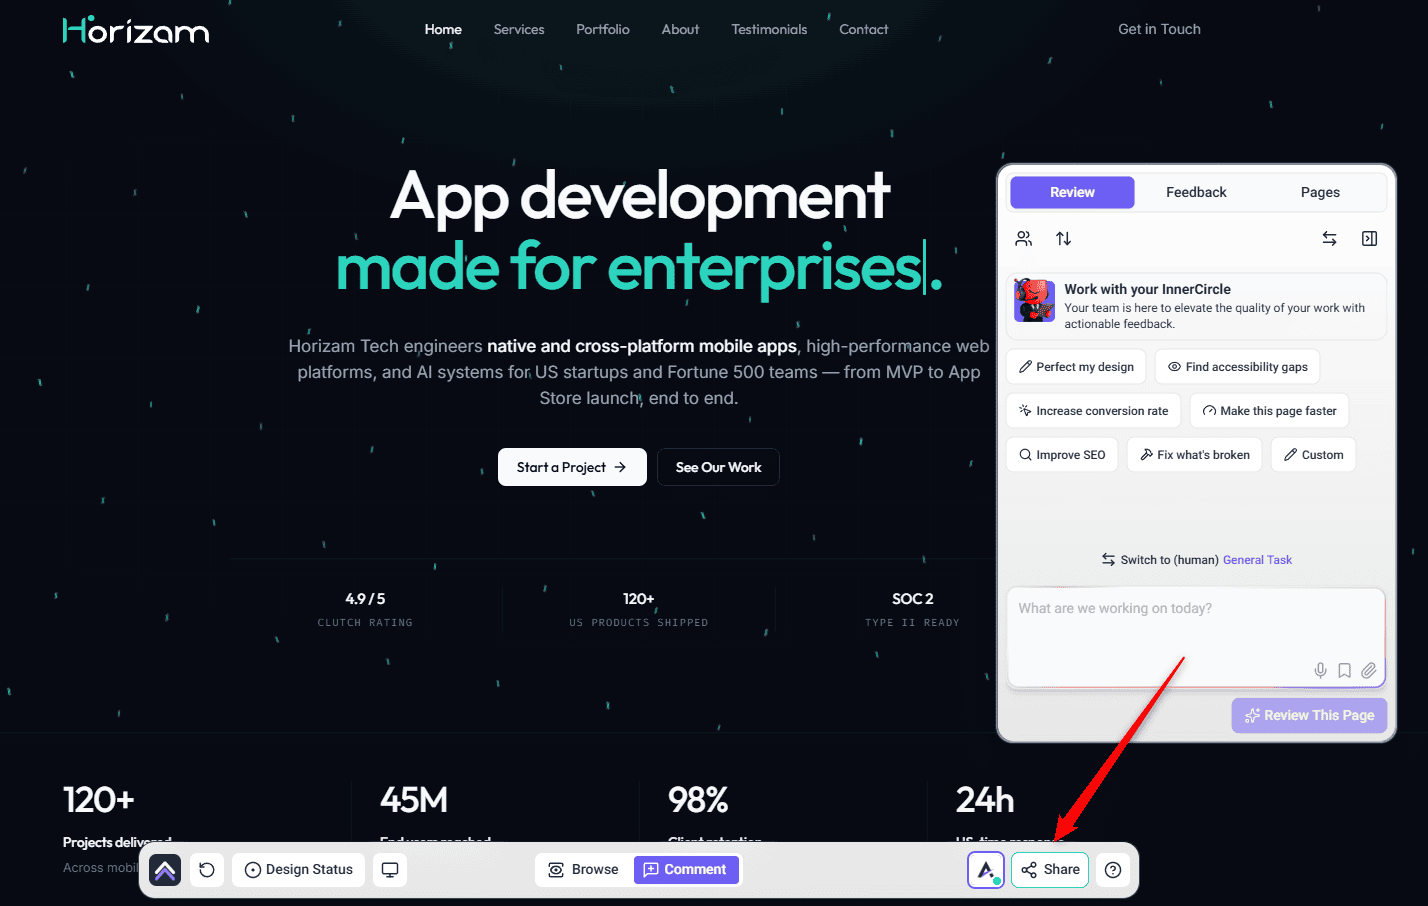
In the Collaborate view of your project, look at the bottom bar.
Select the Share button to open the same sharing modal that appears on the Projects screen.
Enter the names and email addresses of the users, and choose their permission levels.
Send the invitation.
The Share button in the Collaborate view bottom bar
Assigning the right role/permission – Inviting Team Members
Tip
The Share button in Collaborate view opens the same sharing options as the Projects screen, so you can invite a teammate or client in real time while reviewing a live page or design, without leaving the canvas.
Method 4 — Invite a Client (Agency, Credit-Based)
Instructions:
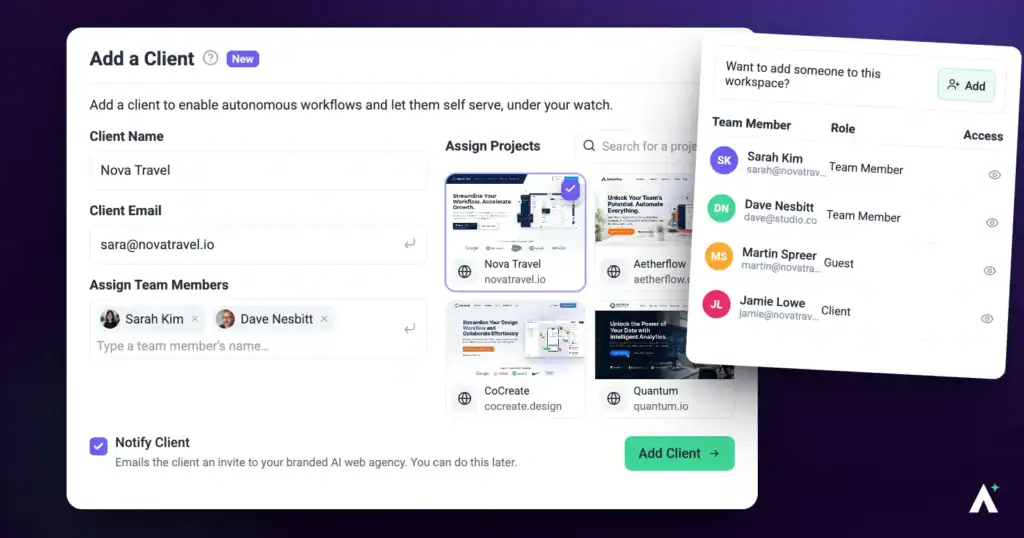
Add a Client
A client invited this way gets their own folder and their own credit allowance, which is what separates it from a guest invite.
Instructions:
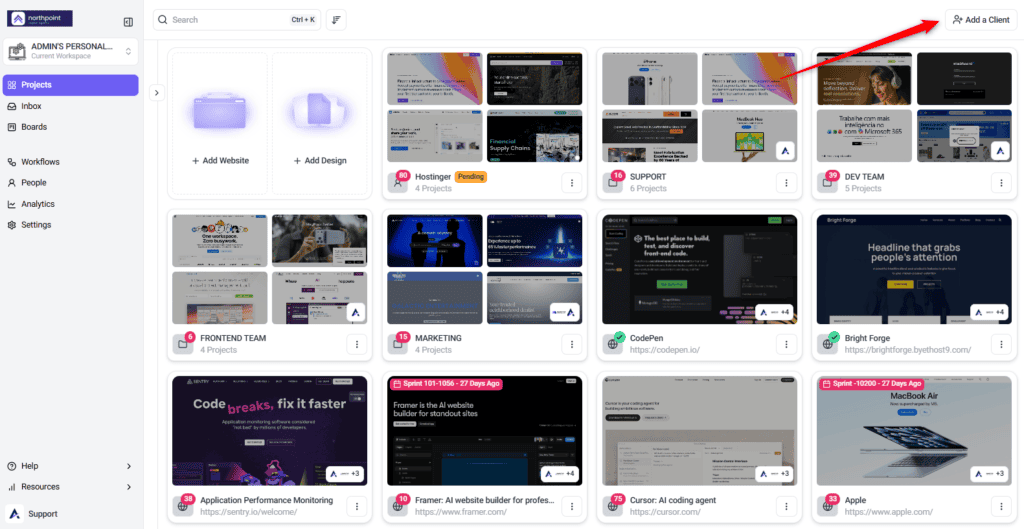
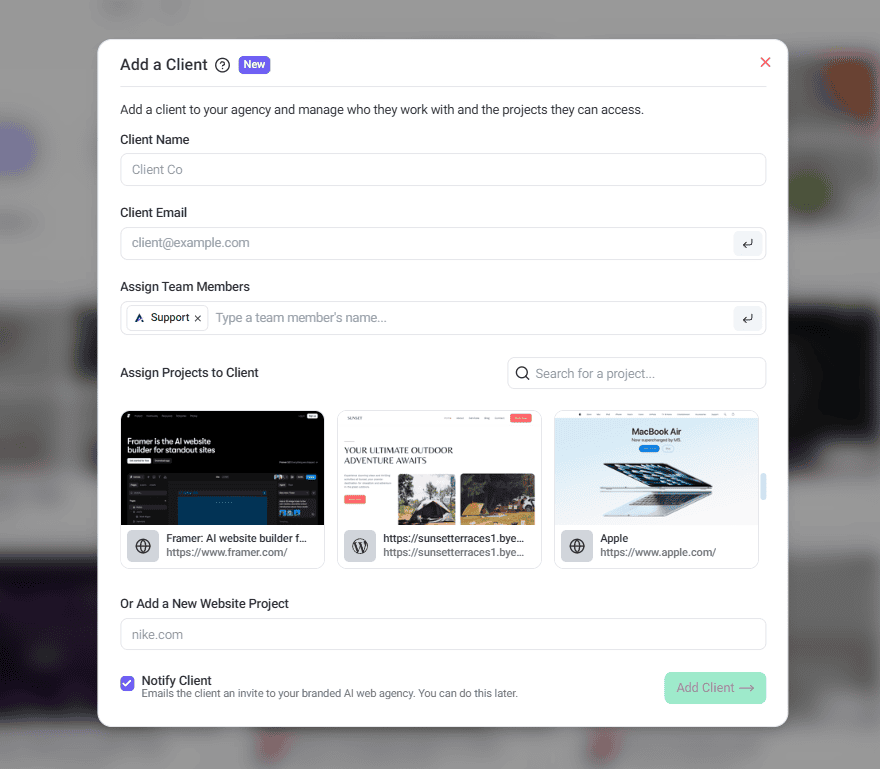
On the Projects screen, select Add a Client (top right).
Enter Client Name and Client Email.
Under Assign Projects to Client, select existing projects, or use Or Add a New Website Project.
Leave Notify Client checked to email the invite (or do it later), then Add Client.
Set the client’s budget
The budget is set per client and per month, and only becomes available once they have connected.
Instructions:
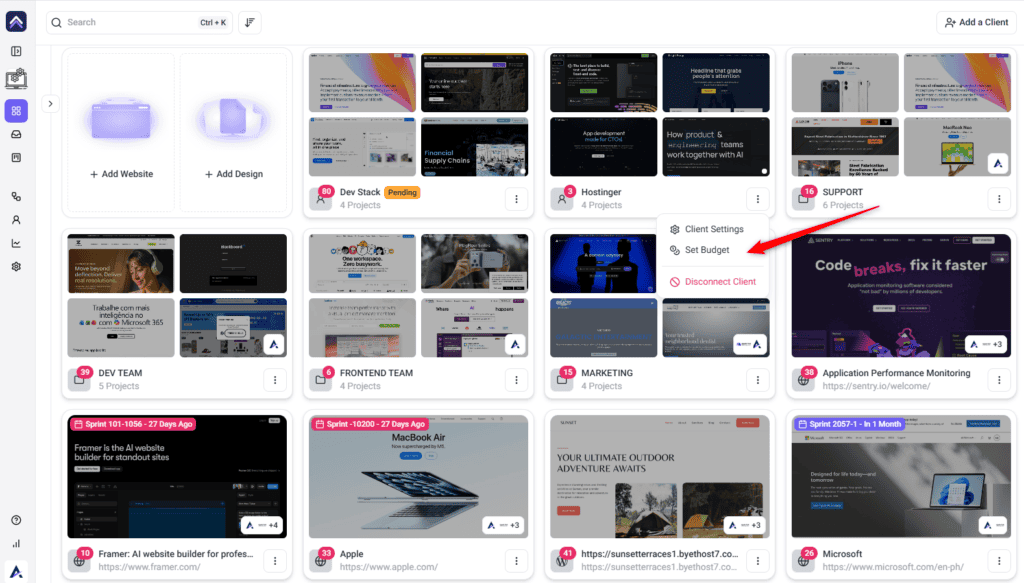
On the Projects screen, open the client folder’s ⋮ menu.
Select Set Budget. (Available once the client is connected — a pending client shows Client Settings / Copy Link / Revoke Client instead.)
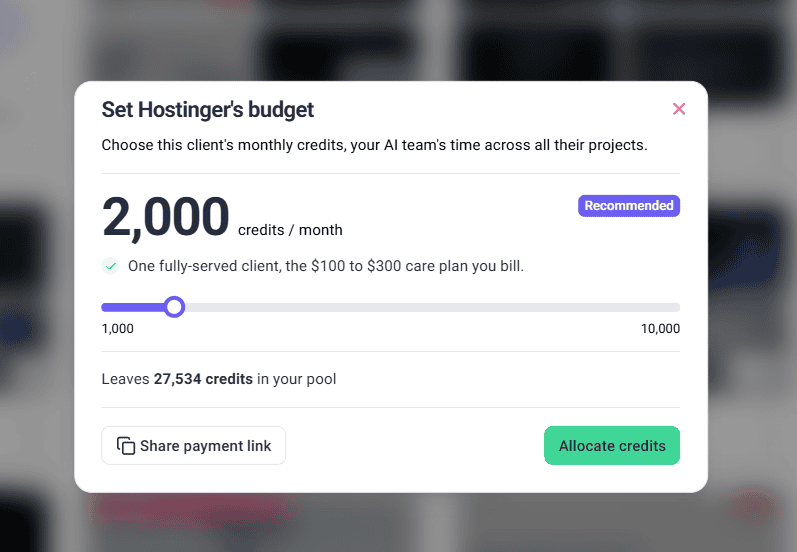
Use the slider to set monthly credits (1,000–10,000; default 2,000). The modal shows what remains in your pool.
Select Allocate credits (or Share payment link to have the client pay).
Add a Client button
Add a Client modal
Set Budget in the client folder menu
Set client budget modal
Note
Adding a client and setting their budget are two separate steps. Add a Client, at the top right of Projects, creates the client and assigns projects to them. Set Budget, in the client folder’s menu, allocates their monthly credits and only appears once the client has accepted — a pending client shows Client Settings, Copy Link and Revoke Client instead. Team members are not assigned in this modal: use Assign Team Members from a project’s menu, which opens the sharing panel on its team tab.
Move an existing project into a client’s folder
The steps above assign projects at the moment you create the client. To hand a project over afterwards, pick it in Client Settings or drag it onto the client’s folder.
Instructions:
On the Projects screen, open the client folder’s ⋮ menu and select Client Settings.
Under Assign Projects to Client, select the projects you want to hand over.
Select Save Changes.
Alternatively, drag the project card and drop it onto the middle of the client’s folder card. Dropping to the left or right of another project reorders your projects instead of moving them.
Note
Assigning a project to a client is a handover, not just a filing change. The project moves into the client’s workspace, the client becomes its owner and gets administrator access to it, and its pages, tasks, comments and history all travel with it. Only the agency that manages the client can do this, and only for projects you own or can edit.
Guests (No-Login Collaborators)
For one-off feedback from someone who doesn’t need a full account, use a link-based Guest invite scoped to a single project — no registration required on their end.
Instructions:
Open the Share modal for the project — either from the Projects screen (the Share action on the project) or from the Share button in the Collaborate view. The Project Permissions modal opens.
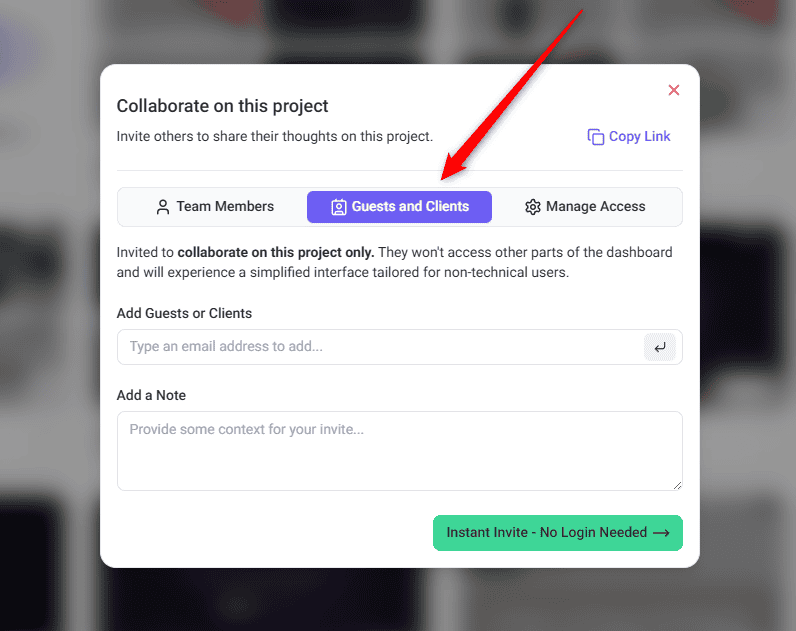
Select the Guests and Clients tab. You’ll see the note that guests are “invited to collaborate on this project only” and get a simplified interface.
In the Add Guests or Clients field, type the guest’s email address and press Enter to add it. Repeat to add more than one guest.
(Optional) Under Add a Note, add context for the invitation (“Provide some context for your invite…”).
Select Instant Invite – No Login Needed.
The guest receives an email invite and can open the project and leave feedback without creating an account — scoped to this project only.
Open the project’s Share modal to invite a guest
Invite a guest or client to collaborate on the project
When to use a Guest instead of a Client
If you’re not sure the relationship will be ongoing, invite as a Guest first. When it becomes ongoing, set them up properly through Add a Client — there isn’t a one-click convert from Guest to Client, so plan to do this manually.
Permission Levels Explained
Administrator: Full access to everything in the Atarim dashboard, including project management, user invitations, and global settings.
Team Member (internally “Contributor”): Access only to the projects they’re assigned to. They can view and work on tasks within those projects.
Collaborator (Guest): Can only visually collaborate on specific projects via a shared link/Guest Mode; cannot access the Atarim dashboard or manage tasks. Typically external clients or stakeholders.
FAQs
Can I change a user’s role after they’ve been invited?
Yes, you can update a user’s role at any time by revisiting the share modal or managing users from the People page.
Why can’t I see the People screen?
The People screen is admin-only. If you are a Team Member rather than an admin, it will not appear in your sidebar. Only admins can invite and manage team members from there.
Why is Collaborator not an option when I invite from People?
The People invite form only offers Administrator and Team Member. Collaborators (Guests) are external, so they are added through the Share modal on a project or in the Collaborate view, not from People.
Why did I get a “You Need More Seats” prompt?
Team invitations consume seats. If you invite more people than your plan’s seat count allows, you will be prompted to upgrade before the invites can send. You can also share an invite link from the People screen instead of emailing each person individually.
What is the difference between a Guest and a Client?
A Guest is for one-off feedback on a single project: link-based, no account required, scoped to that project only. A Client is for an ongoing agency relationship, where you assign them projects and allocate a credit budget. There is no automatic conversion between the two, so if a Guest relationship becomes ongoing, set them up as a Client manually via Add a Client.
Can I invite people while working on a live page or design?
Yes. In the Collaborate view, the Share button opens the same sharing options as the Projects screen, so you can invite a teammate, guest or client in real time without leaving the canvas.
What is the difference between sharing a project and adding a client?
Project sharing grants access to one specific project and lets you set a role (Administrator or Team Member) and an access level (Anyone with the link, or Only people with access). Add a Client is an agency-level flow that connects an external client, assigns them projects, and allocates a monthly credit budget from your pool. Team members are assigned separately, from a project’s menu.
Why do I not see “Set Budget” for a client I just added?
Set Budget only appears once the client has accepted and is connected. A client who is still pending shows Client Settings / Copy Link / Revoke Client instead, so allocate their budget after they accept.
Can Team Members see all projects?
No. Team Members only see the projects they have been assigned to. Administrators have full access across the workspace.
Conclusion
Picking the right invitation flow up front — team, client, or guest — keeps your People screen organized and gets each person into the account type that actually matches the relationship.
Tips & best practices
Use Guest invites for anyone you're not sure will become an ongoing relationship.
Set a client's credit budget from their project dashboard's “+ Get More Done” button right after adding them, so their workflows don't stall waiting on a budget.
Reset a project's Share modal back to “Only people with access” after a one-off open-link invite, so it doesn't stay open longer than intended
To provide the best experiences, we use technologies like cookies to store and/or access device information. Consenting to these technologies will allow us to process data such as browsing behavior or unique IDs on this site. Not consenting or withdrawing consent, may adversely affect certain features and functions.
Functional
Always active
The technical storage or access is strictly necessary for the legitimate purpose of enabling the use of a specific service explicitly requested by the subscriber or user, or for the sole purpose of carrying out the transmission of a communication over an electronic communications network.
Preferences
The technical storage or access is necessary for the legitimate purpose of storing preferences that are not requested by the subscriber or user.
Statistics
The technical storage or access that is used exclusively for statistical purposes.The technical storage or access that is used exclusively for anonymous statistical purposes. Without a subpoena, voluntary compliance on the part of your Internet Service Provider, or additional records from a third party, information stored or retrieved for this purpose alone cannot usually be used to identify you.
Marketing
The technical storage or access is required to create user profiles to send advertising, or to track the user on a website or across several websites for similar marketing purposes.